[SOLVED] Vaptio N1 Pro - Low battery troubleshooting

Well 27 replies in 3 hours is pretty damned impressive! :laughing: (and I’m sure most have already been covered, but I’ll quote things I would have suggested, as I read them, since you asked me, and add anything else I can think of, if need be, at the end…)

With a Q-tip that’s been lightly dipped in 80+ rubbing alcohol or windex. (Simply removing excess liquid may leave a film. Whereas the above two should leave no film on the contact surfaces) Do the same for the battery contacts occasionally! :wink:

Sorry for seeming “nitpicky”, but while I know you and VM know the difference (as would most here) some don’t. So I’m just pointing out there is a difference for the uninformed who might run across this in the future! :wink:

Mrpipes raises a very good point.
Make sure you read the directions for flashing firmware closely before you attempt to do so!
I’ve seen some instances where the process and steps were very unorthodox (like having to remove the atty, or be in a certain mode, etc). Also, some require the software being run first, before you connect the USB to the mod the very first time, which is absolutely ridiculous, but little things like doing these out of order, or in the wrong order HAVE directly caused bricked mods. (Not trying to raise the level of fear in anyone trying to update a mod, just trying to make sure folks know in advance, so they have a maximum chance for success!)

Not your head sis. The mod!
Lol. :wink:
Seriously, after you’ve exhausted every “sensible approach”. Try this. If all else has failed, this might loosen or jar that hiding sliver of metal loose from that unseen place. But this is pretty much a last resort!

This was my first thought!
Either use the phone in camera mode, and zoom in, or use the light (flash) from it, and grab a magnifying glass… But either way, it’s not uncommon to see a thread shaving lodged beneath the lip of the center post (positive pin) and under/between the insulator and the 510 ground. I would expect this, or a firmware reload to solve the situation though.

Yeah, the alien is one of the acrewballs that require the mod to be properly shut down before removing and changing batteries (at least according to the clowns at Smok) or else you risk bricking it… :roll_eyes:

Anyways, you’ve already been given the advice I would’ve suggested (barring the side notes). Great job from the usual suspects! :wink:

4 Likes

Ah, ha! Thanks man, PG/VG stays around forever it seems, I’ll try that next time :+1:

4 Likes

You’re so fucking awesome. I’m bookmarking this reply for the future. As I’m sure you’ve seen by now… it was a loose wire. :smile:

4 Likes

That IS unfortunate.

And is also my #1 reason I won’t buy a mod that doesn’t have firmware update ability (and at least one published update). I’ve seen a couple say 'firmware updateable" but then nothing was ever released… /smh

7 Likes

That’s what I get for replying as reading (once again). /facepalm :laughing:

Anyways! The important thing is: You found it!! :tada: Huzzah! :tada: :thumbsup:

Feel free to send it my way if need be sis!
(Holler first for the “temp. recovery address” though)

5 Likes

Oh and FTR @Sprkslfly… I totally didn’t know the difference between firmware and software. :rofl:

3 Likes

I think I’ll take you up on that! I have two other mods to send you too. You can pm me with your temp address when you get the chance. :hugs:

4 Likes

You could bowl me over with a feather right now.

Software = the program that runs on your computer.

Firmware = “machine code” instructions that allows hardware components to talk to/see each other.

5 Likes

Np… Doing it now. =)

3 Likes

Thank you! I will forget that in 3 days most likely… :laughing:

4 Likes

Looks like you got it squared away, this forum moves at light speed…to infinity and byond!

6 Likes

You helped and didn’t even know it! I went and looked at your N1 review to see if you tore yours down and the pictures totally helped me see where to pry into to unclip the sled. So thank you!

7 Likes

Awesome, I am glad it helped :+1:

4 Likes

Well, as @anon96069639 pointed out, it was a simple and quick fix. What I don’t get however is how it happened. It seems like a stress break. But it doesn’t appear to be because the wire was too short.

The only thing I can think of offhand, is that perhaps it was jostled after it was soldered in place, but before the sled assy. was actually installed? (Thinking about in an assembly line environment…maybe it got hung on something just enough to weaken it [as it was tossed into the bin], without actually breaking it, until additional stress put it over the line…)

The other thing I noticed was that the wire itself is super thin (even for a monitoring circuit). There was another area (same wire) that had a noticeable crease in it, from just being shoved in (wherever it landed) with the rest of the sled assy., even though I saw *dedicated wire guides on the under side of the sled.

Two tiny, yet simple & cheap strips of tape (over the wire, in the guides) would easily have prevented this from happening in the first place. So I can easily see this being a problem for more users in the future (if this is not a one-off accidental omission).

Further, I would have replaced the wire altogether with a slightly larger gauge for “insurance” for @VapeyMama, but sadly, I wasn’t at home with access to my full bench and resources. :frowning:

I will say though, that for the most part, I’m pretty pleasantly surprised with the overall product, and very impressed with the chassis and heatsink mount setup.

Another thing I noticed right off the bat (once it was working again) was that it read the coil resistance really well, and repeatedly so. Even after firing the atty on another mod, removing it while still warm, and instantly (well as fast as possible anyways, less than 15 seconds lol) putting it on the N1 Pro, it read the correct resistance. Doing this with my Cuboid (and others) renders an increased resistance of .03-.05ohms! The N1 Pro read it at 0.19, each of the three times I tried it.

I know at least one of those times I had the batteries out for a while… So I’m not sure if this has an “atty memory” feature or not, but I would think having batteries out would negate that anyways (since I haven’t yet seen a mod, even one with a clock, that has implemented a “memory cap”). I could be wrong here, but either way, I found the real world functionality impressive!

I also saw some interesting similarities with Sigelei, and another brand (I can’t recall ATM), so there’s more curiosities afoot. But enough of my ramblings for the moment. (I knew there’d be at least a couple folks who are “inquisitive”…)

Apologies to those I bore. :crazy_face: :laughing:

7 Likes

Well. Son. Of. A. Bitch.
My other N1 Pro just did the same damn thing. Was working perfectly, went to swap out the batteries, and there was the low battery warning. Opened it up and the little red wire had come loose just like the other one. Ugh! :woman_facepalming:
@Sprkslfly…I might need you again…

1 Like

Sometimes you see, what you just don’t want to.
Sorry for the bad luck VM. =(

3 Likes

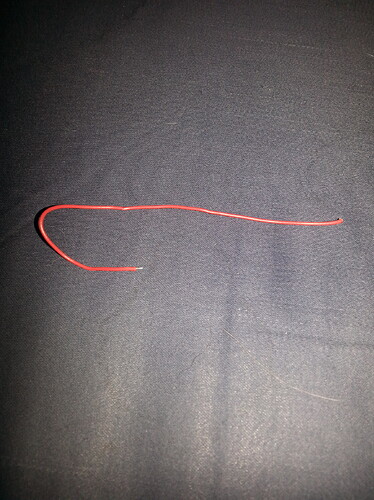
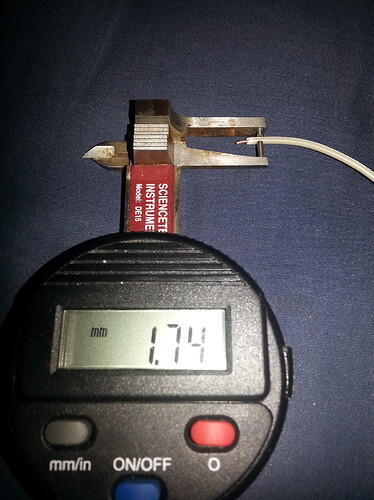
I know it’s been a while since I updated this (Sorry about that!), but I figured it would be nice for everyone (especially Vaptio) to see the piece of wire that caused the failure.

I plan on doing a little “review” of the process I had to go through in replacing it (please note: serious soldering skills are needed, along with some specialized tools and very steady hands), but I needed to get a few things together before that.

For the moment though, my opinion is such that both of her failures were due to a manufacturing defect: the wrong choice of wire gauge.

The factory wire (for what I refer to as “the sensing wire” - or the wire that it appears is used for monitoring part of the battery circuit) is WAY too small for the needs of the particular application.

Whether that’s because of the physical pressure being put on it (by the battery sled), or the failure to sustain the amount of current being passed through it.

Her white N1 Pro failed near/at the battery connector. I can’t say for certain whether this was due to stress of too much current, or routing of the wire itself (which is what I originally thought). But it’s been nagging at me since I worked on it, that it could be due to being too small a gauge for the electrical needs. But I left that out of my comments.

Her black N1 Pro, actually had crushed the wire between one of the wire guides, /while properly installed, inside the wire guides built into the battery sled, and taped down/ (which I noted had NOT been done in the white unit). Even though the wire was properly routed and secured, the wire was just too tiny (delicate) for the job.

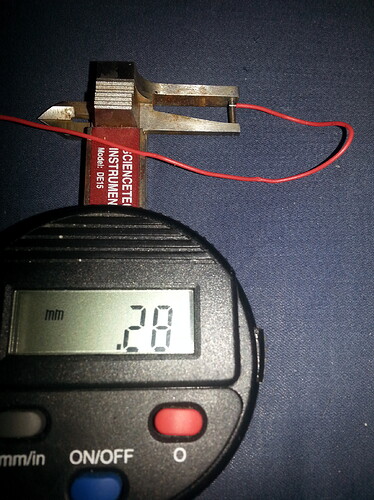
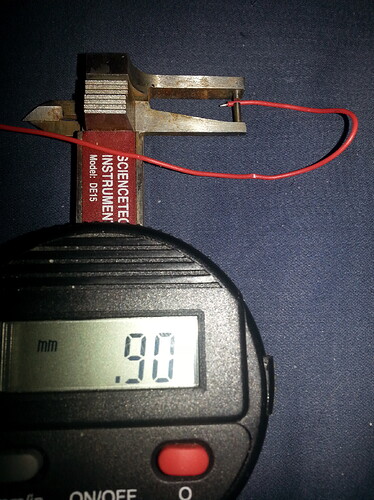
0.28mm translates to 29 gauge wire (according to the chart below), and anyone who has tried to make their own coils can attest, that’s some damned fine (small) wire to work with!

The outer casing (insulation) on the wire was almost double the thickness of the wire itself, but it’s a very soft casing, and doesn’t provide much protection in this instance.

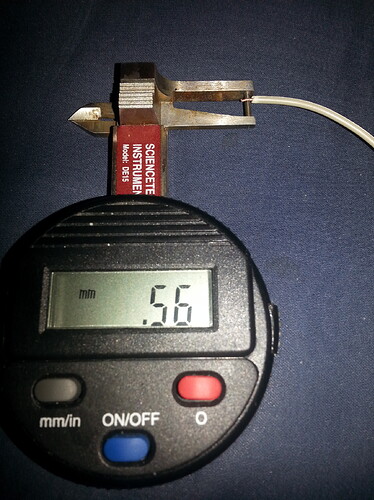
I ended up going with a wire double the original size, and with a much more stout insulating jacket. (It measured out at 0.56mm, which puts it in the range of being a 23 gauge)

I don’t expect any further issues for VM in the black one (which has the upgraded sensing wire), and while I didn’t have access to my wire supplies etc when I had the white one, it should be interesting to see if there’s any issues in the future (although I did a bit of a reroute on the white one).

Anyways, the fault had been traced to the same sensing wire, regardless of circumstances. So I hope this helps other Vaptio N1 Pro owners!

Vaptio has a lot of great things going on in this device, but obviously need a little fine tuning in their product. Hopefully they’ve already revised things in production, but if not, hopefully this will help persuade them to!

8 Likes

Thanks for sharing this, it’s extremely helpful information

5 Likes

Thanks Pugs, I just did that with my Evic Primo. Little bastard was giving me weak battery warnings on full batteries.

Took out the battery and gave it a good bang on the desk. With the bottom of course since that’s where spanking occurs.

Works like a charm now :heart_eyes:

7 Likes

That didn’t last very long.
Tried spanking again but it has become immune to a good trashing :woman_shrugging: :hammer:

4 Likes