Thanks out to Joyi from @Sourcemore for sending out this kit for the purposes of this review. She did provide some coupon codes as well for you guys.
Code: PAIOK
Code: PULV
Vandy Vape teamed up with Tony B again, for another product for the masses !!! I have nothing but respect for Tony, and what he has, and is doing for the community.
Vandy Vape PULSE AIO 80W Kit Features:
- Dimensions - 97.5mm by 55.6mm by 28.2mm
- Single High-Amp 18650/20700/21700 Battery - Not Included
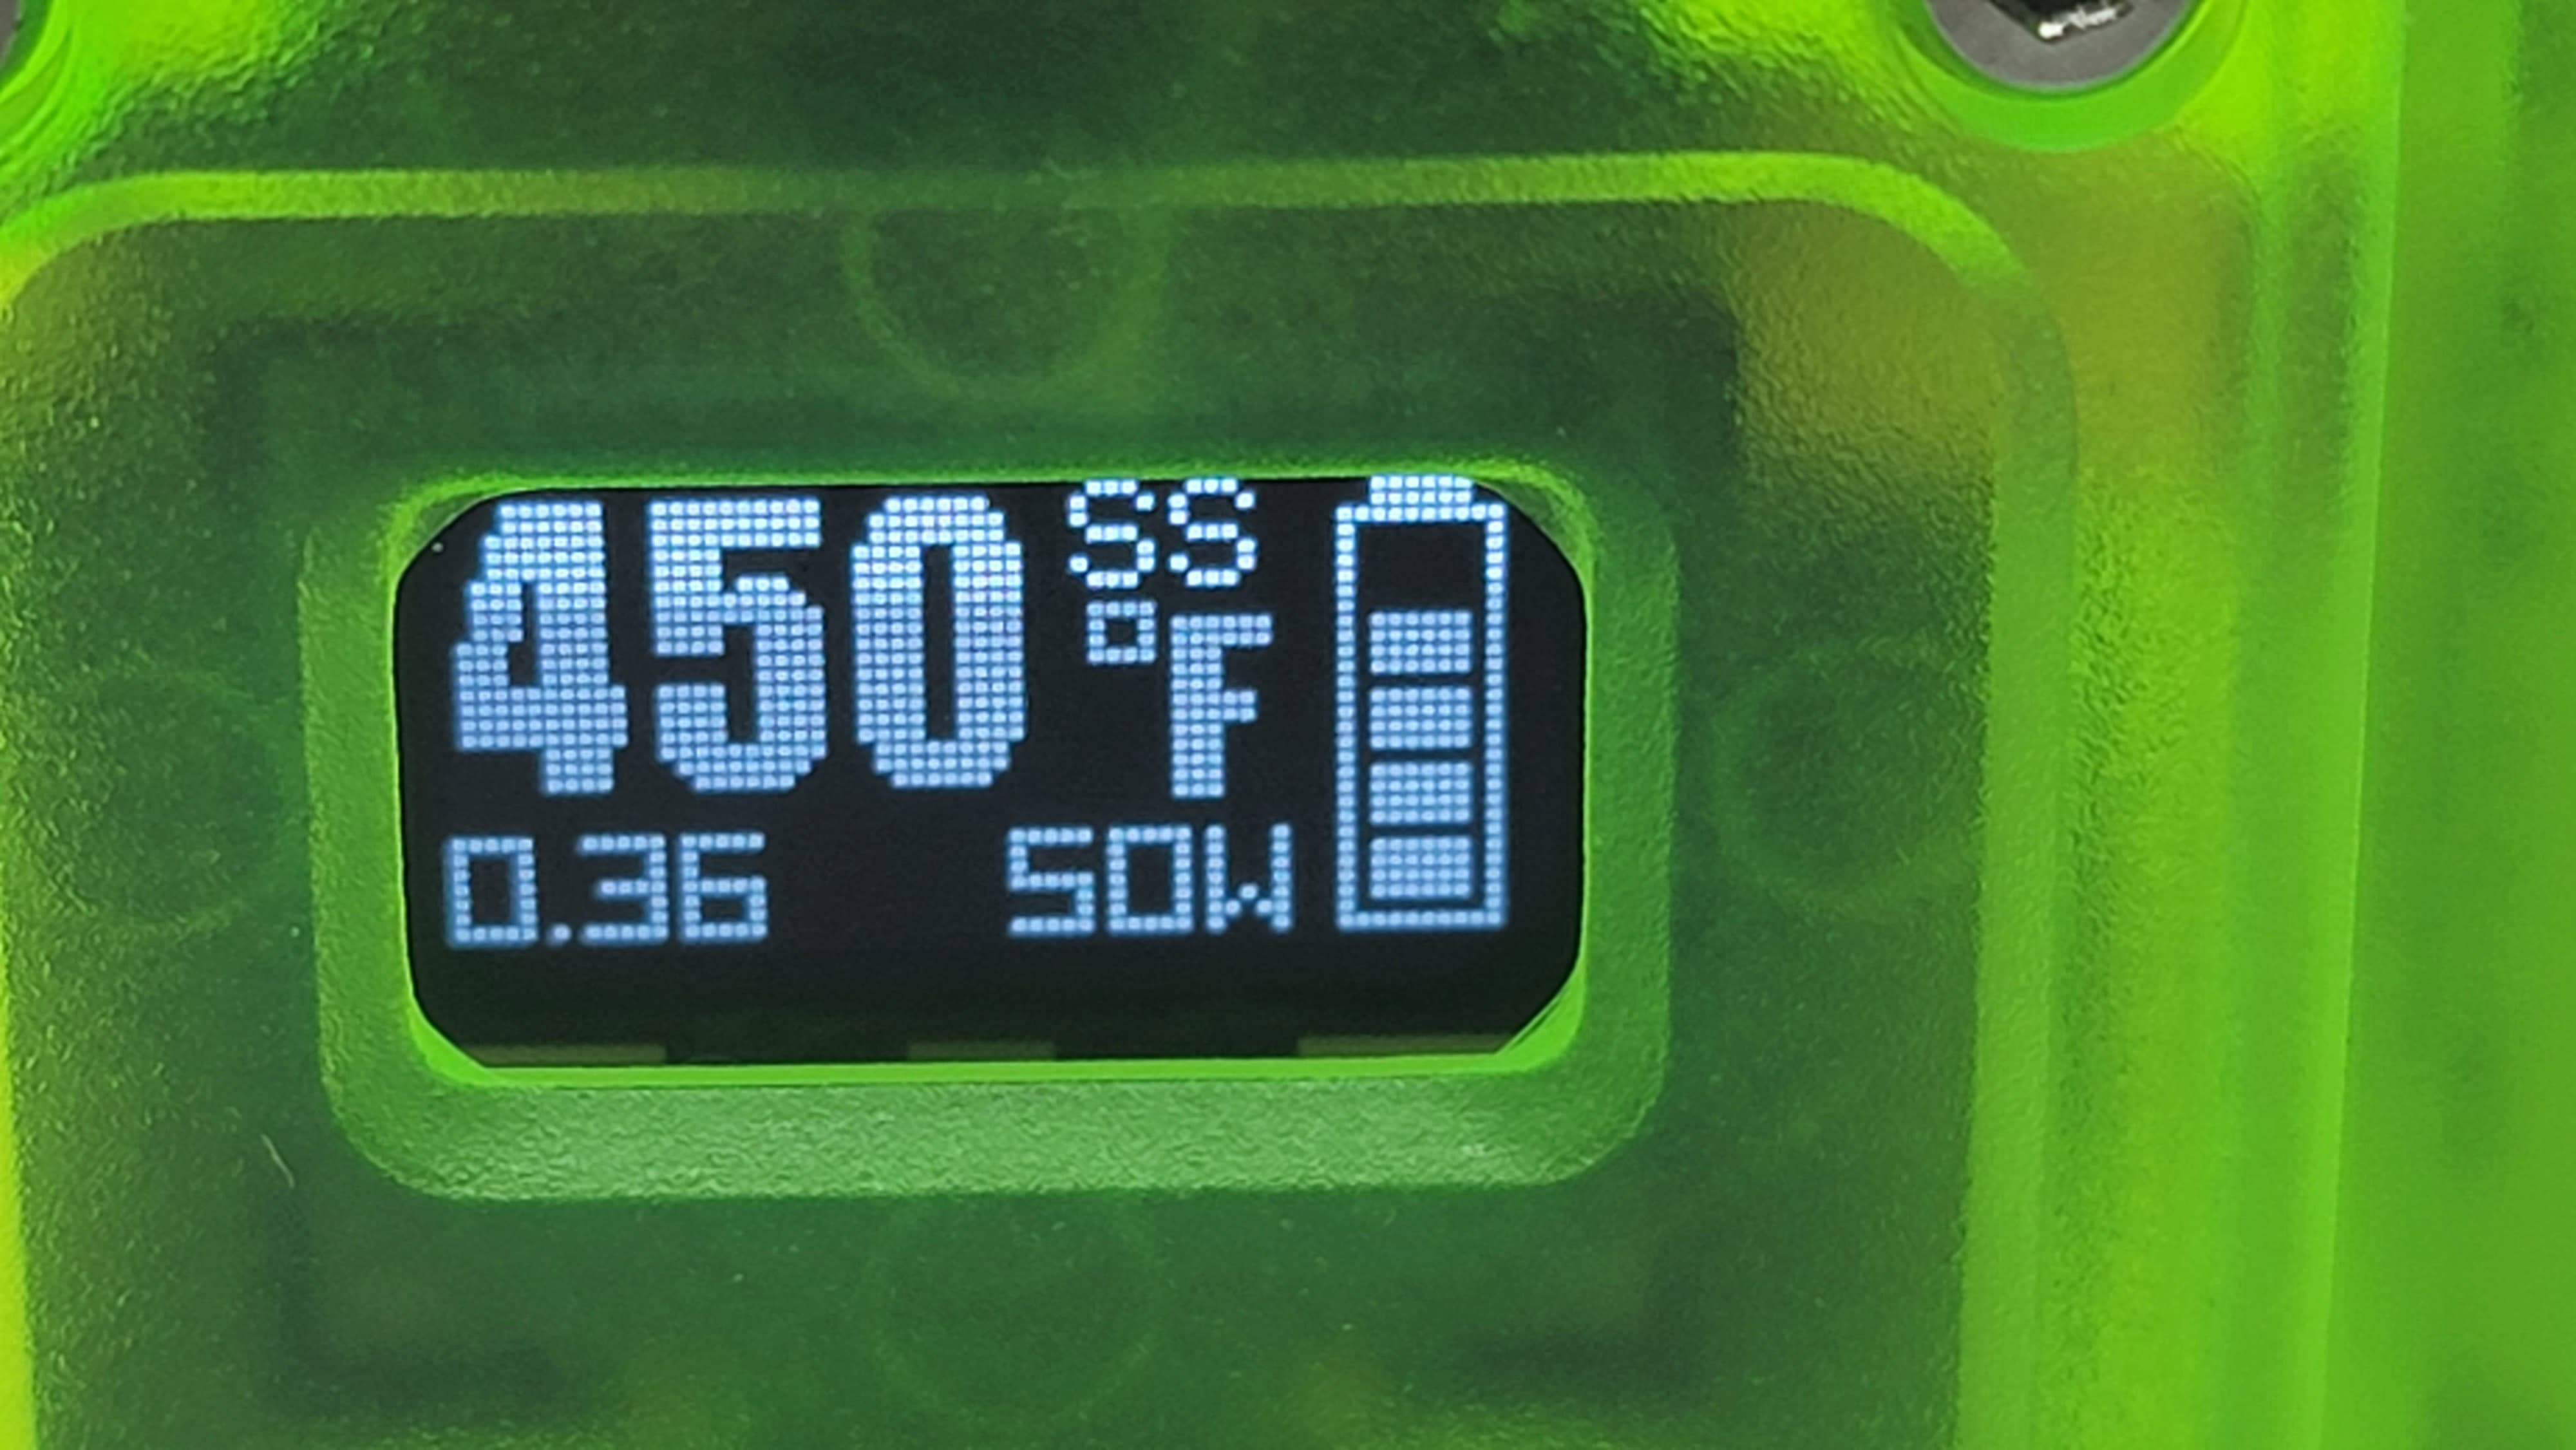
- Wattage, Voltage, Bypass, Temp Control (SS TC, TI, NI), and Smart Mode (when using VVC Coils).
- Wattage Output Range: 5-80W
- Voltage Output Range: 3.2-4.2V
- Resistance Range: 0.05~3.0ohm
- Zinc-Alloy Chassis Construction
- Intuitive Firing Button
- Two Adjustment Buttons
- OLED Display Screen
- 5.0mL Prebuilt Coil Pod Capacity
- 3.7mL RBA Pod Capacity
- Side Fill System - Silicone Stoppered
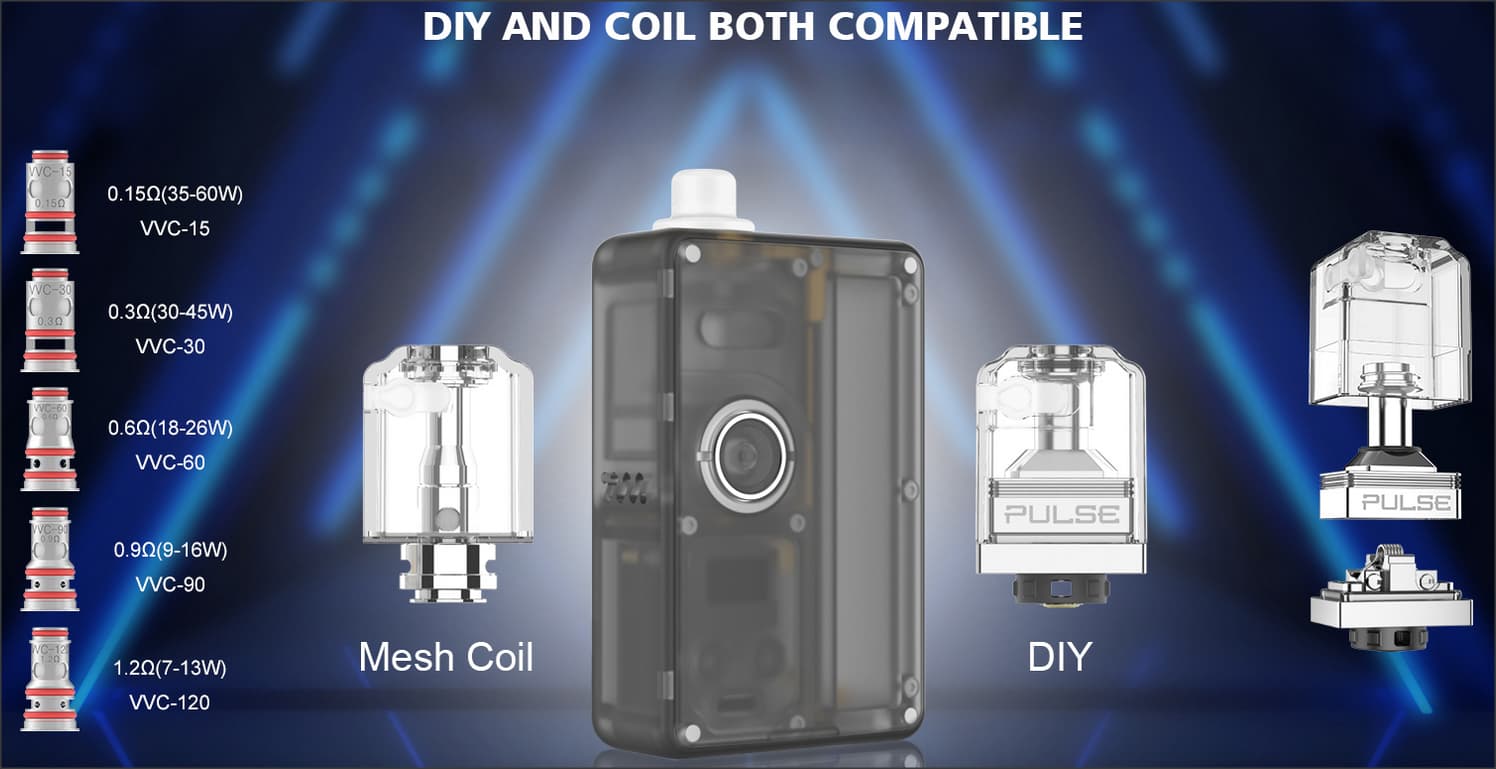
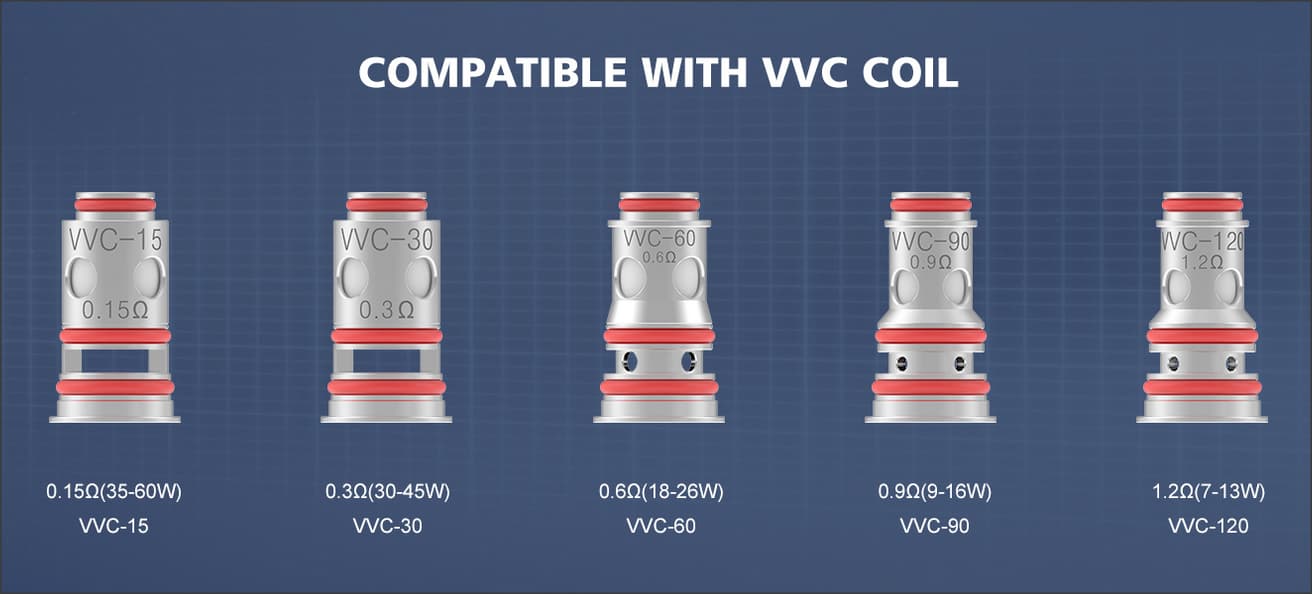
- Vandy Vape VVC Coil Series
- Press-Fit Coil Installation
- Open Circuit Protection
- Over-Current Protection
- 10S Cut-Off Protection
- Short-Circuit Protection
- Over-Temperature Protection
- Low Battery Protection
- Type-C USB Port
- Available in Frosted Black, Frosted Green, Frosted Blue, Frosted Grey, Frosted Red
What’s Included:
- 1 Pulse AIO Device
- 1 Pulse AIO DIY Pod
- 1 Pulse AIO Pod Cartridge
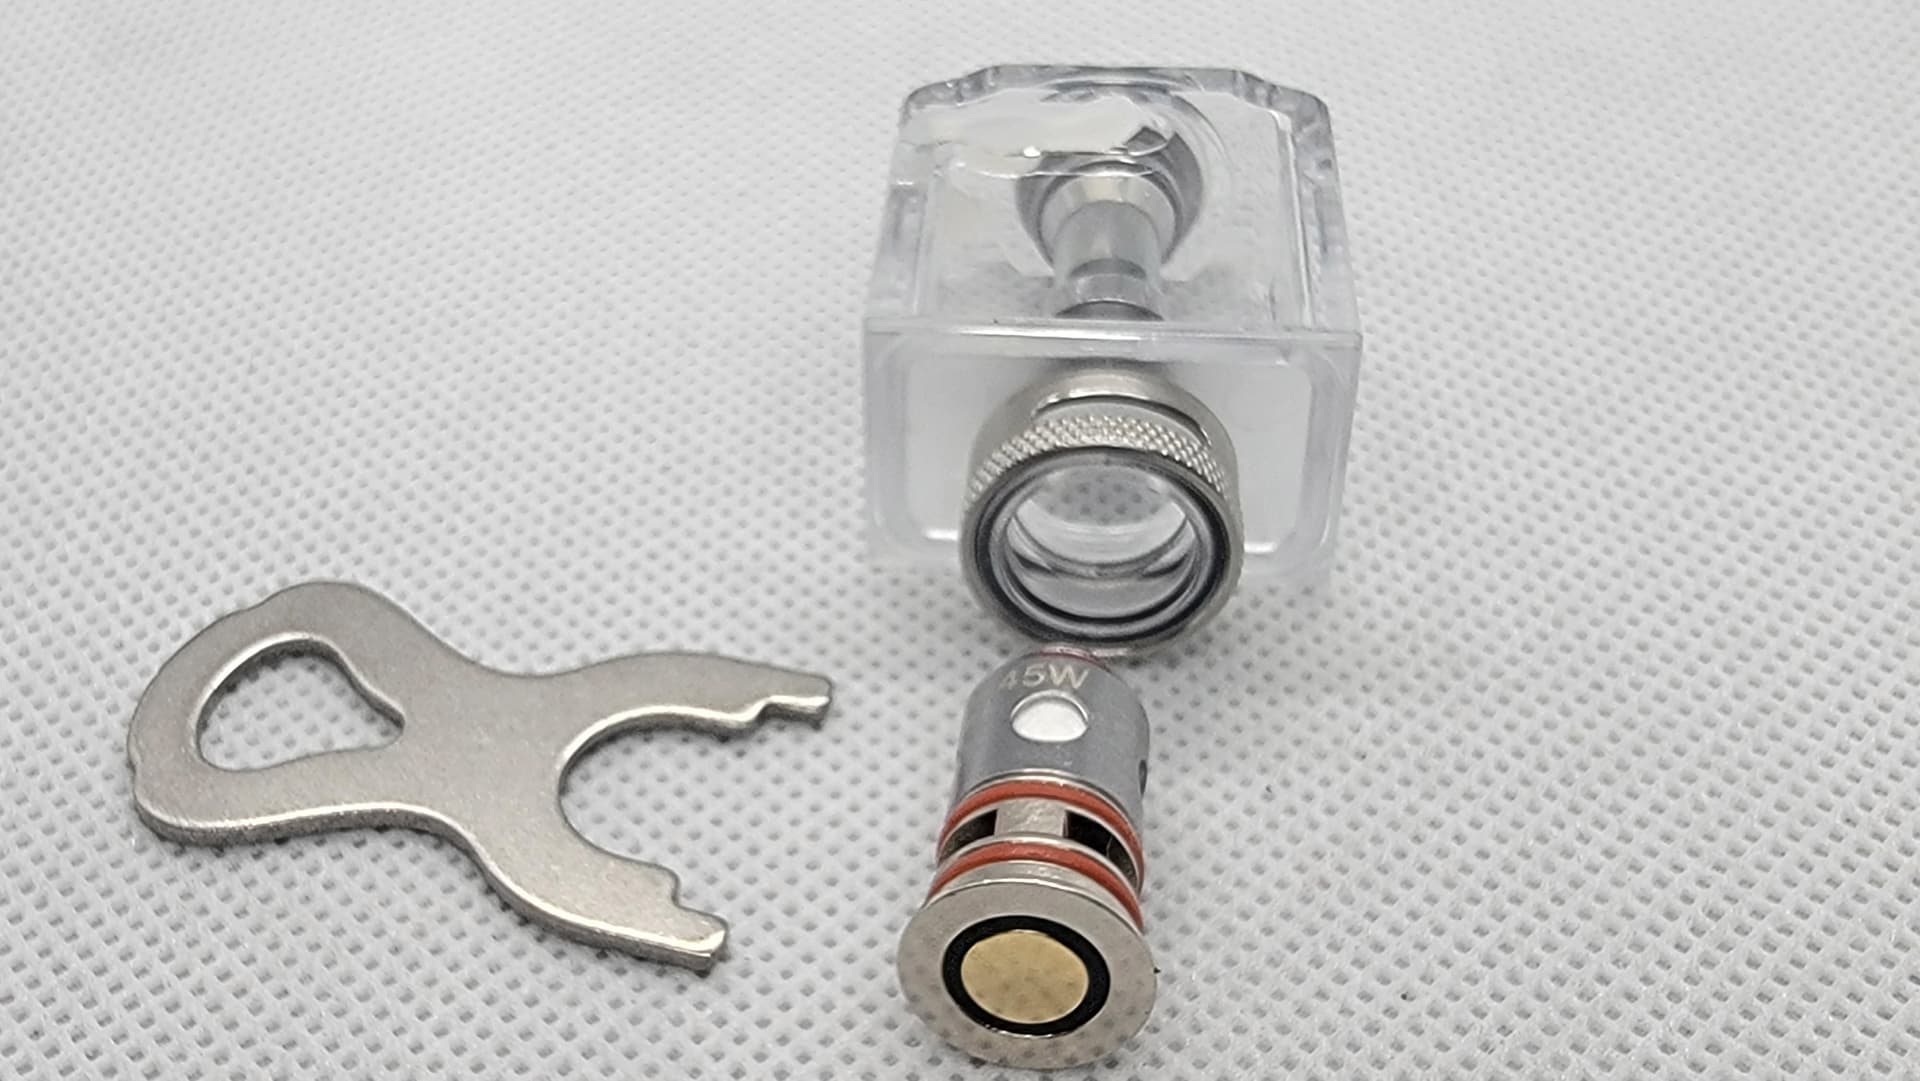
- 1 Wrench
- 2 VVC Coil
- 2 24ga Ni80 Wire
- 1 Accessories Bag
- 1 Coil Lead Guide
- 1 QC Type-C USB Cable
- 1 User Manual
- 1 18650 Adapter
There’s a LOT to unpack here with this new kit, so let’s get INTO it !!!
Starting out with some of the Vandy Vape chipset features …

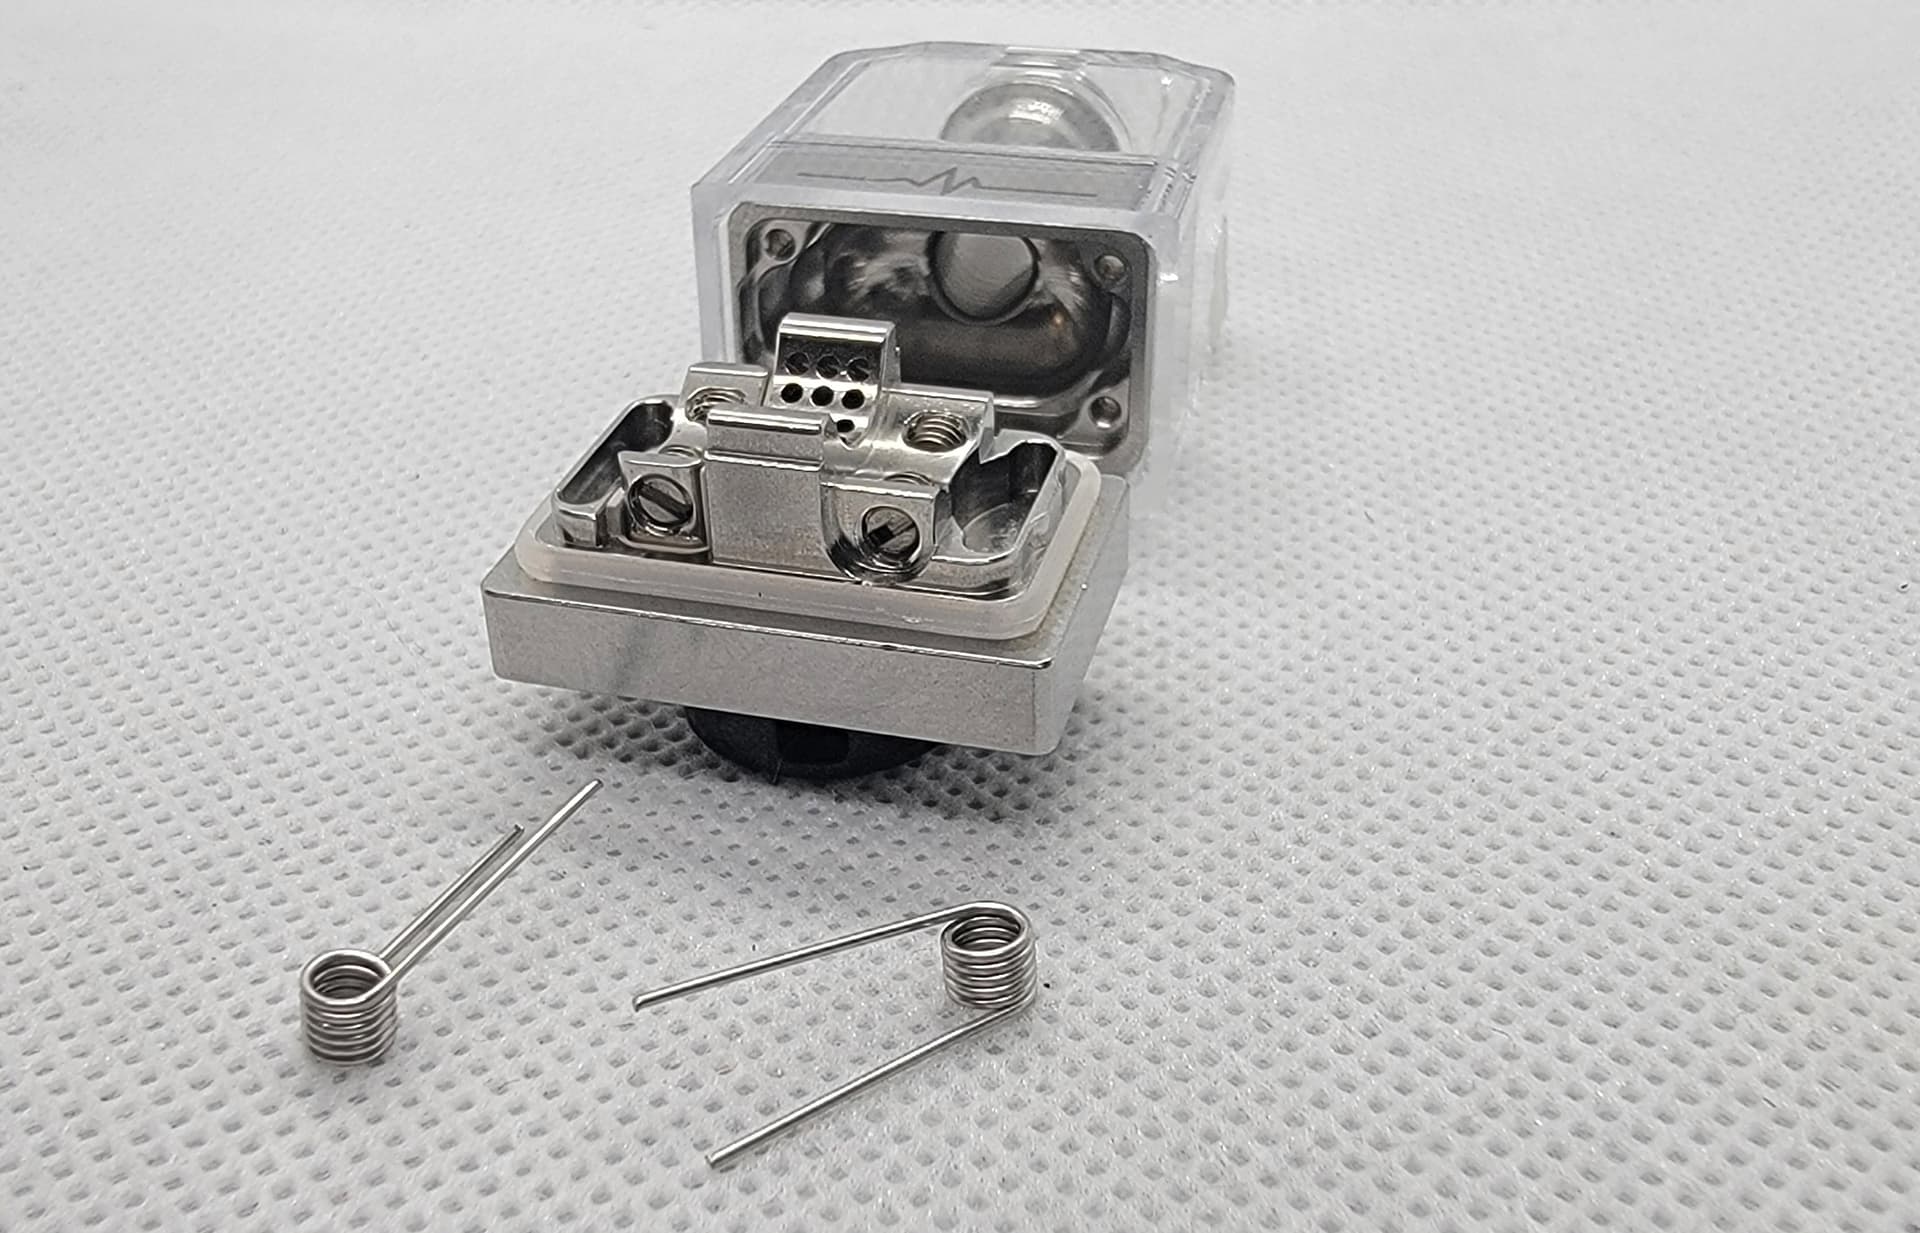
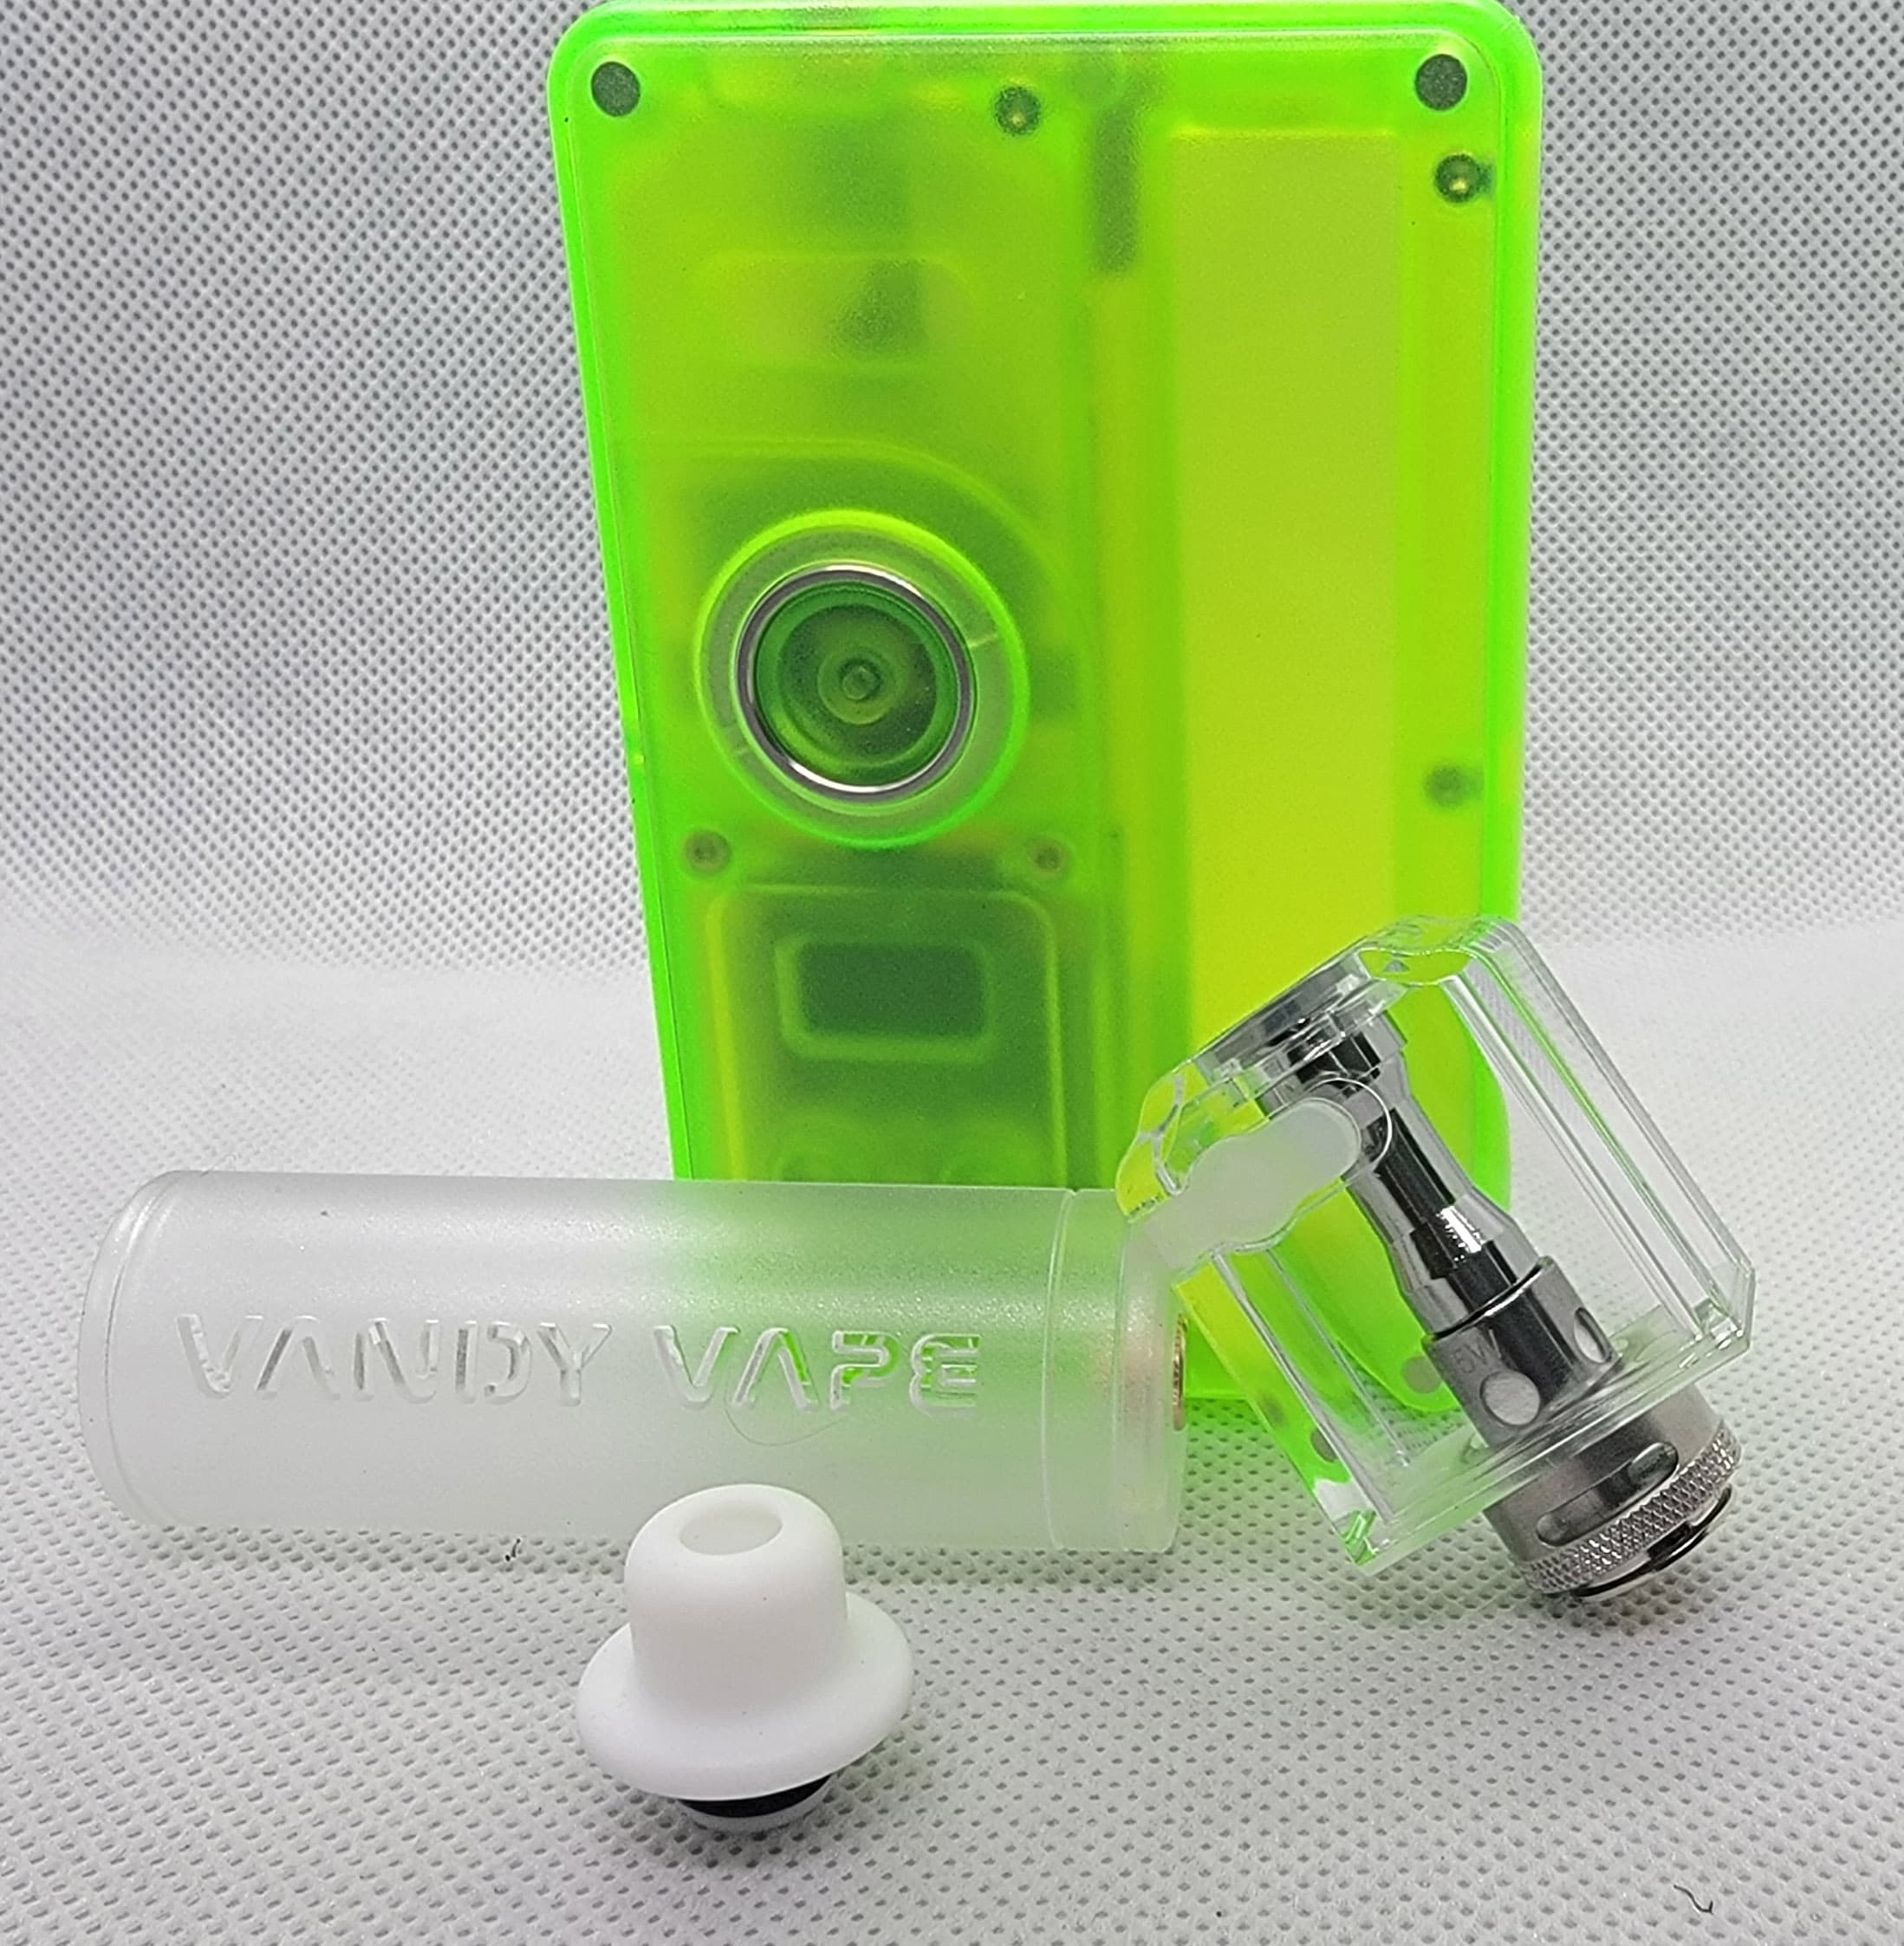
You get TWO vessels (tanks), with one using Pre-built coils, and the other, Re-buildable coils …
With lots of customizable options (we’ll cover that more below), checking out the parts …

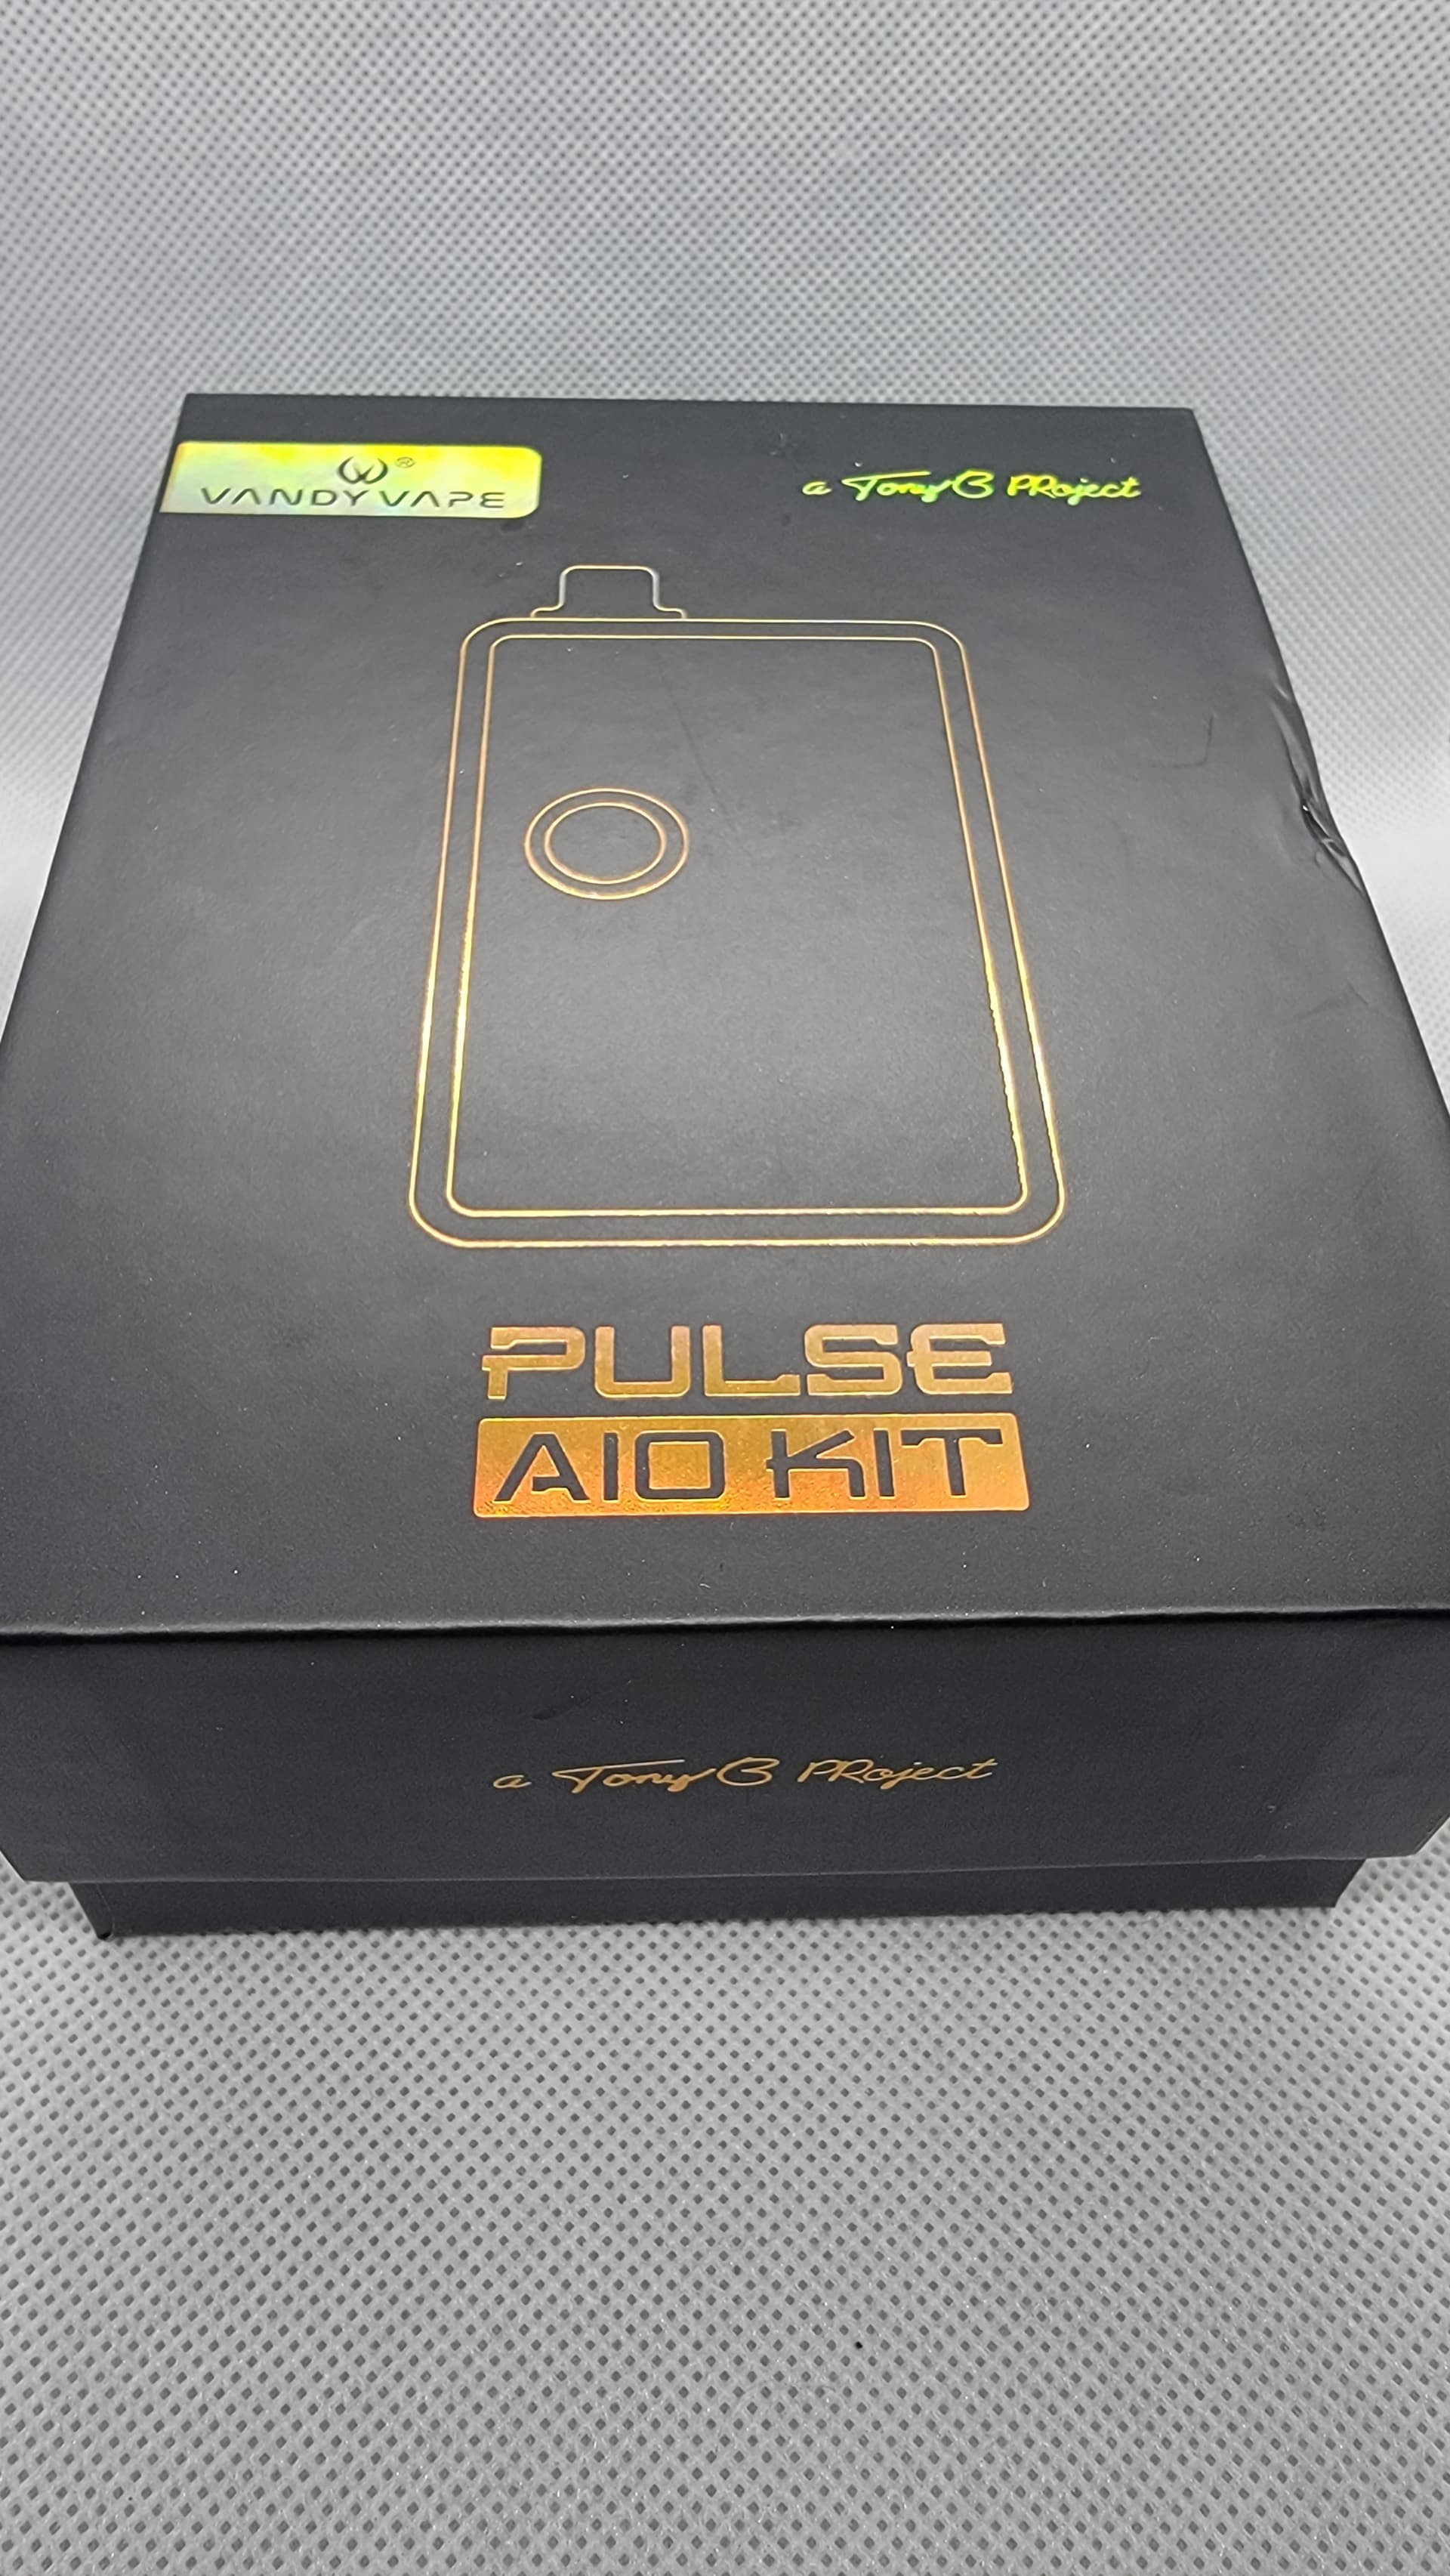
The box …
Nicely packaged …
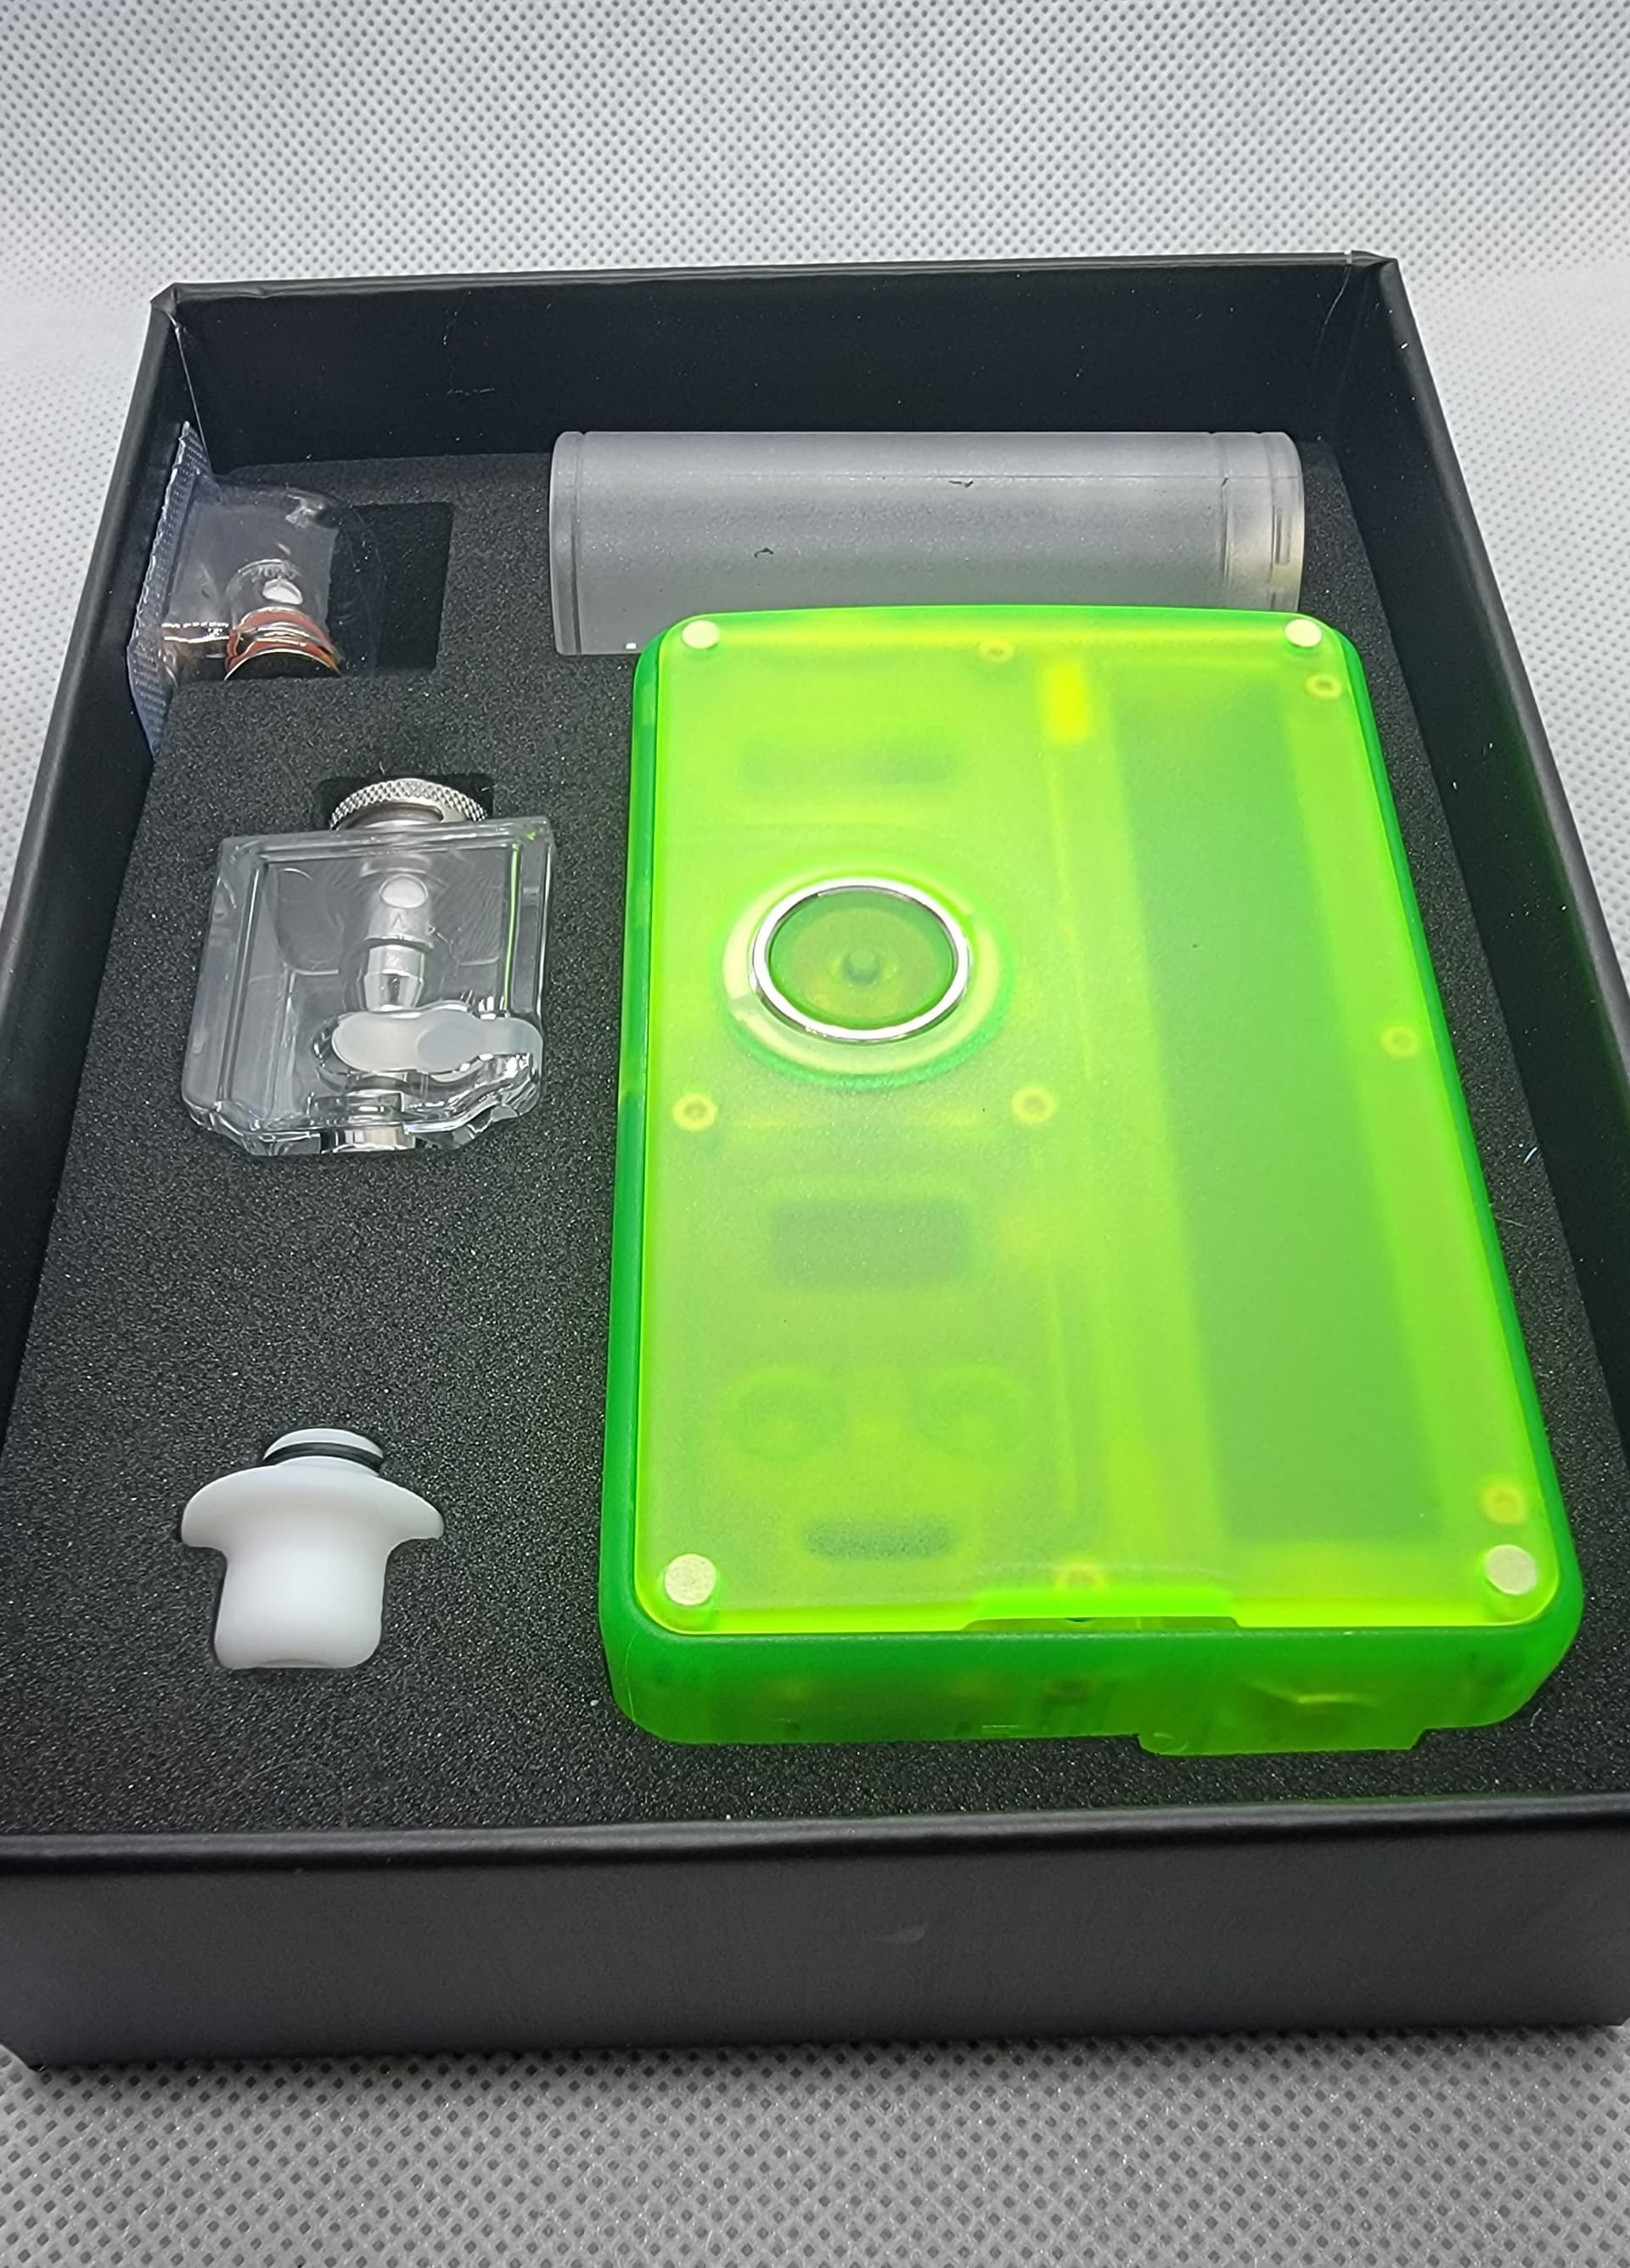
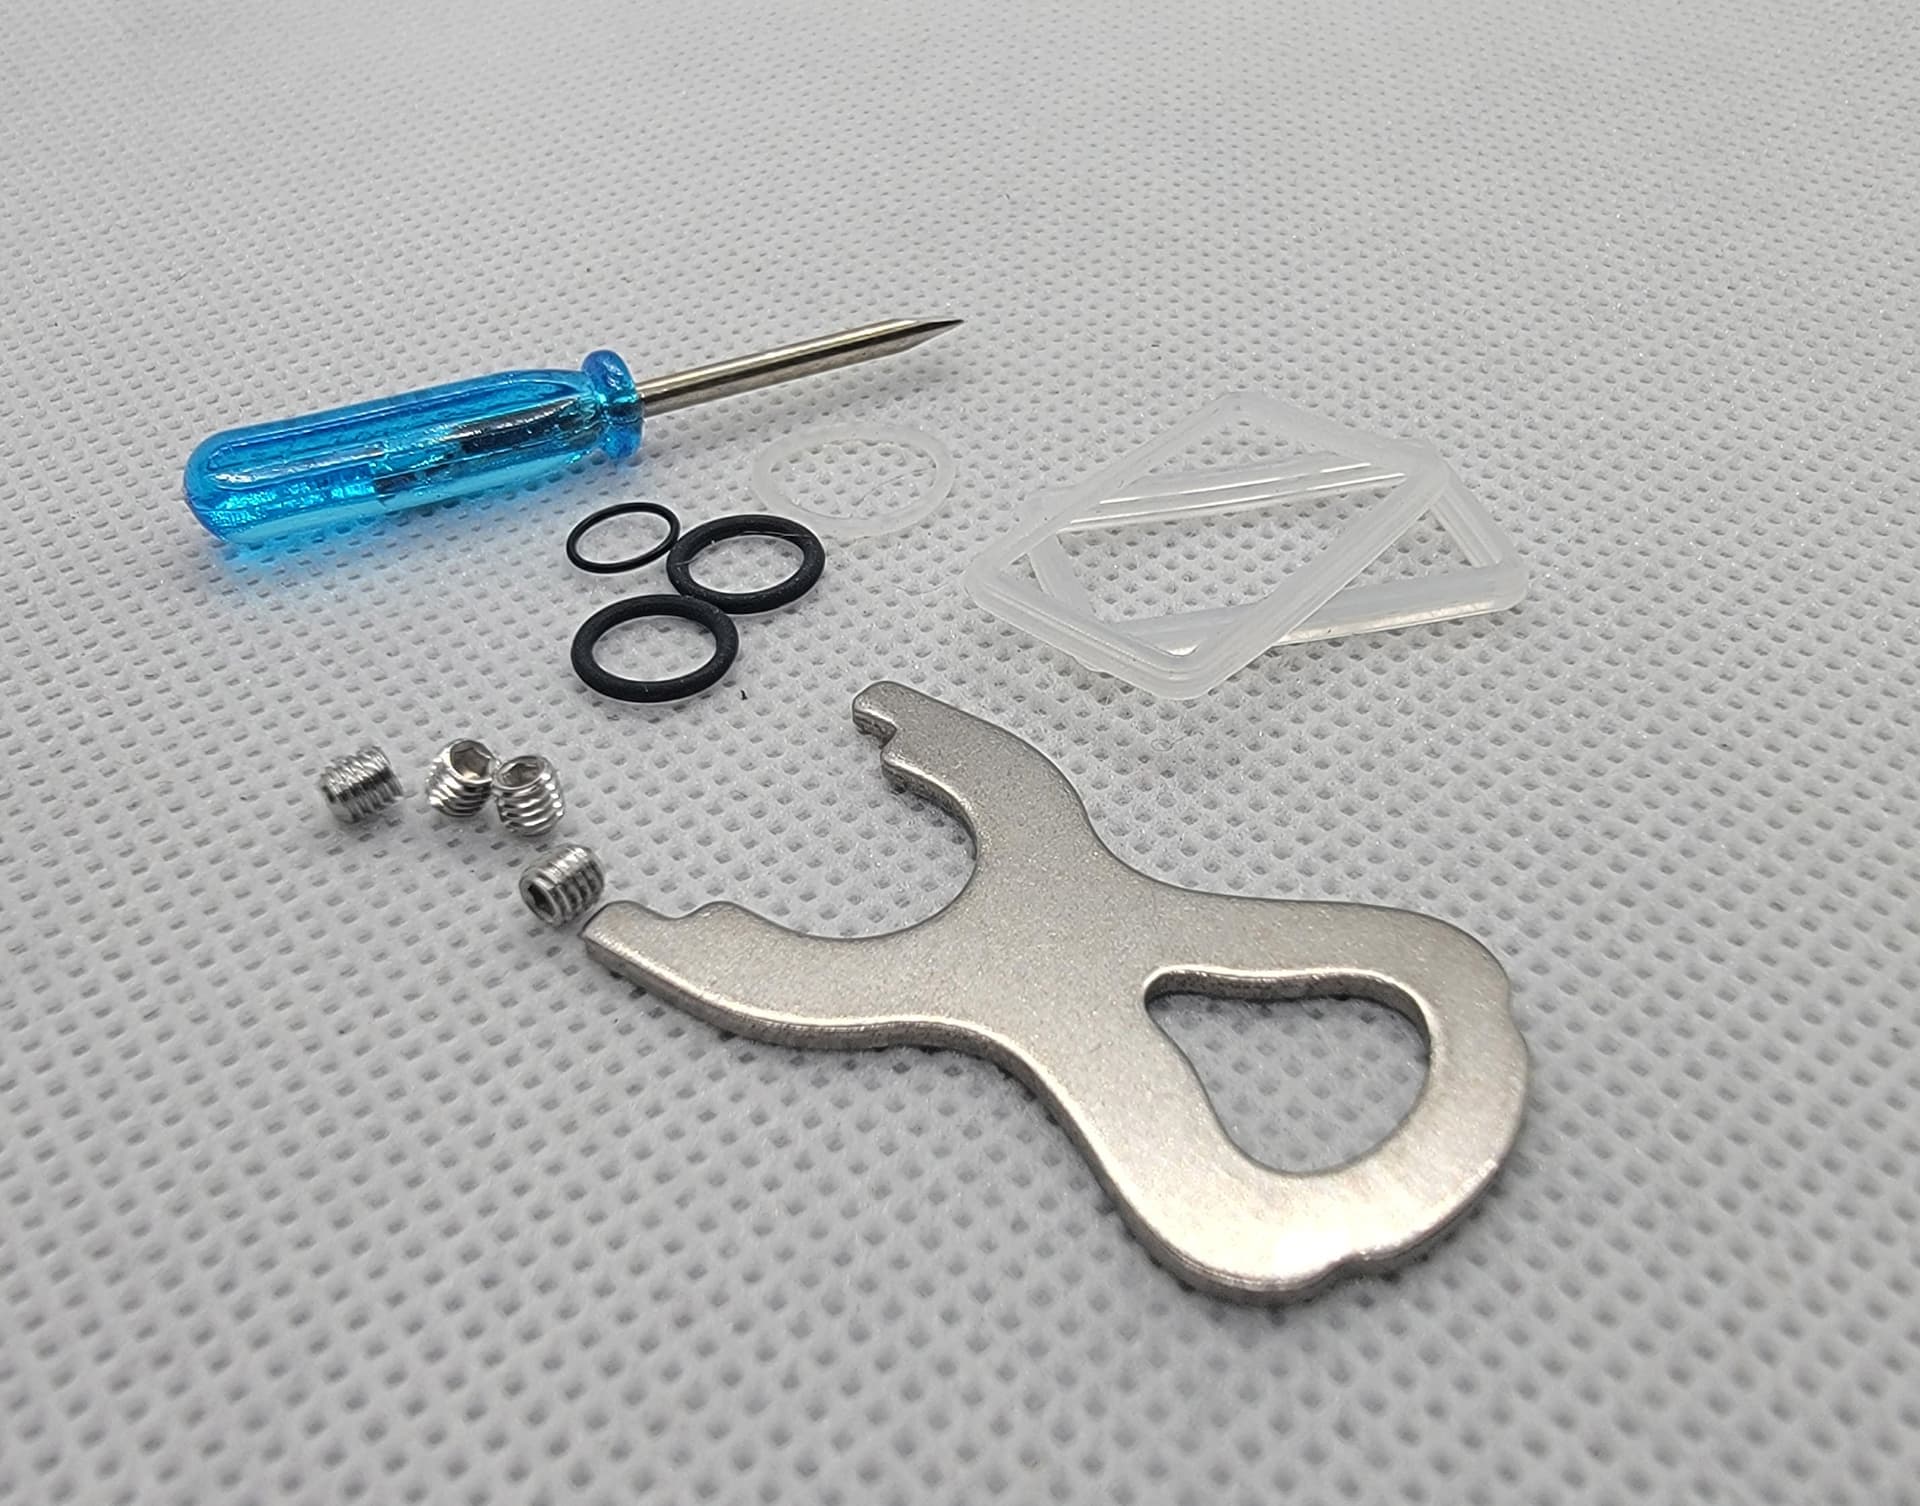
Lots of extras including both pre-built coils, and RBA deck coils, multi-tool, driver, o-rings, charger cable, driver, grub screws,coil cutting guide, user’s manual (not pictured), AND a qualified certificate.
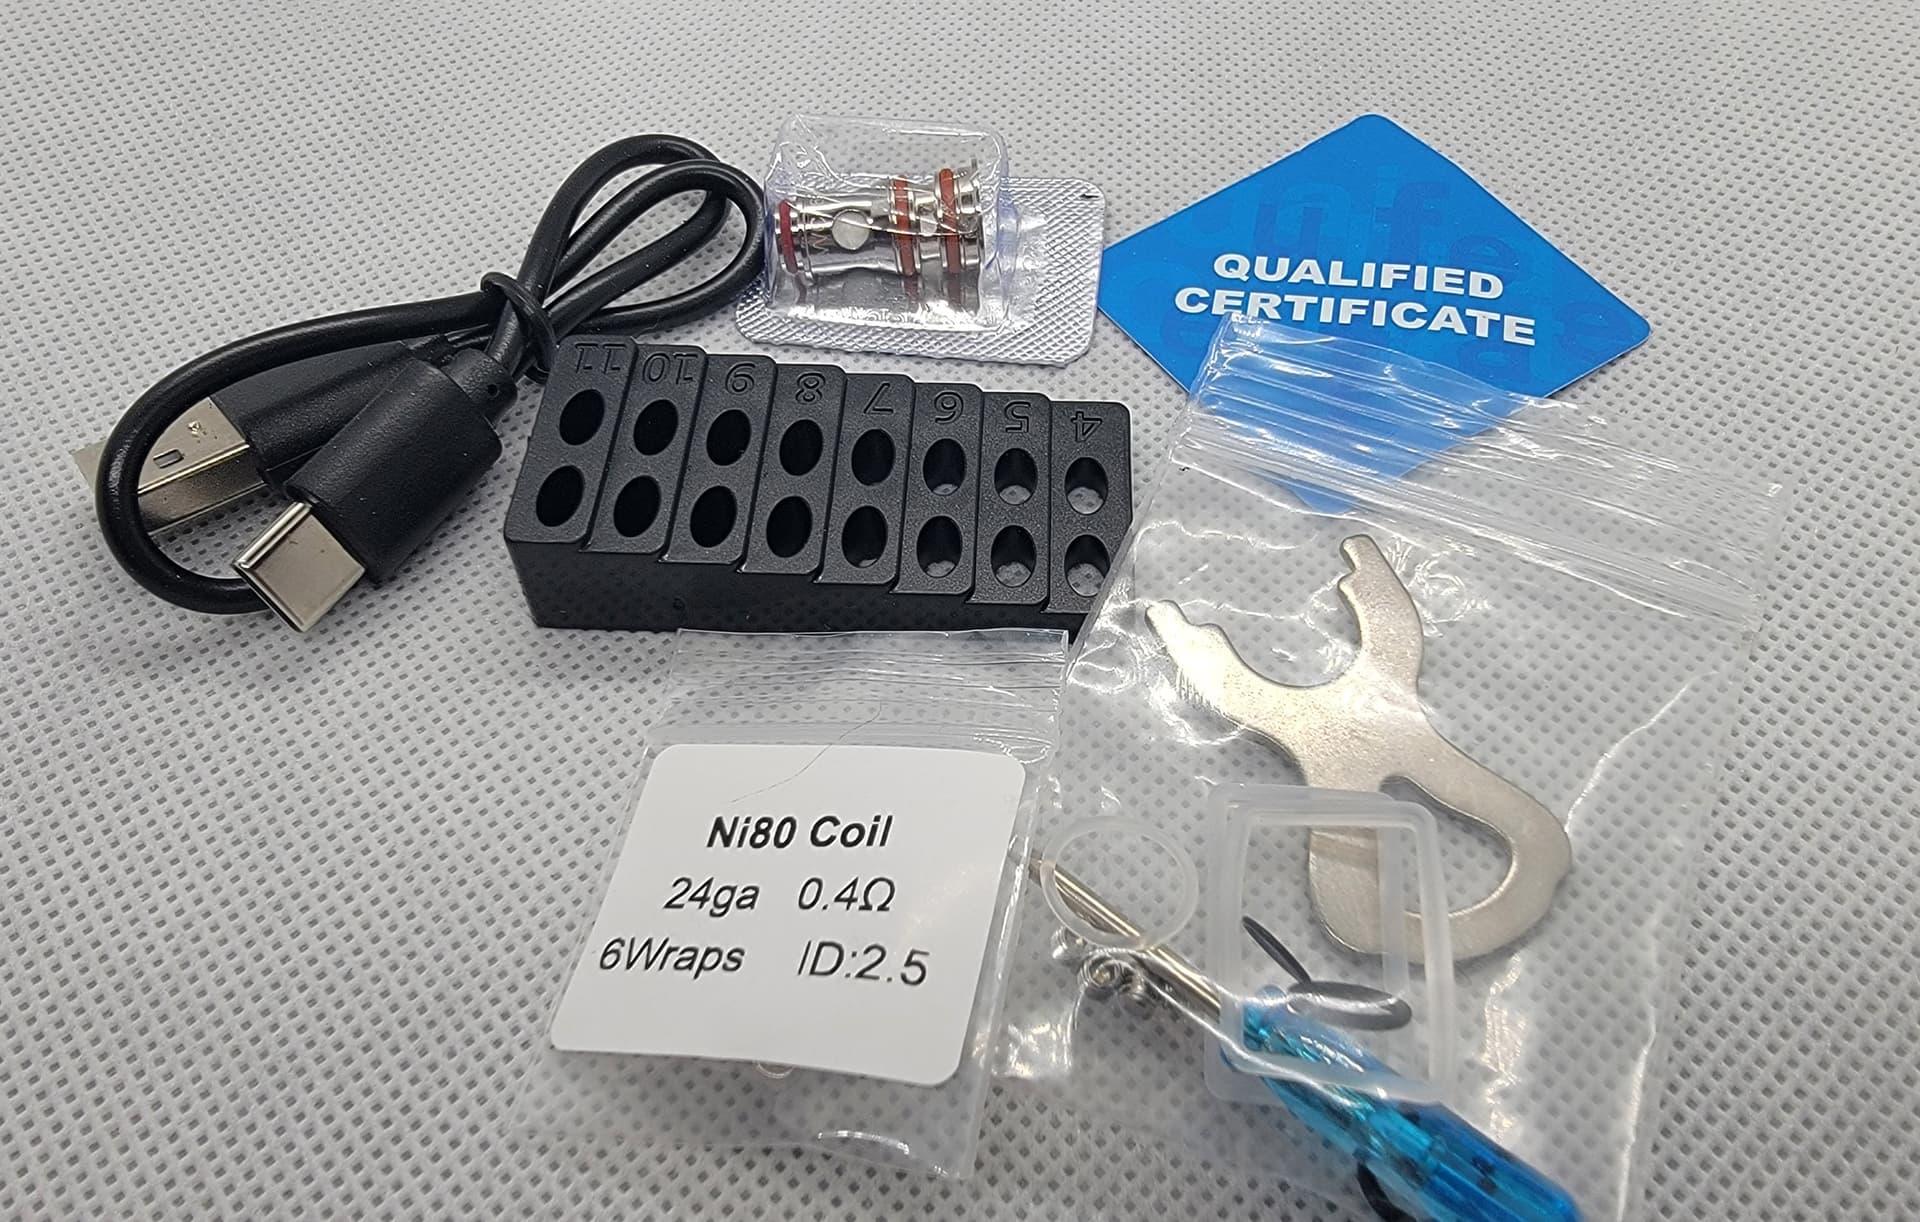
A close up of the bag contents …
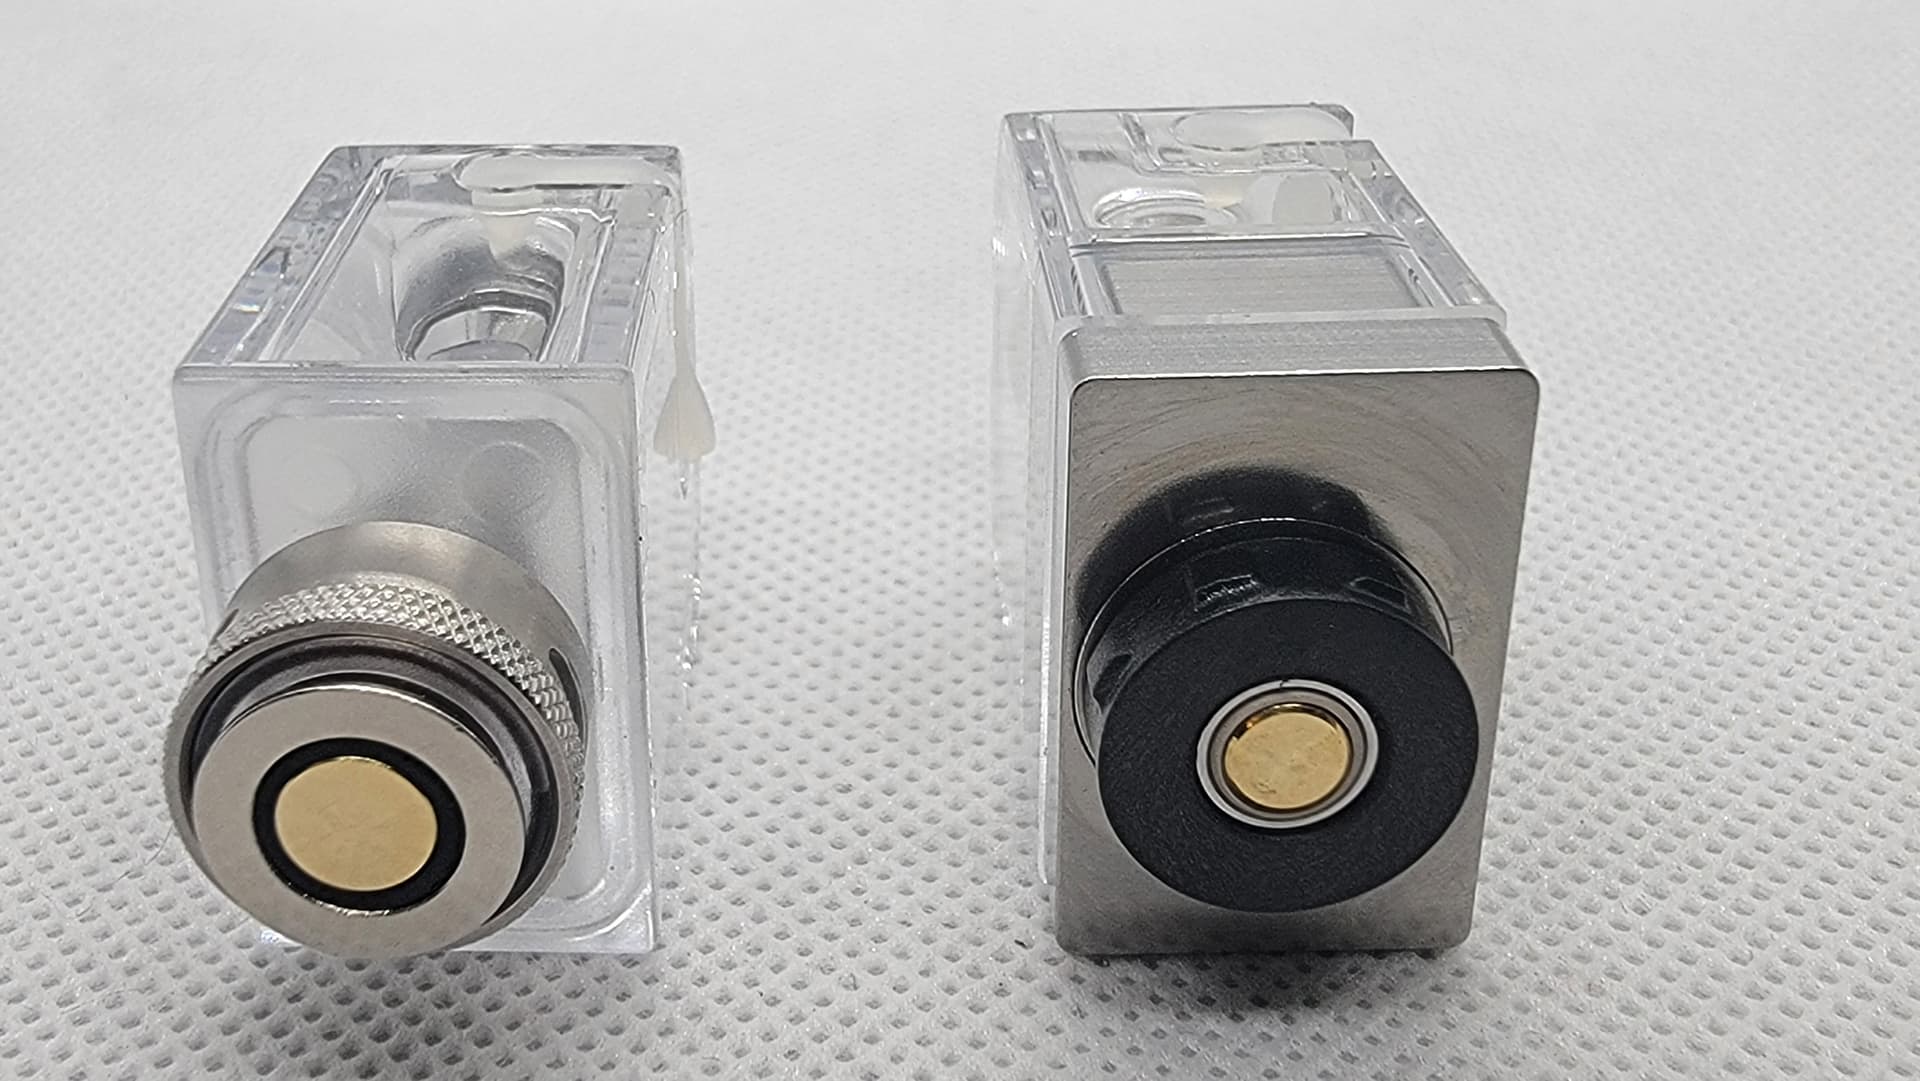
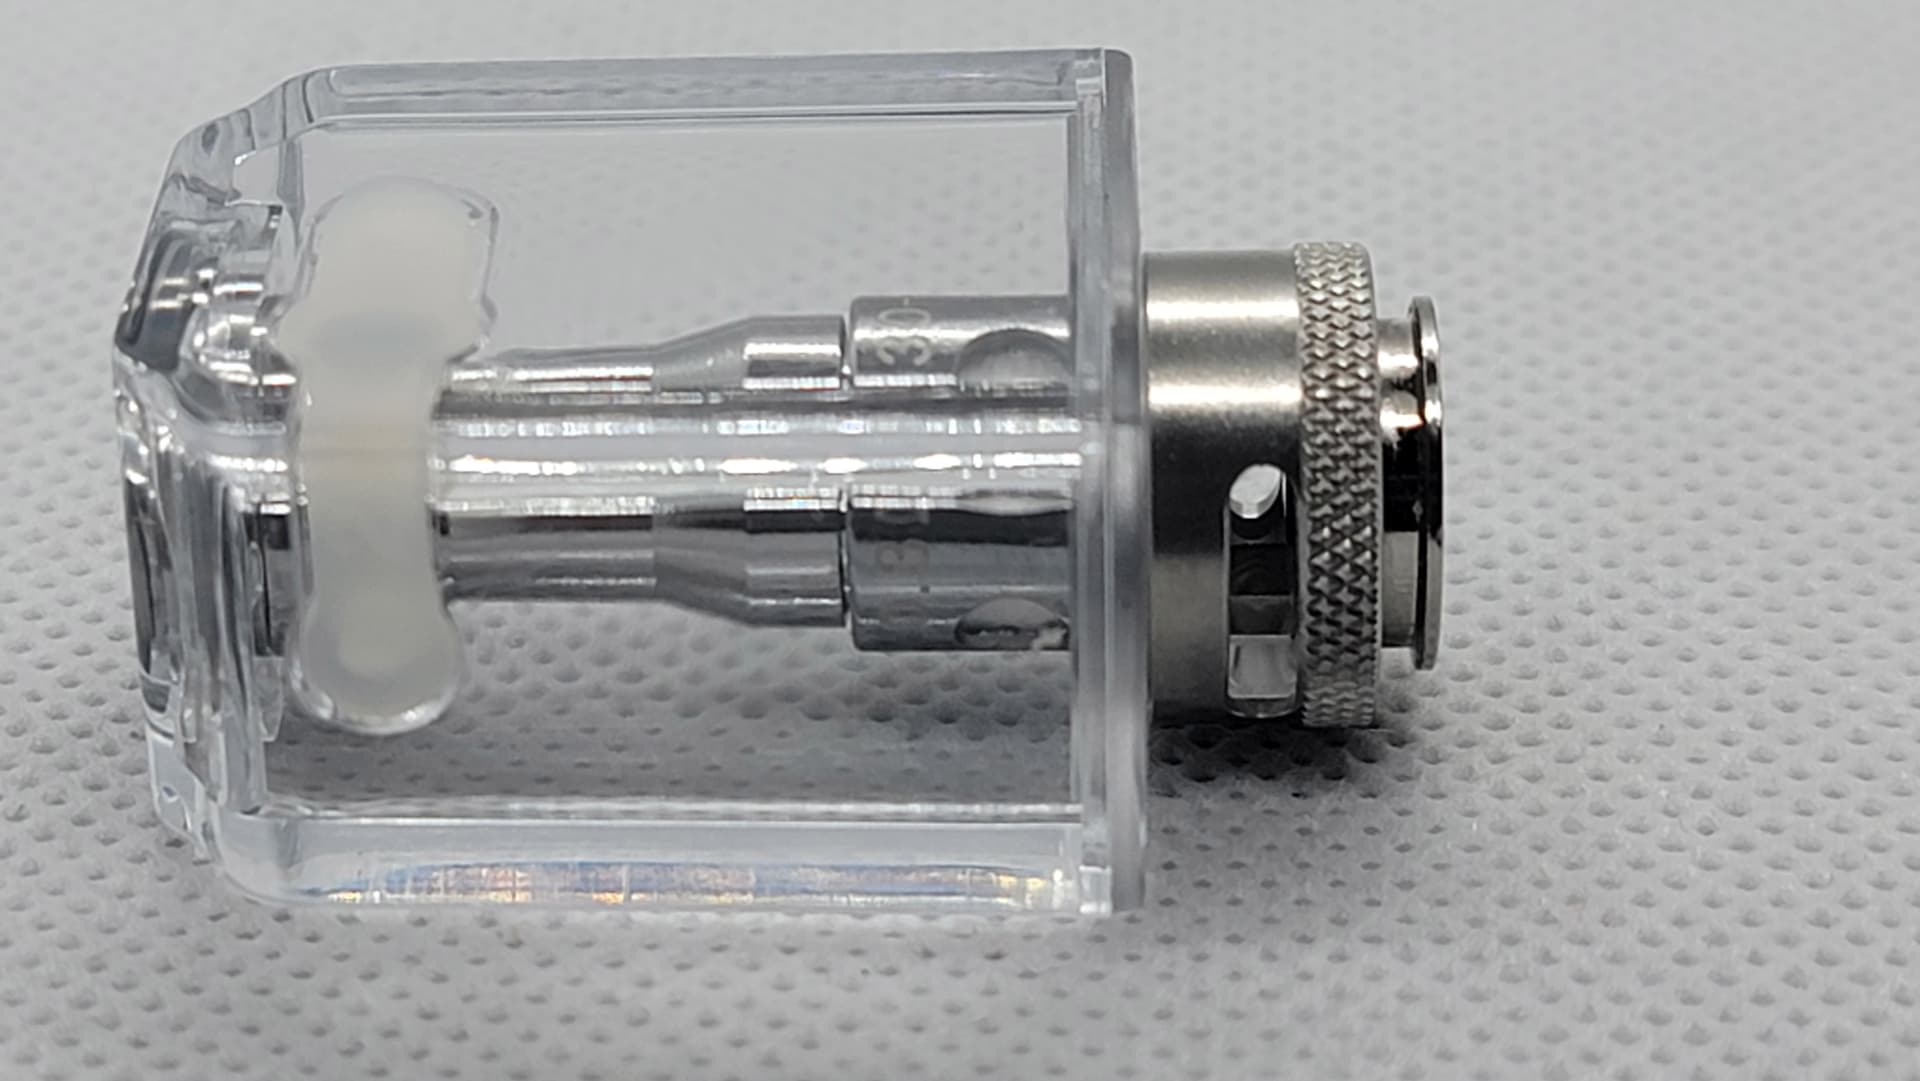
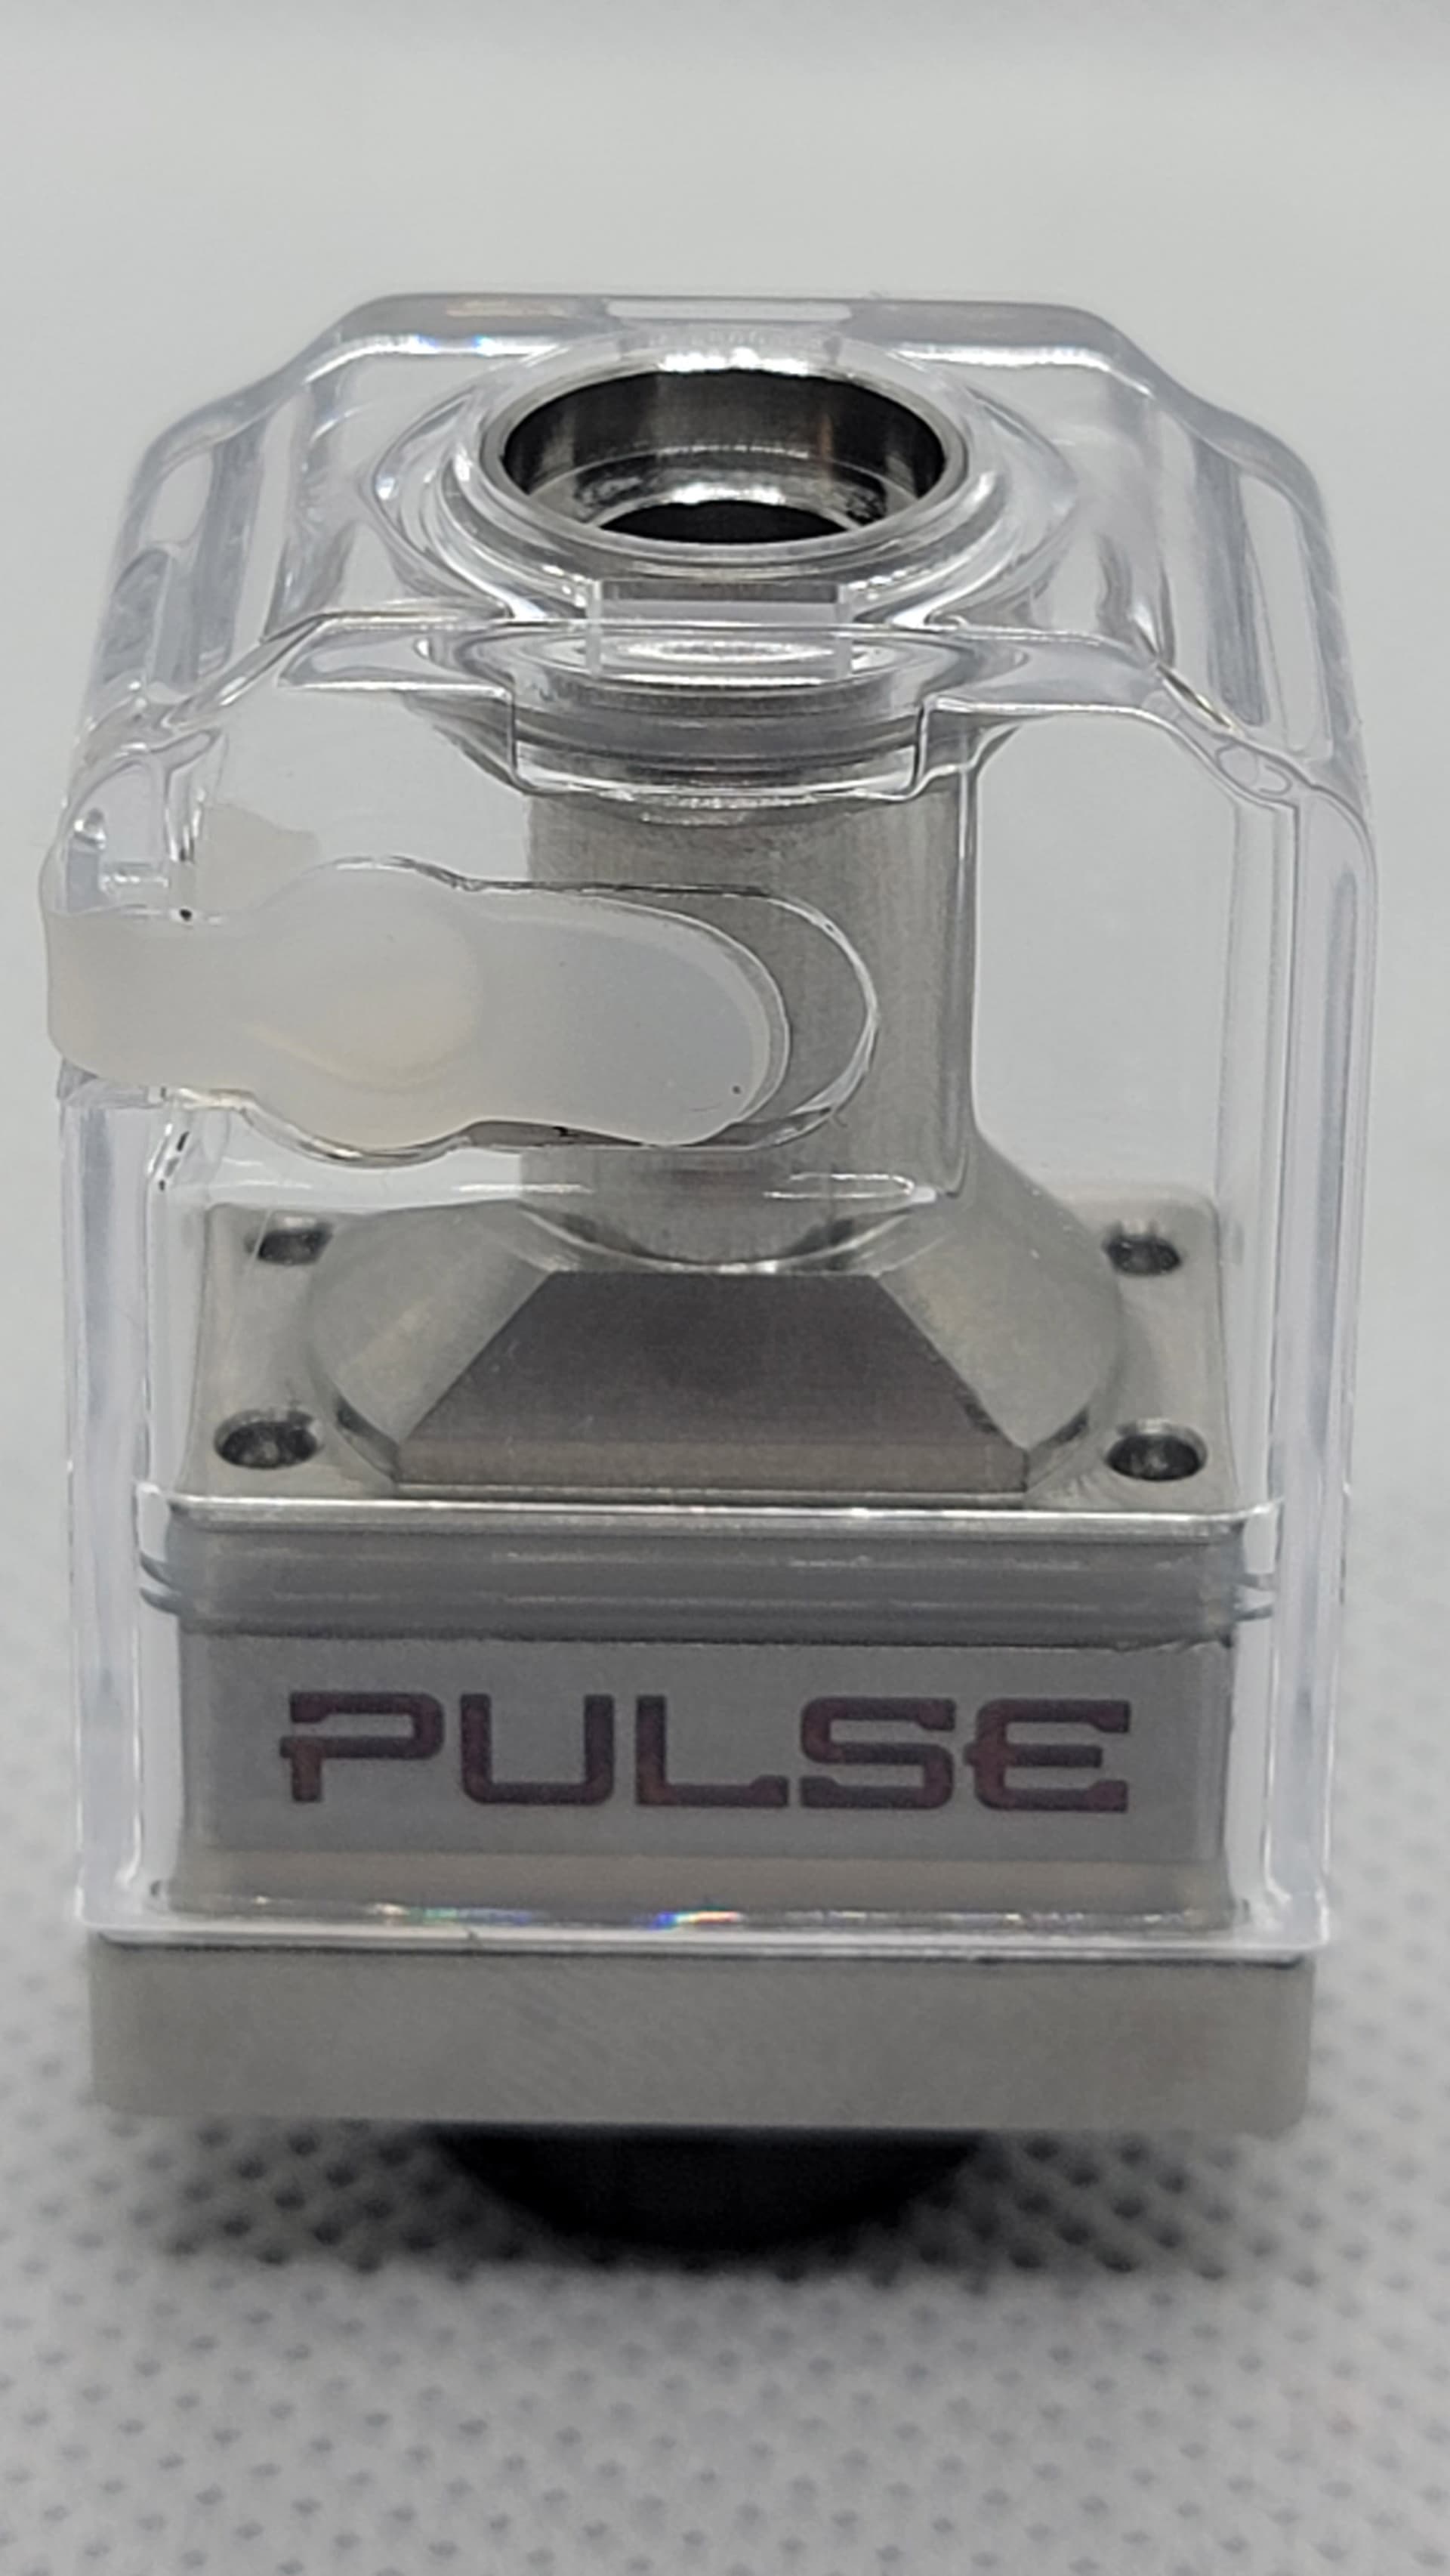
As mentioned, you get both the pre-built, and RBA vessels …
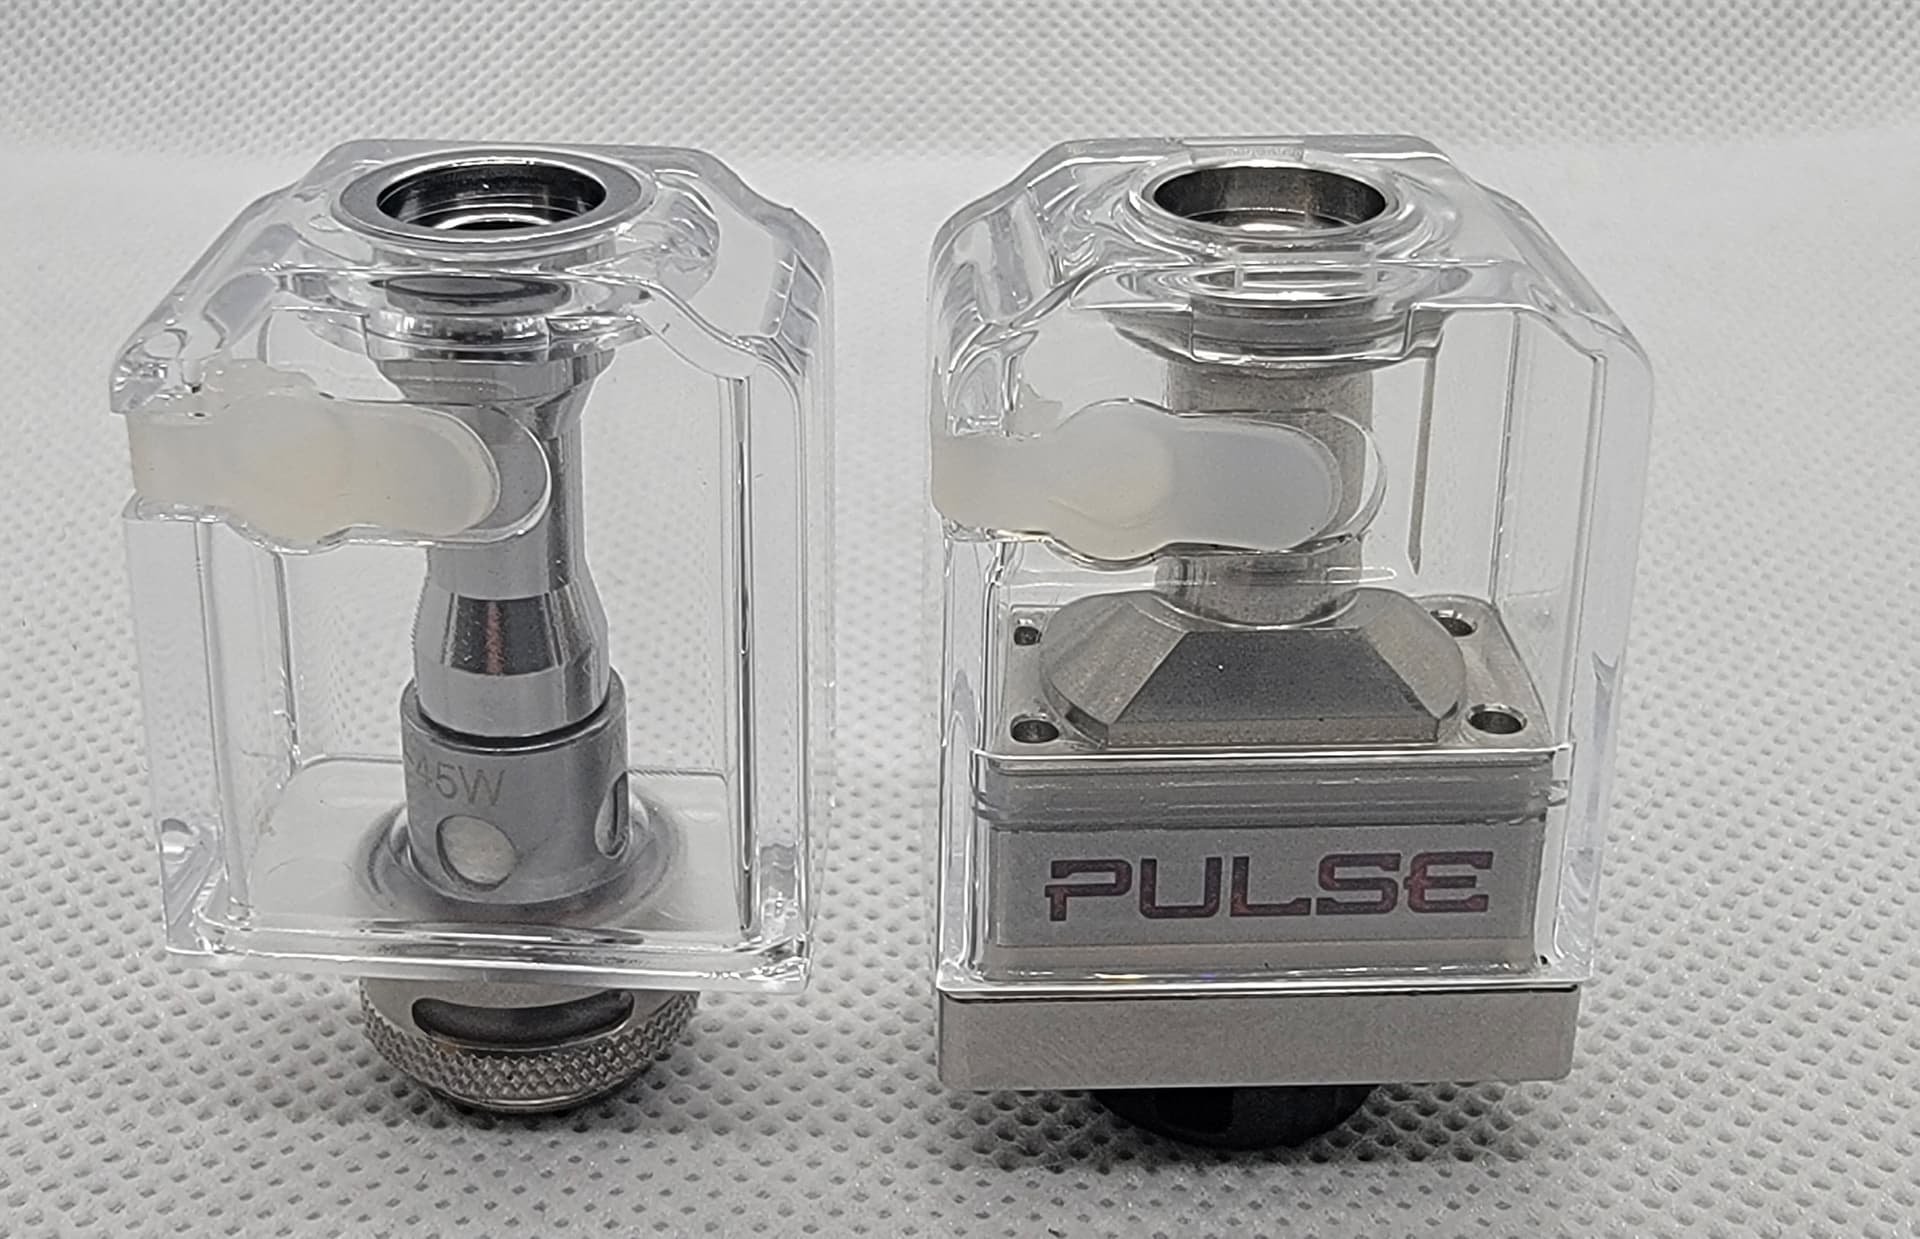
Both with adjustable airflow rings on the bottom …
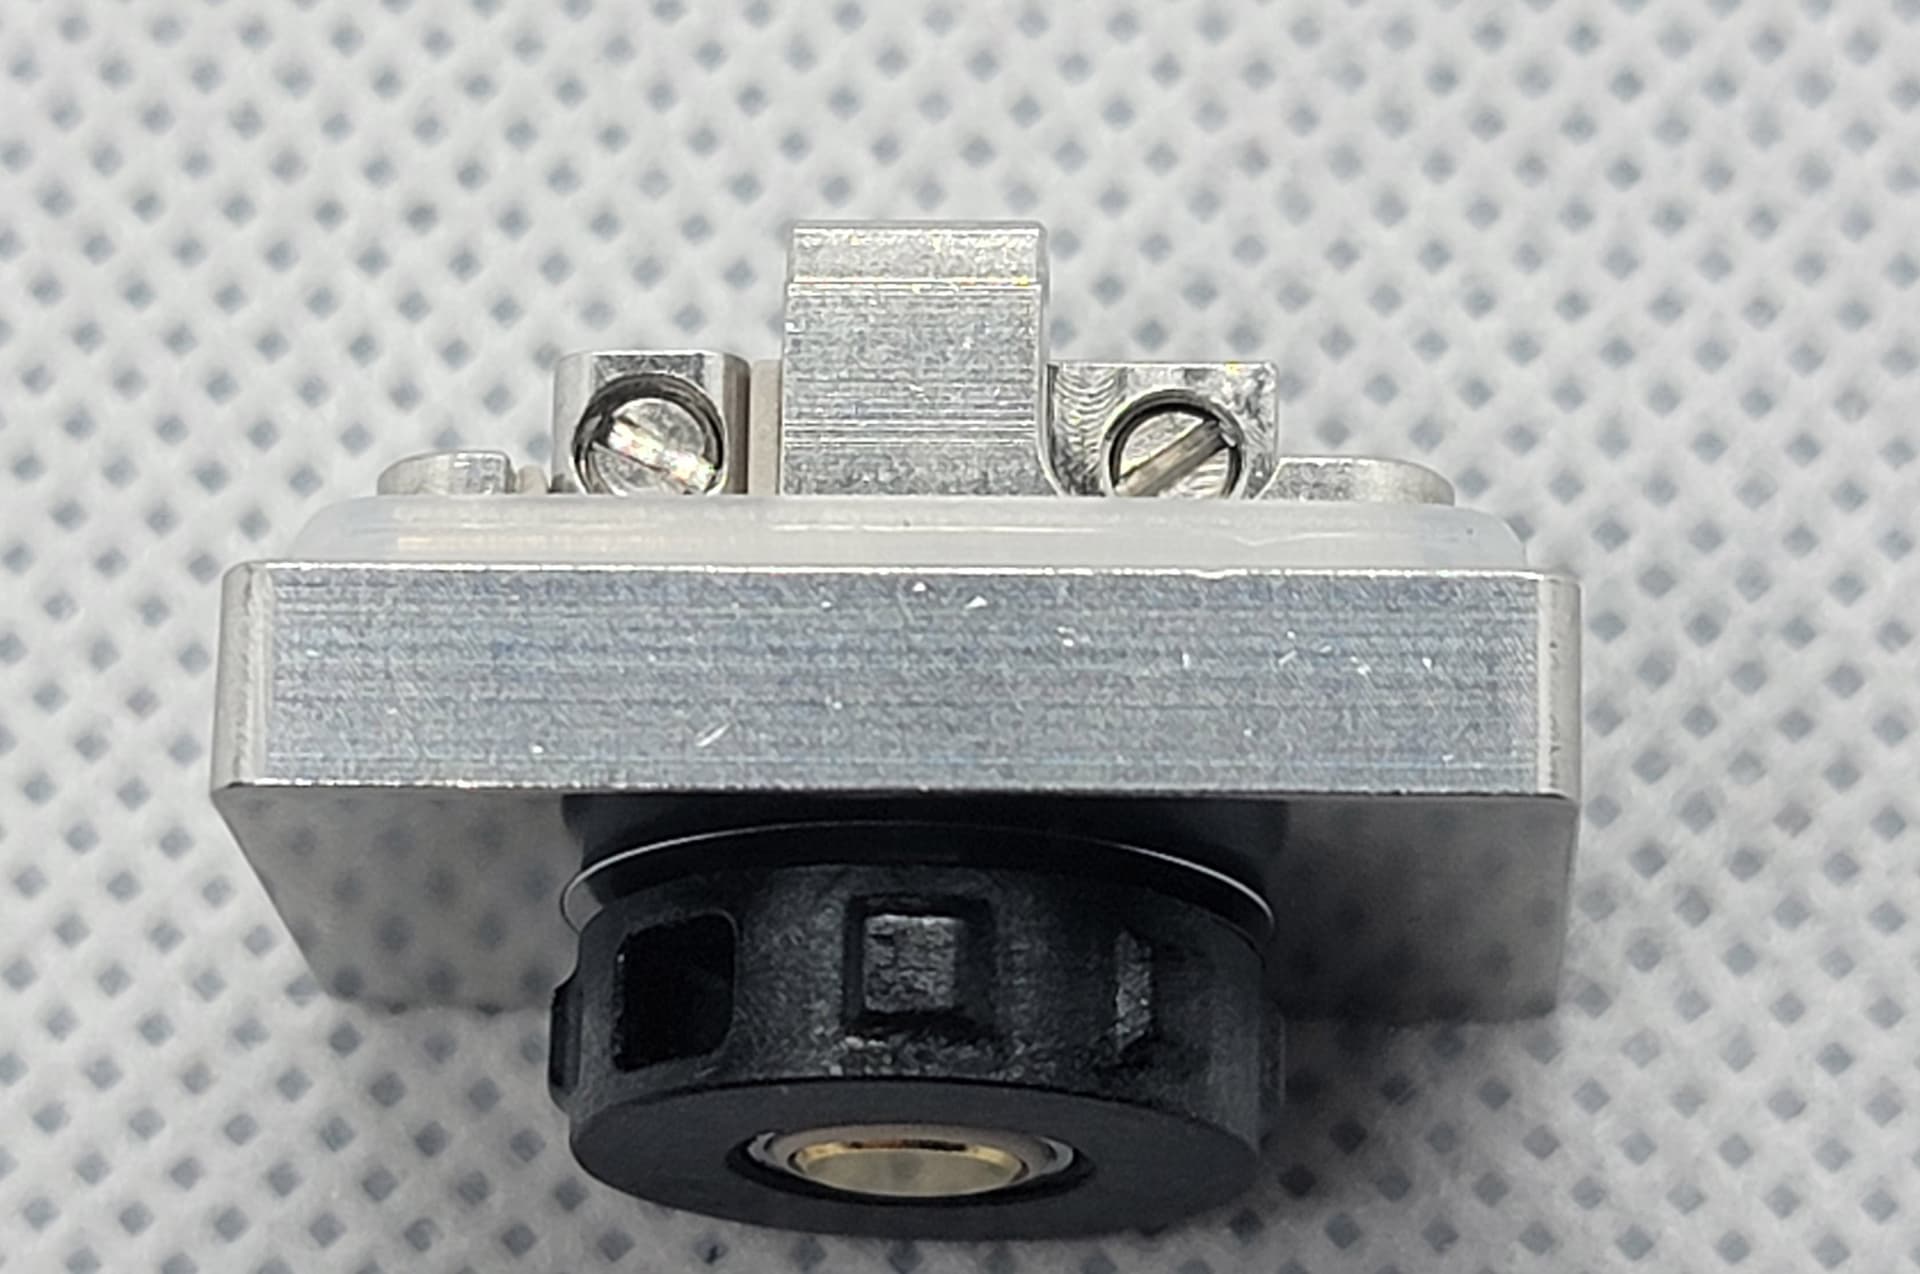
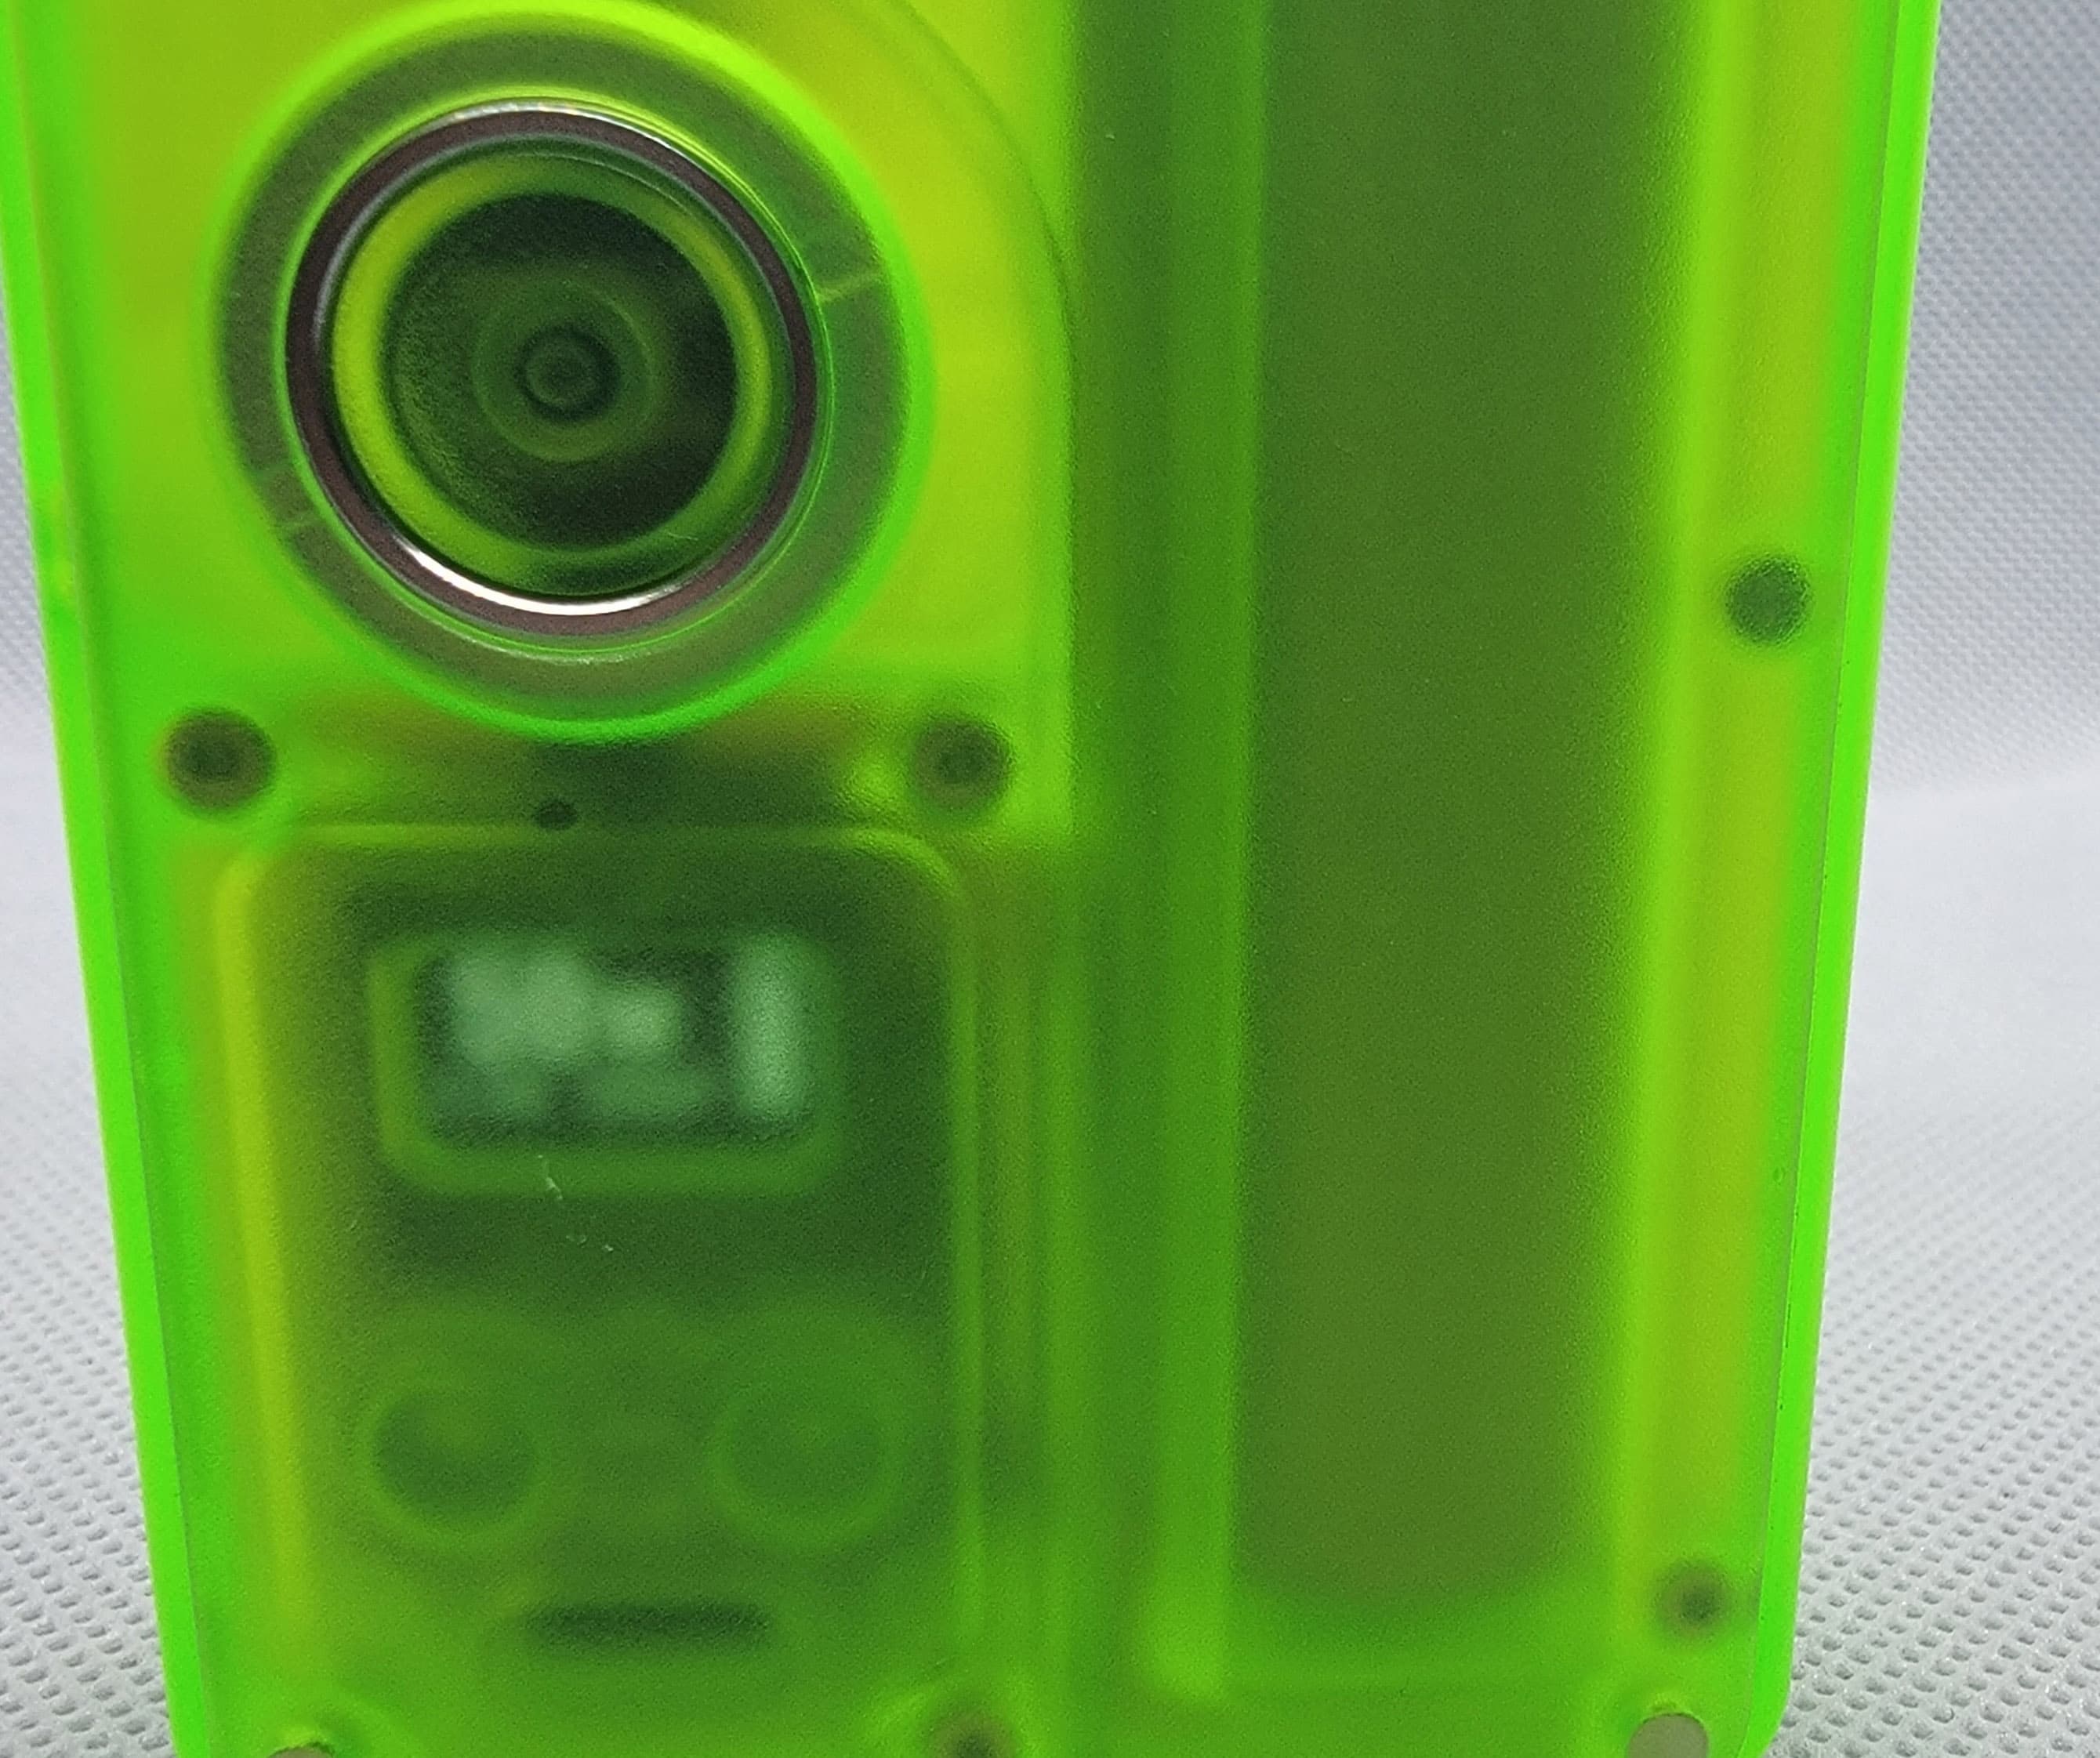
Firing button, up/down adjustment buttons, 5mm X19mm OLED display, and USB-C charging port …
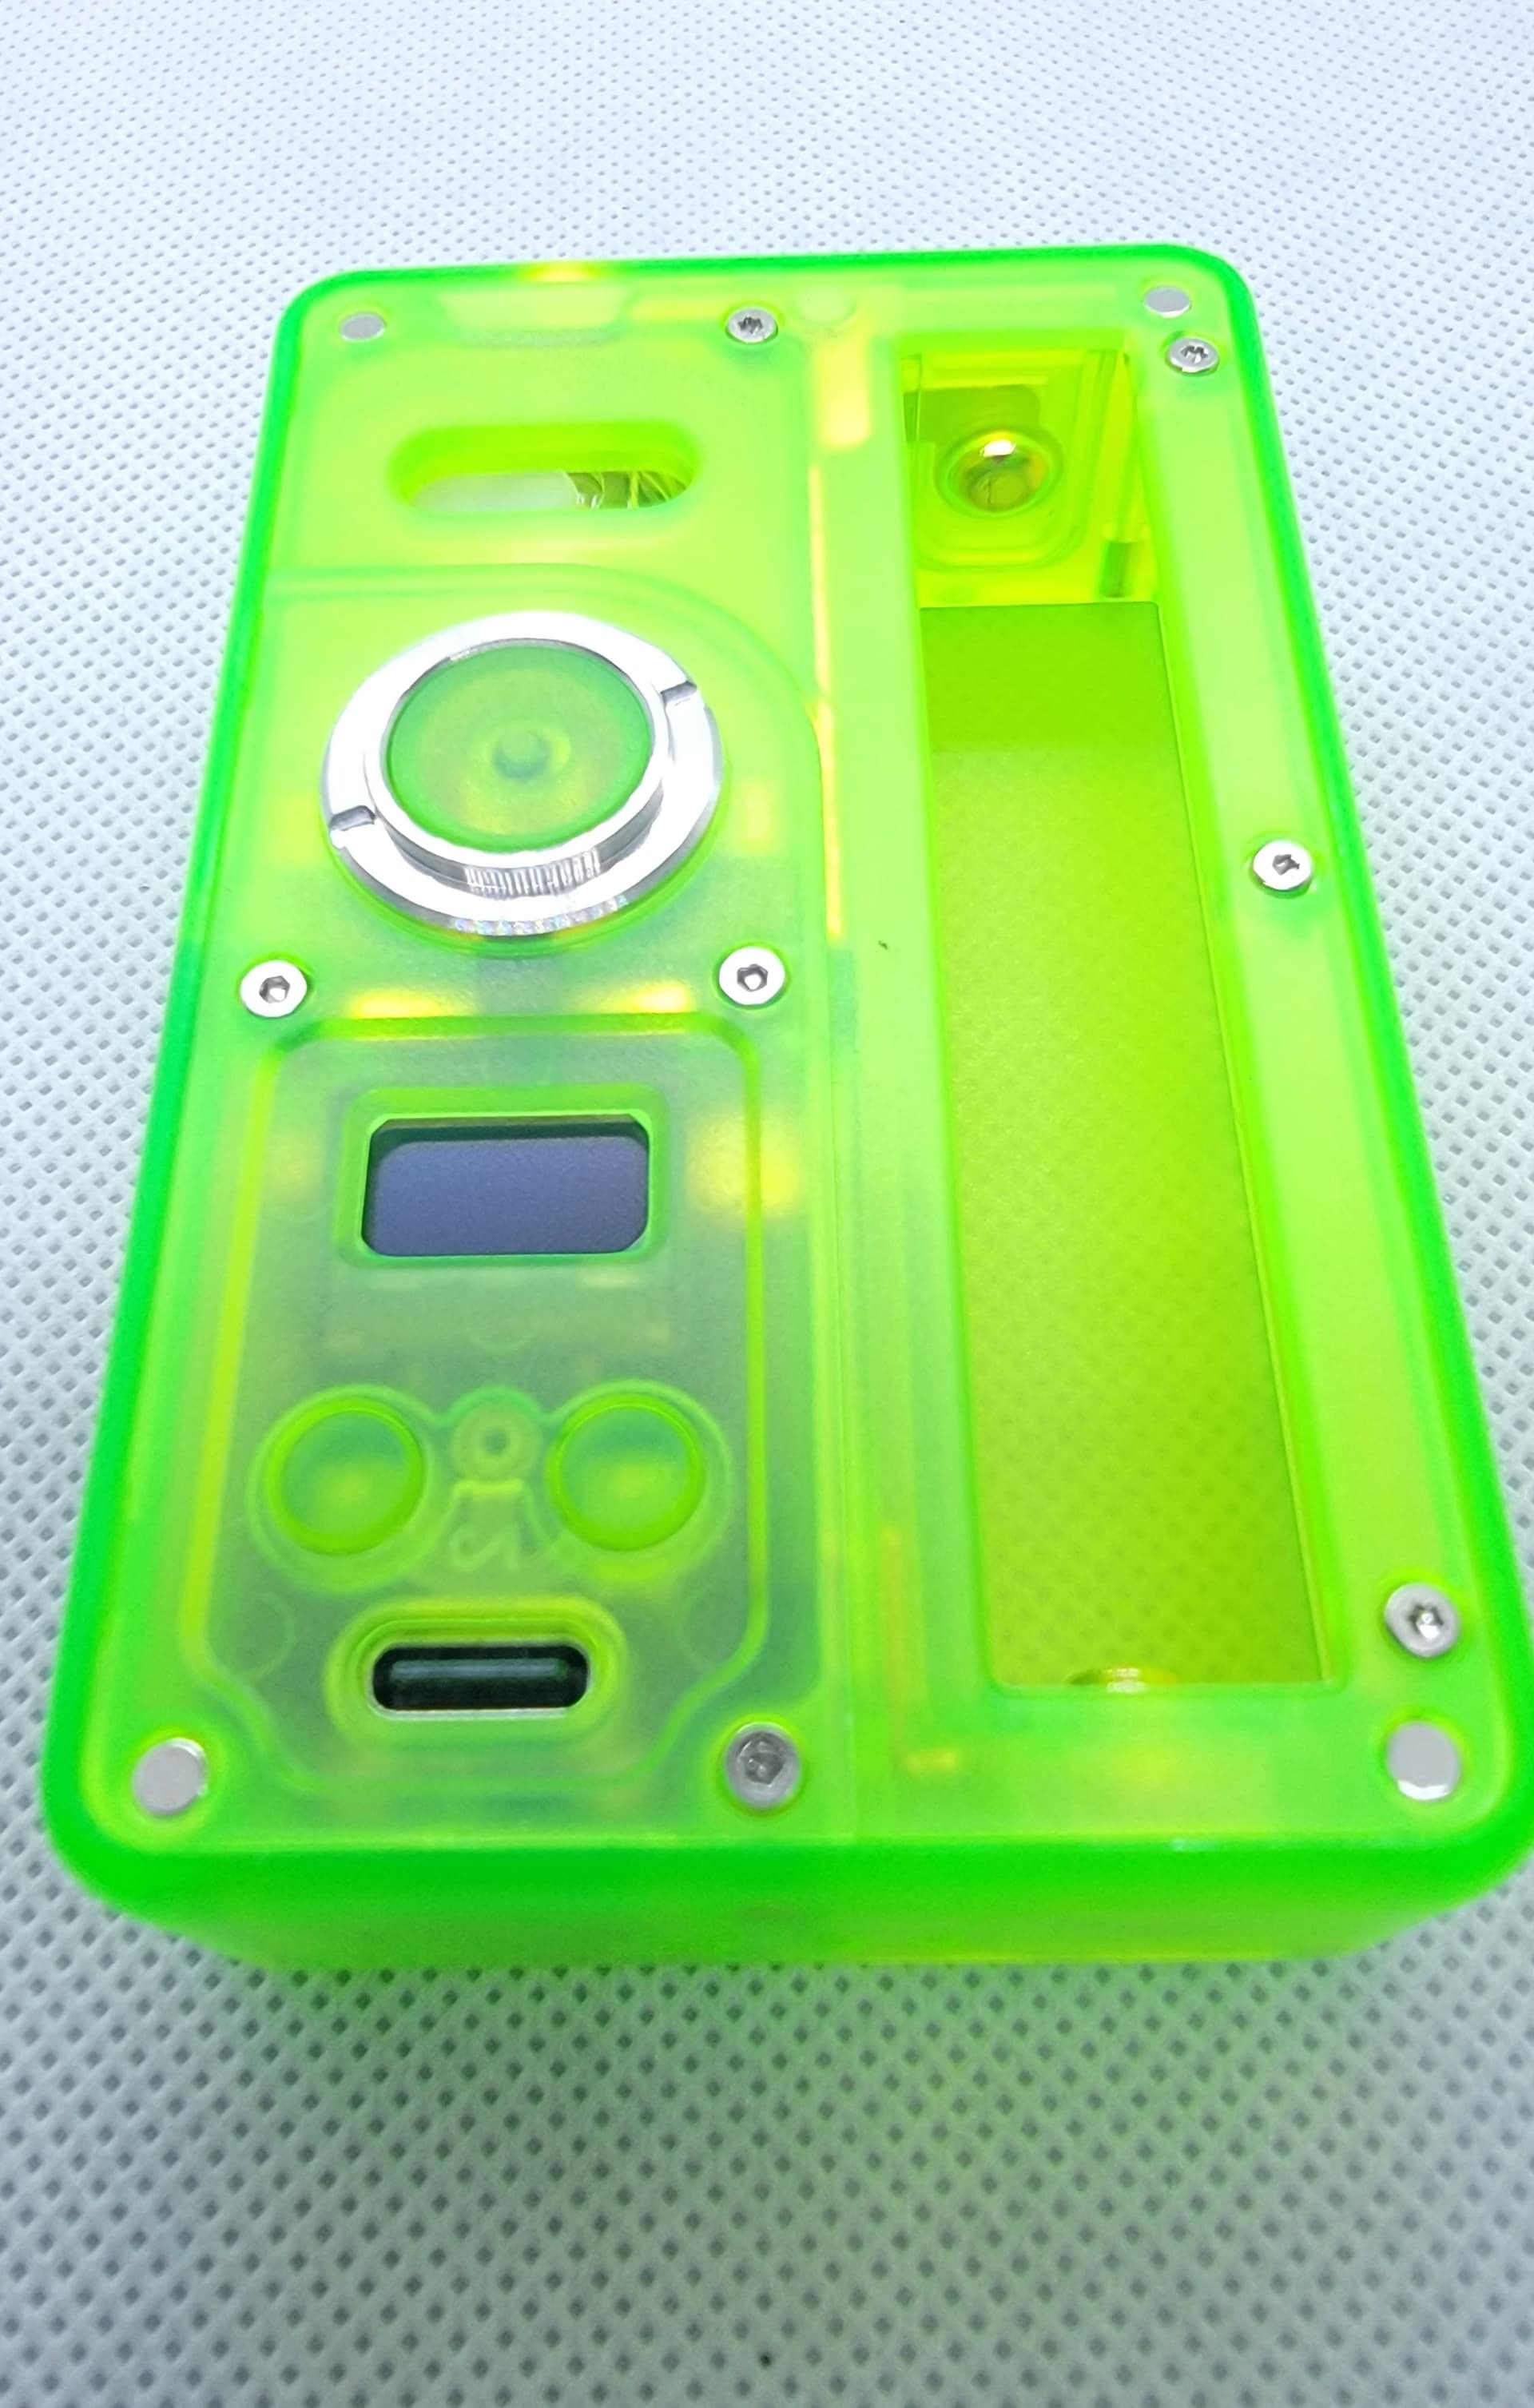
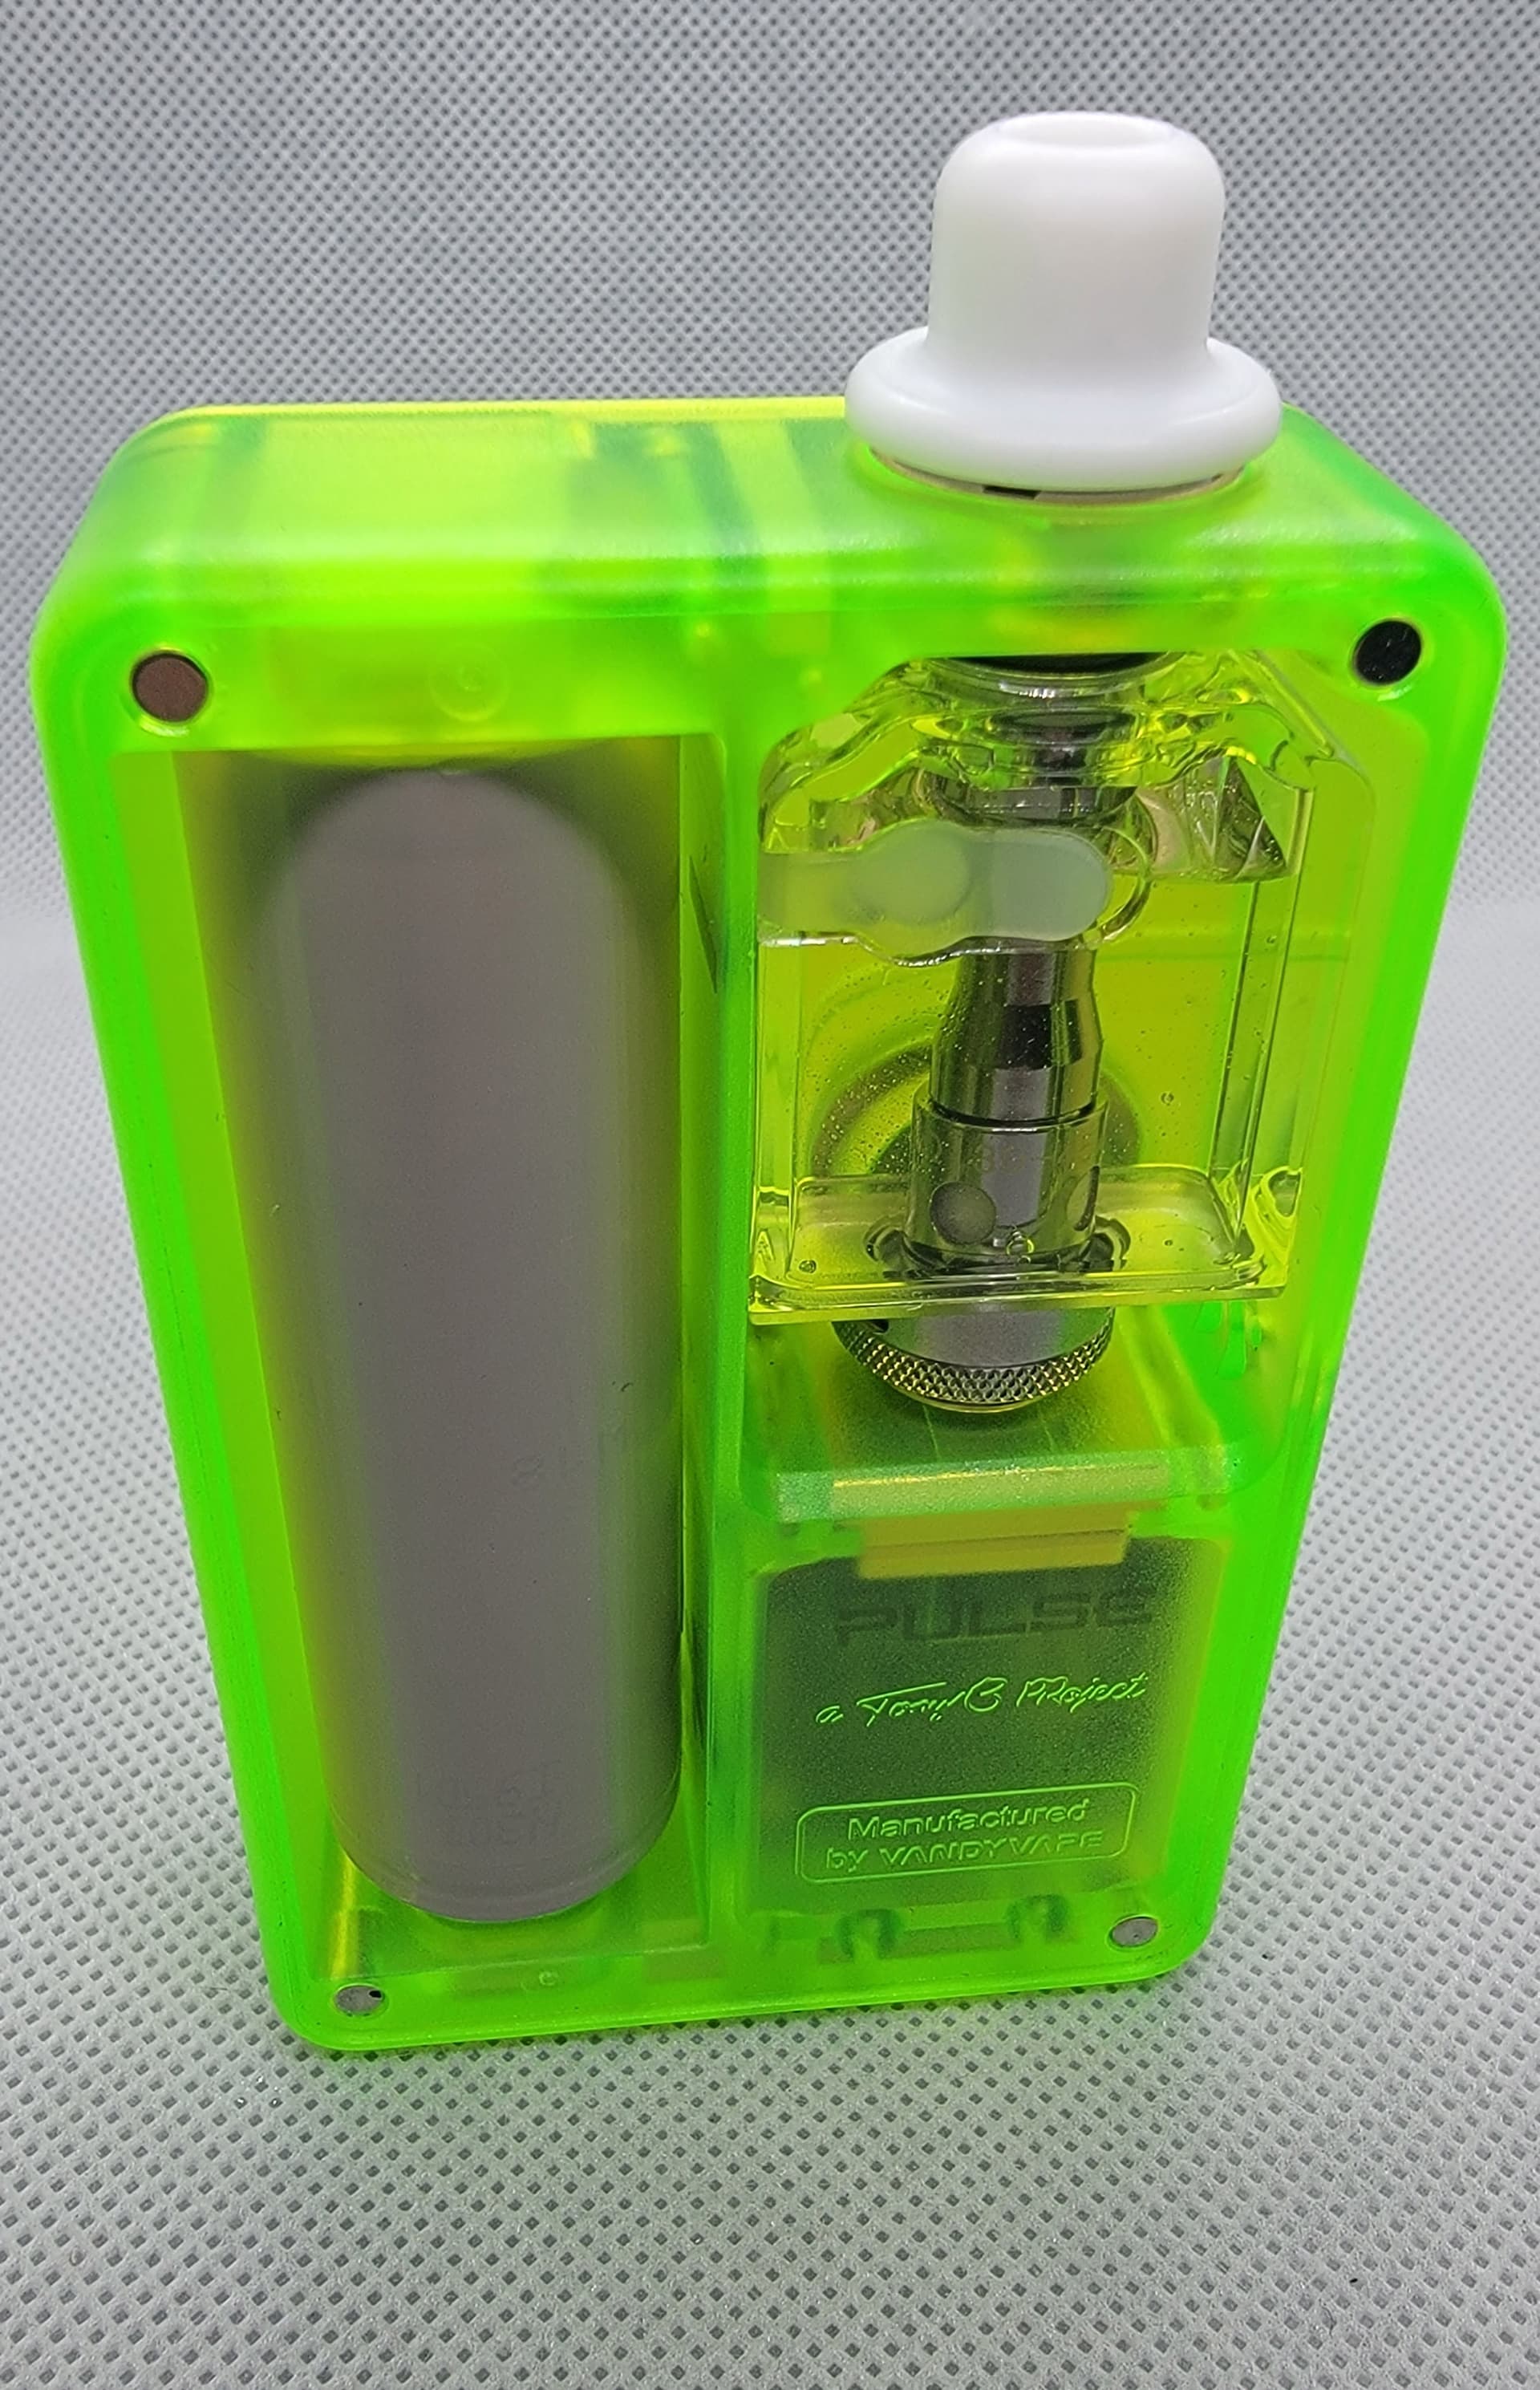
Both the front and rear have removable panels with 4 magnets that hold them snugly in place …

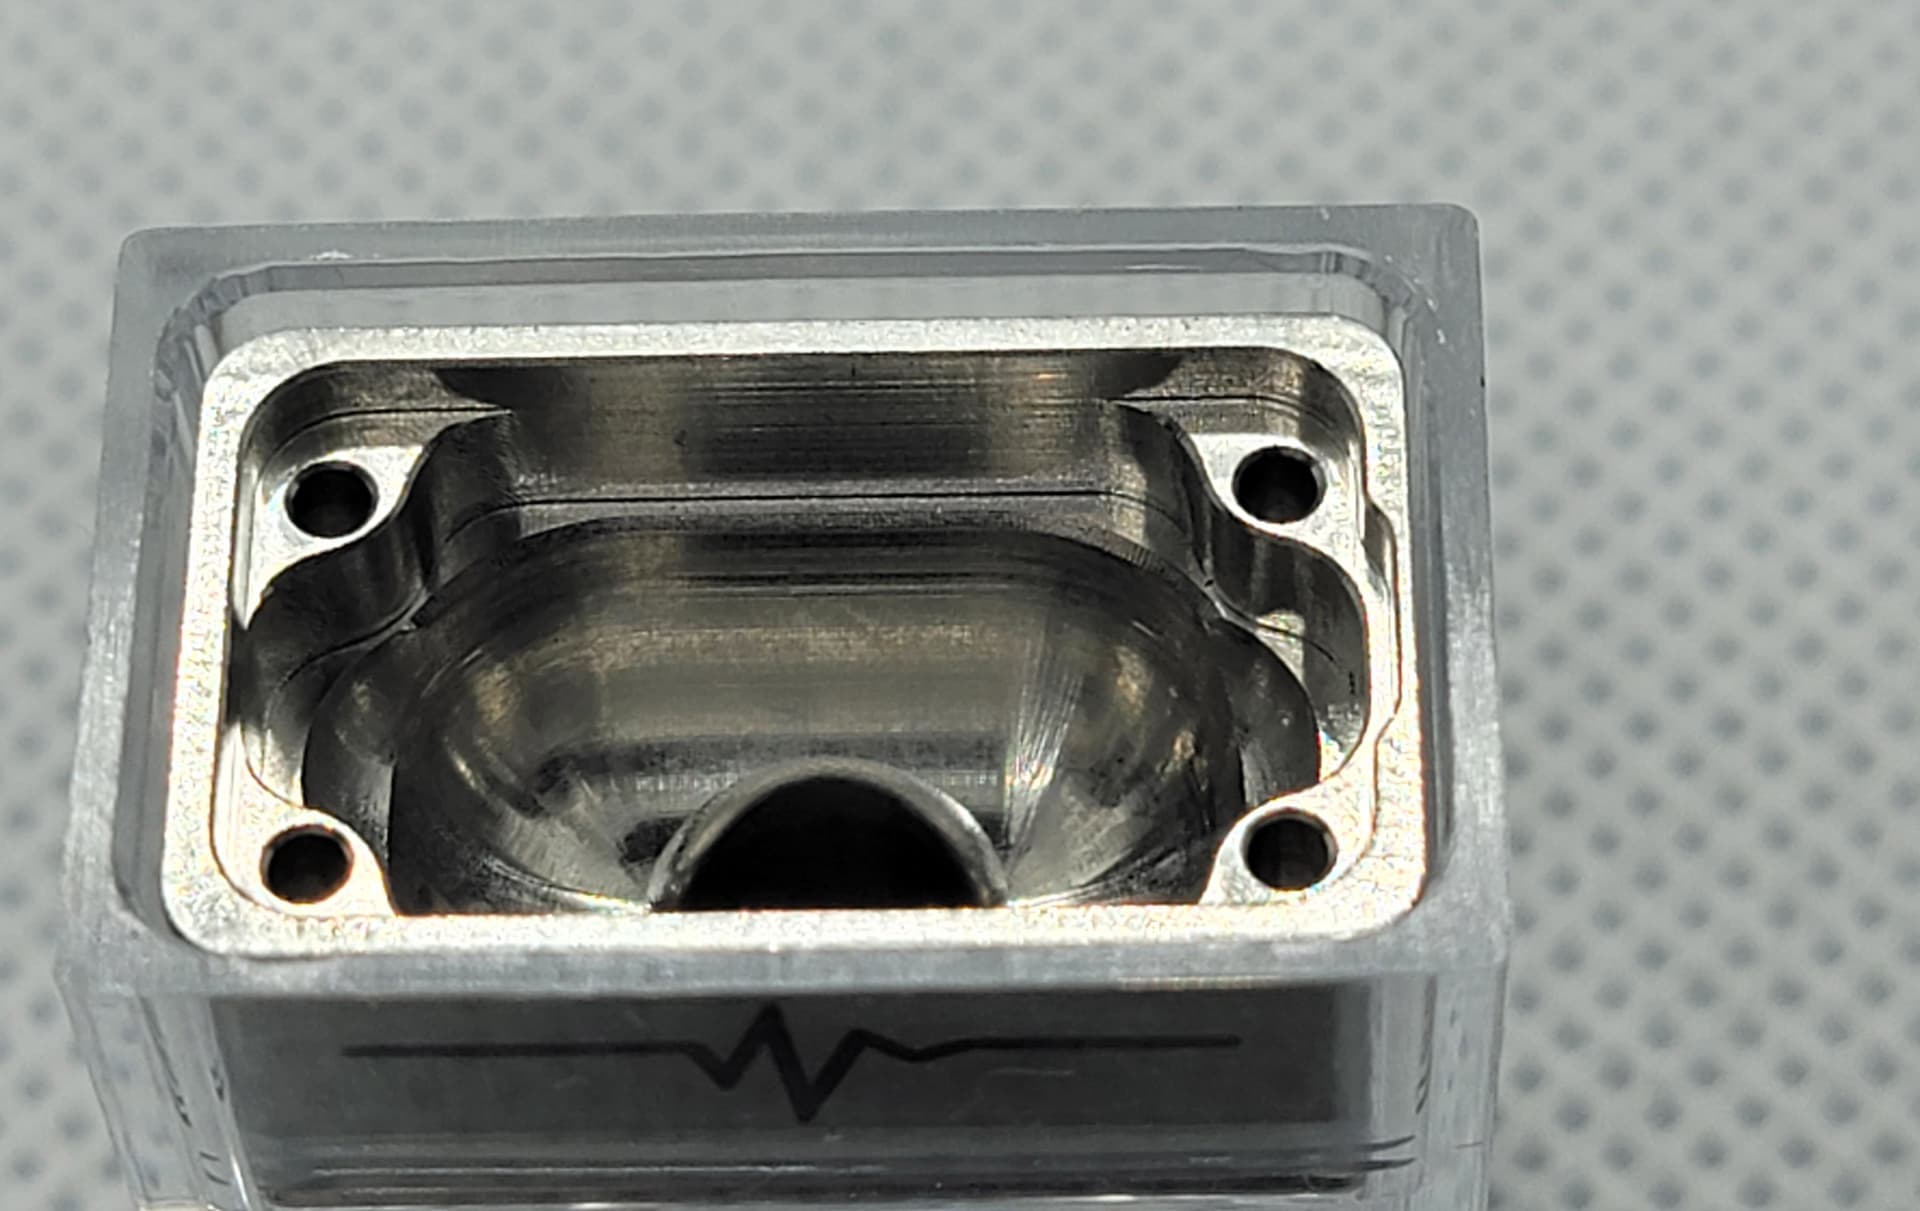
Removable top retaining screw, and chamber airflow venting ports …
Visible internals, and snug lid magnet adhesion …
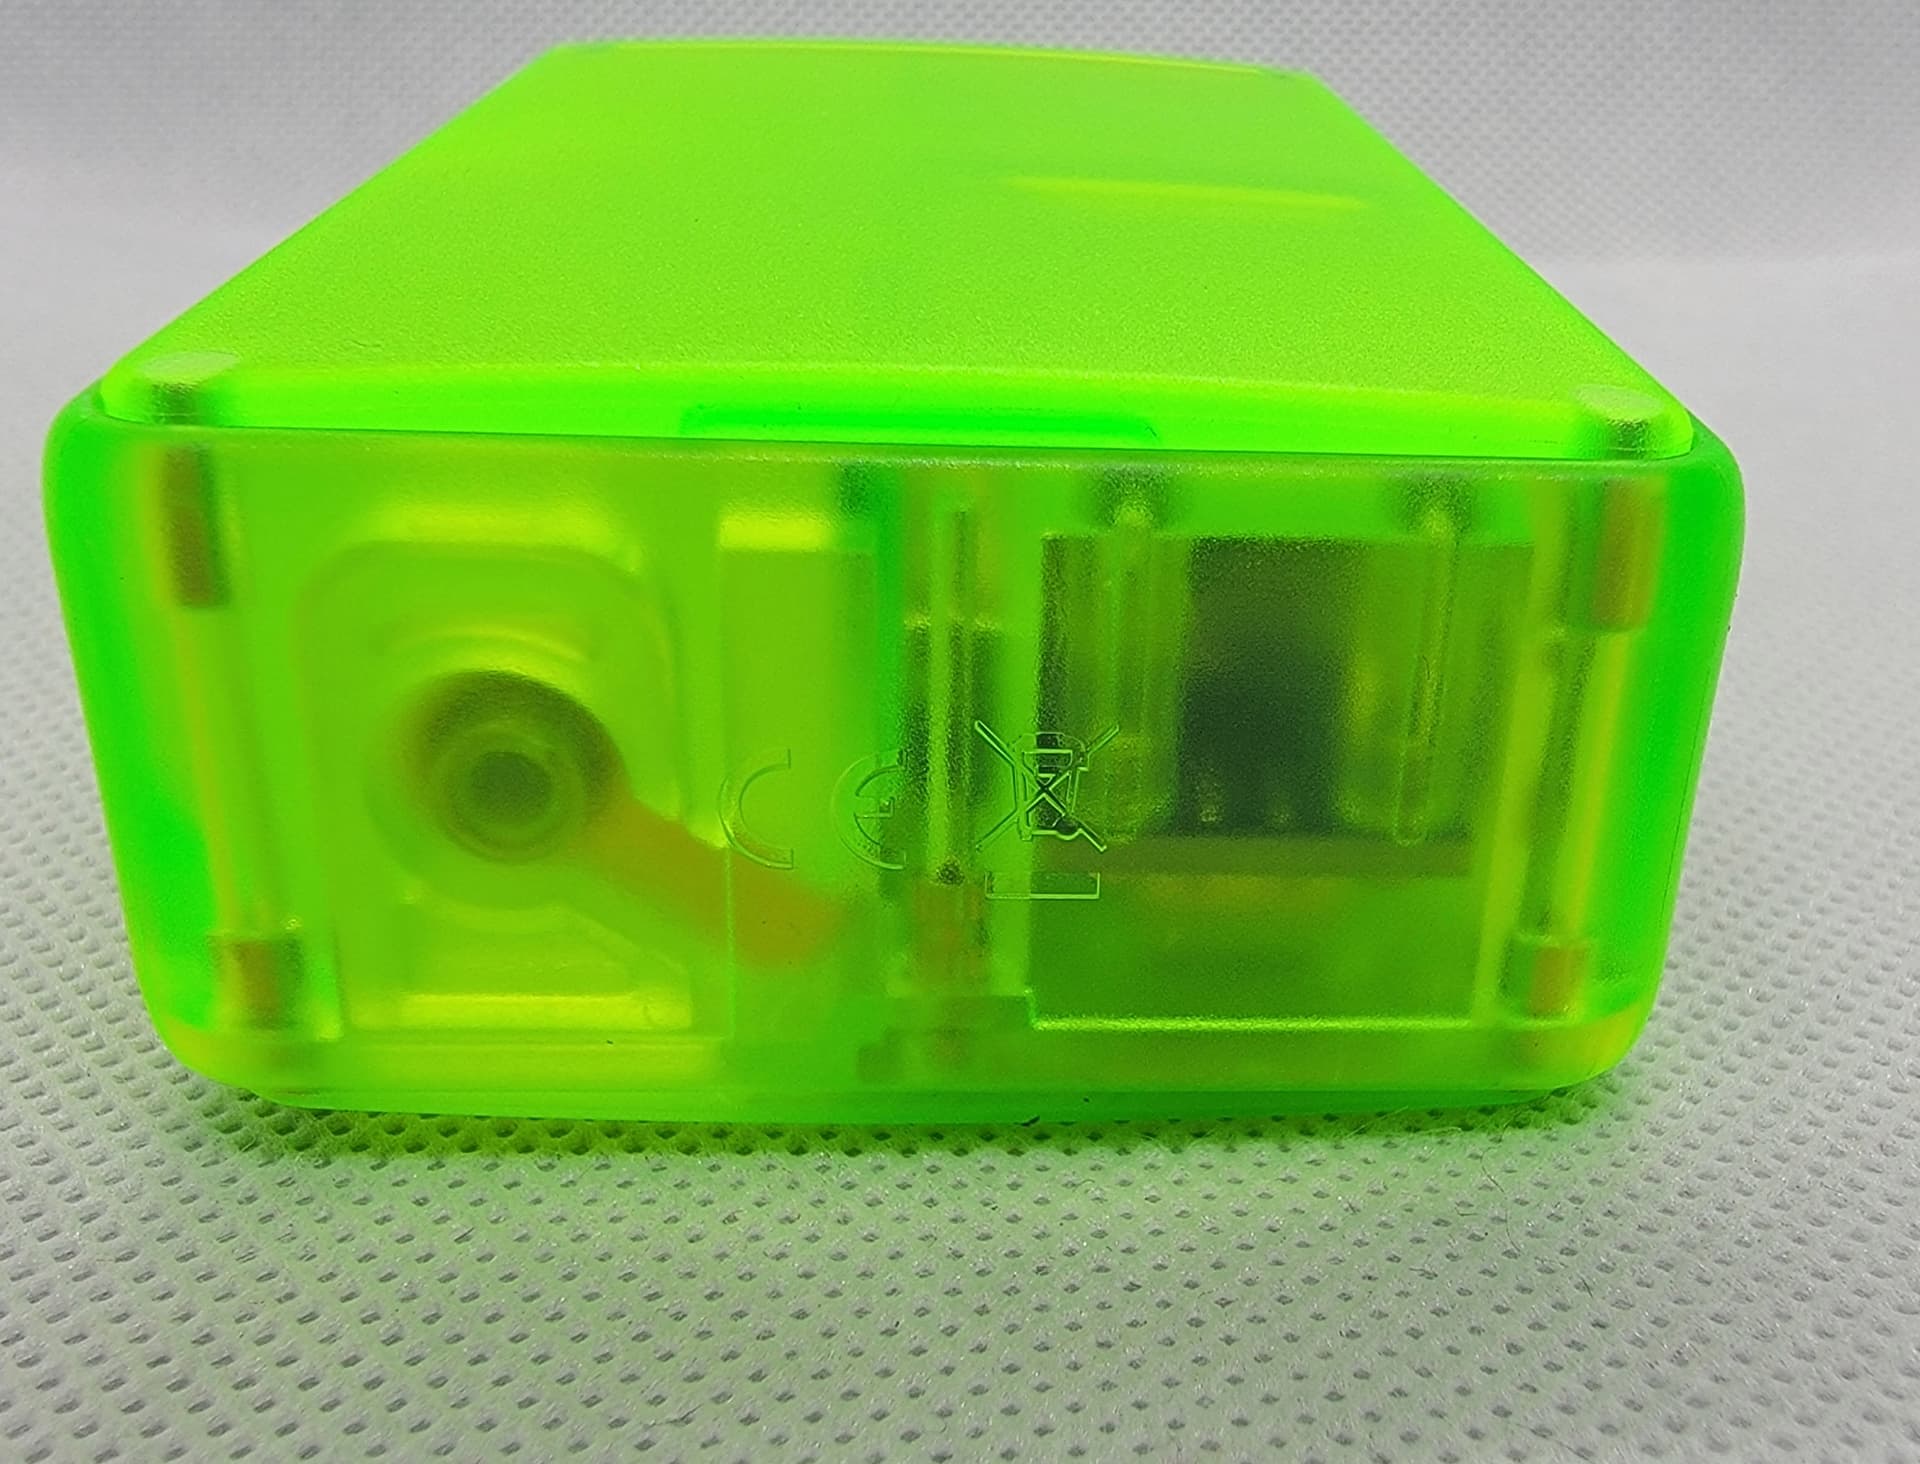
Opaque, but still visible internals …

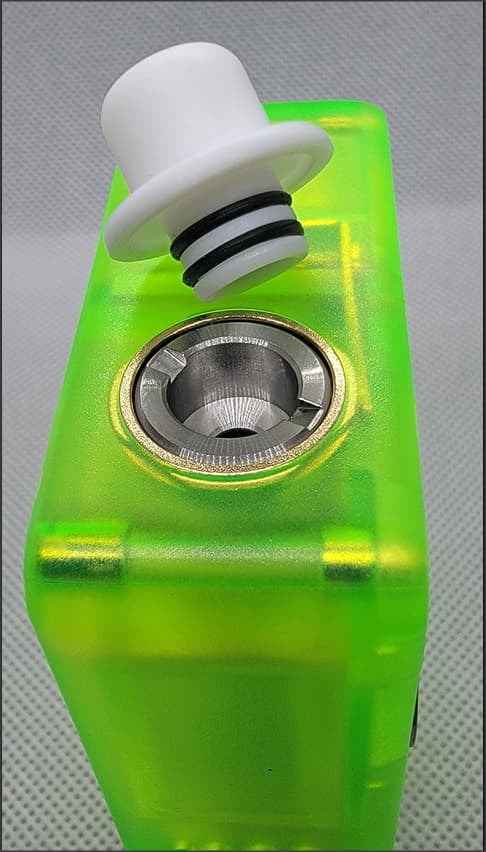
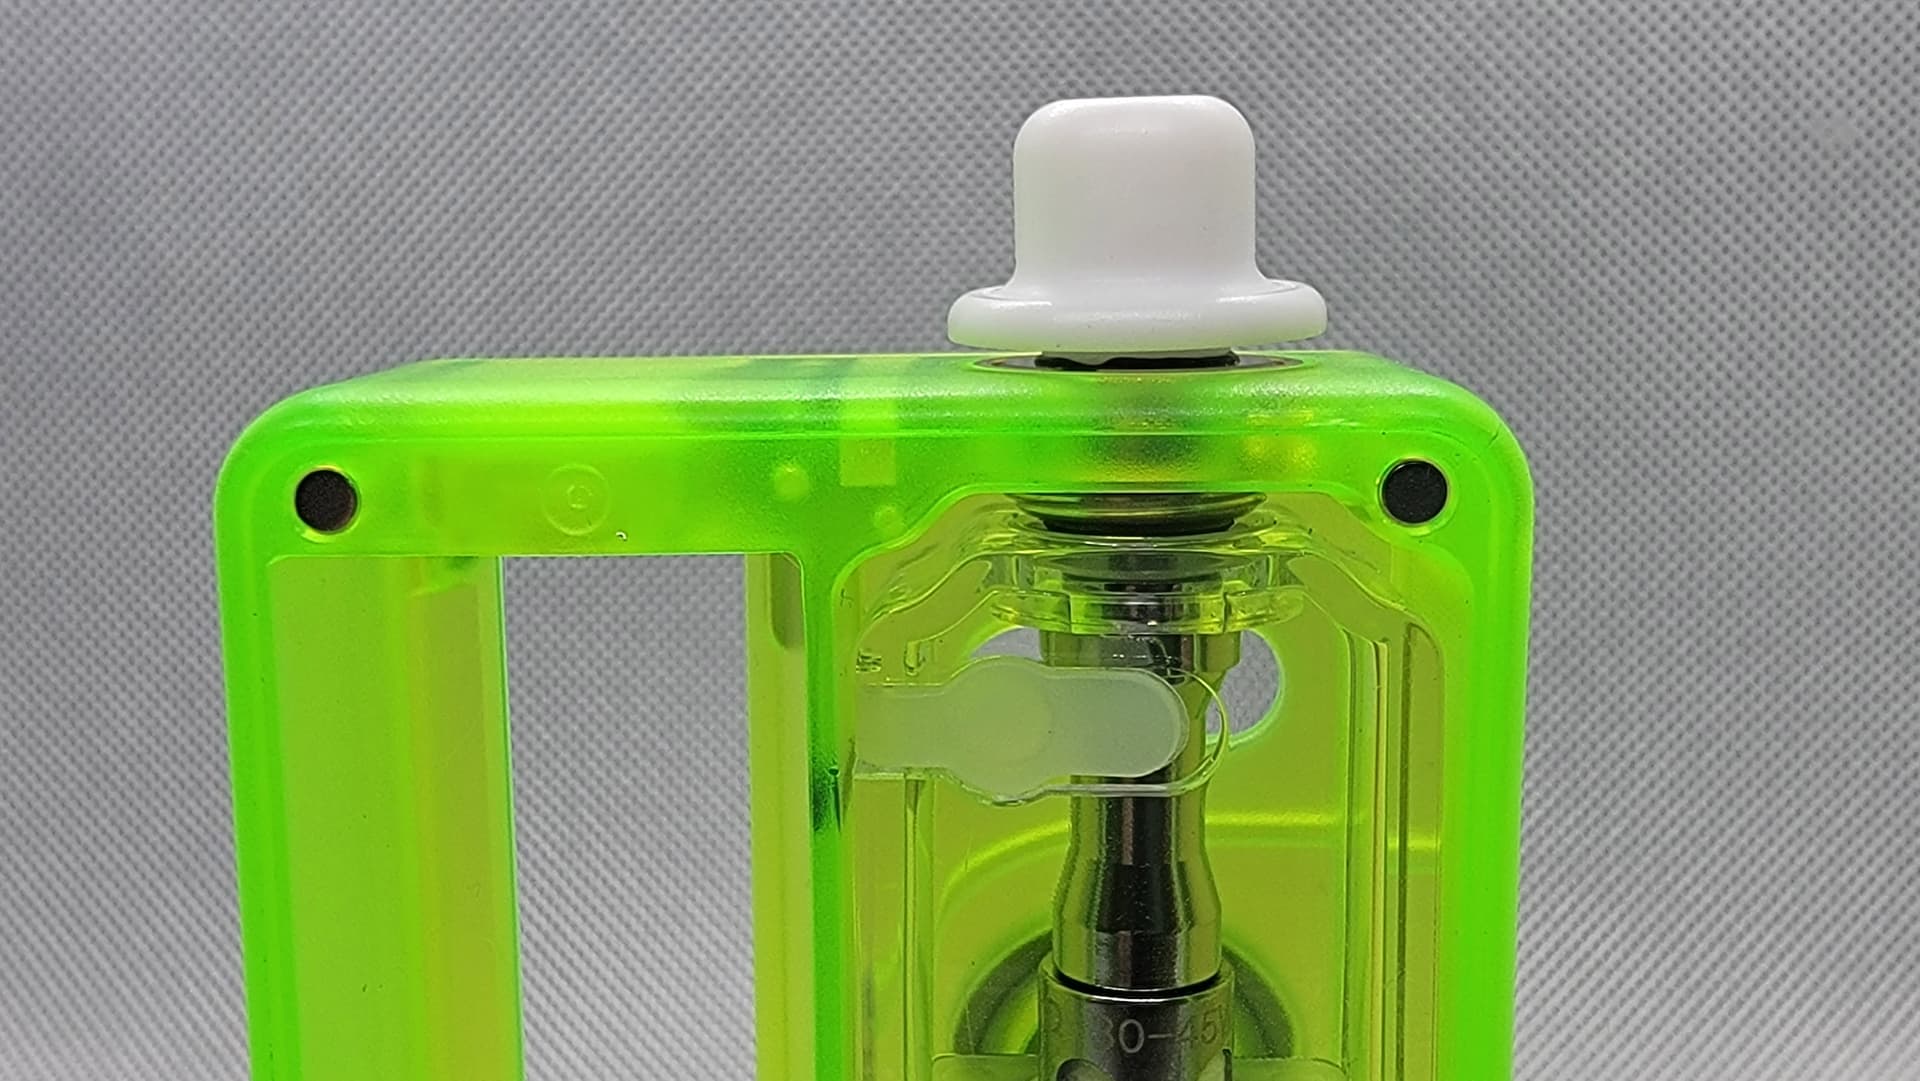
Moving on to the top, and one of my cons, is the love/hate drip tip …

Despite lubing it up, it rarely wanted to go fully flush …
Clearly marked polarity, tight spring loaded battery posts, and an adapter if you want to go below a 21700, which is always my choice, on single batters …
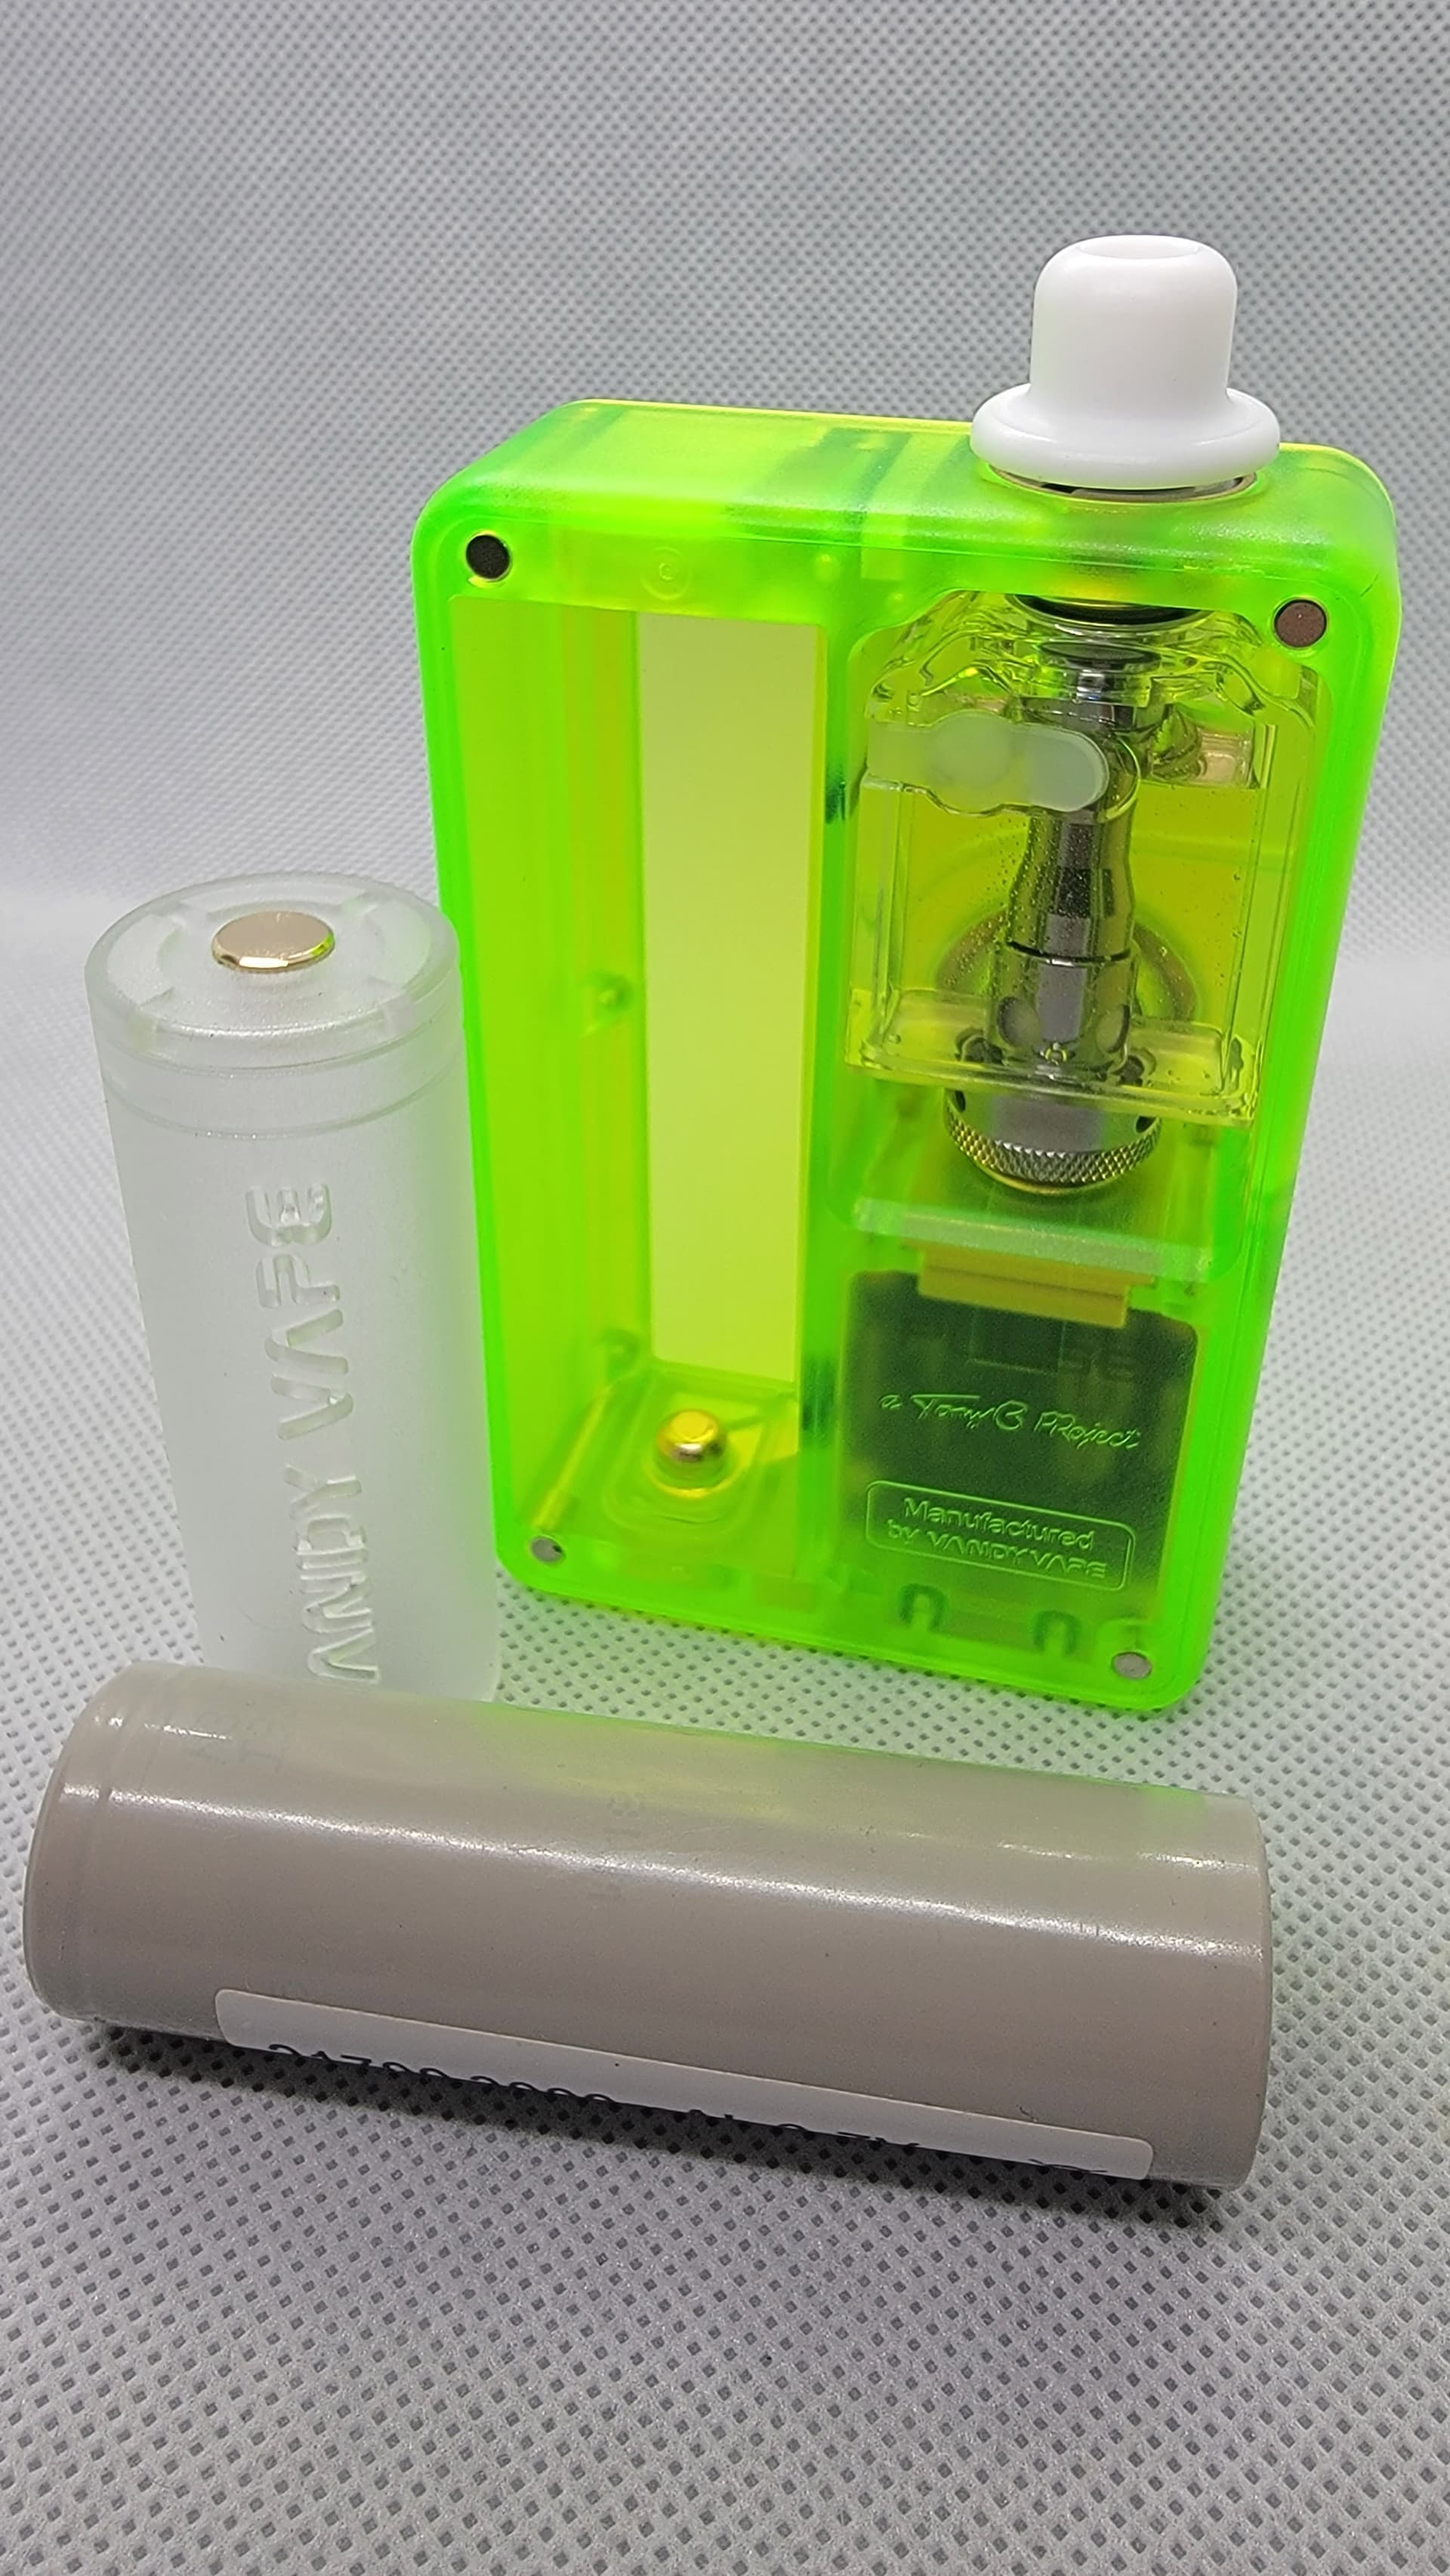
My 21700 was snug as a bug in a rug, no rattles …
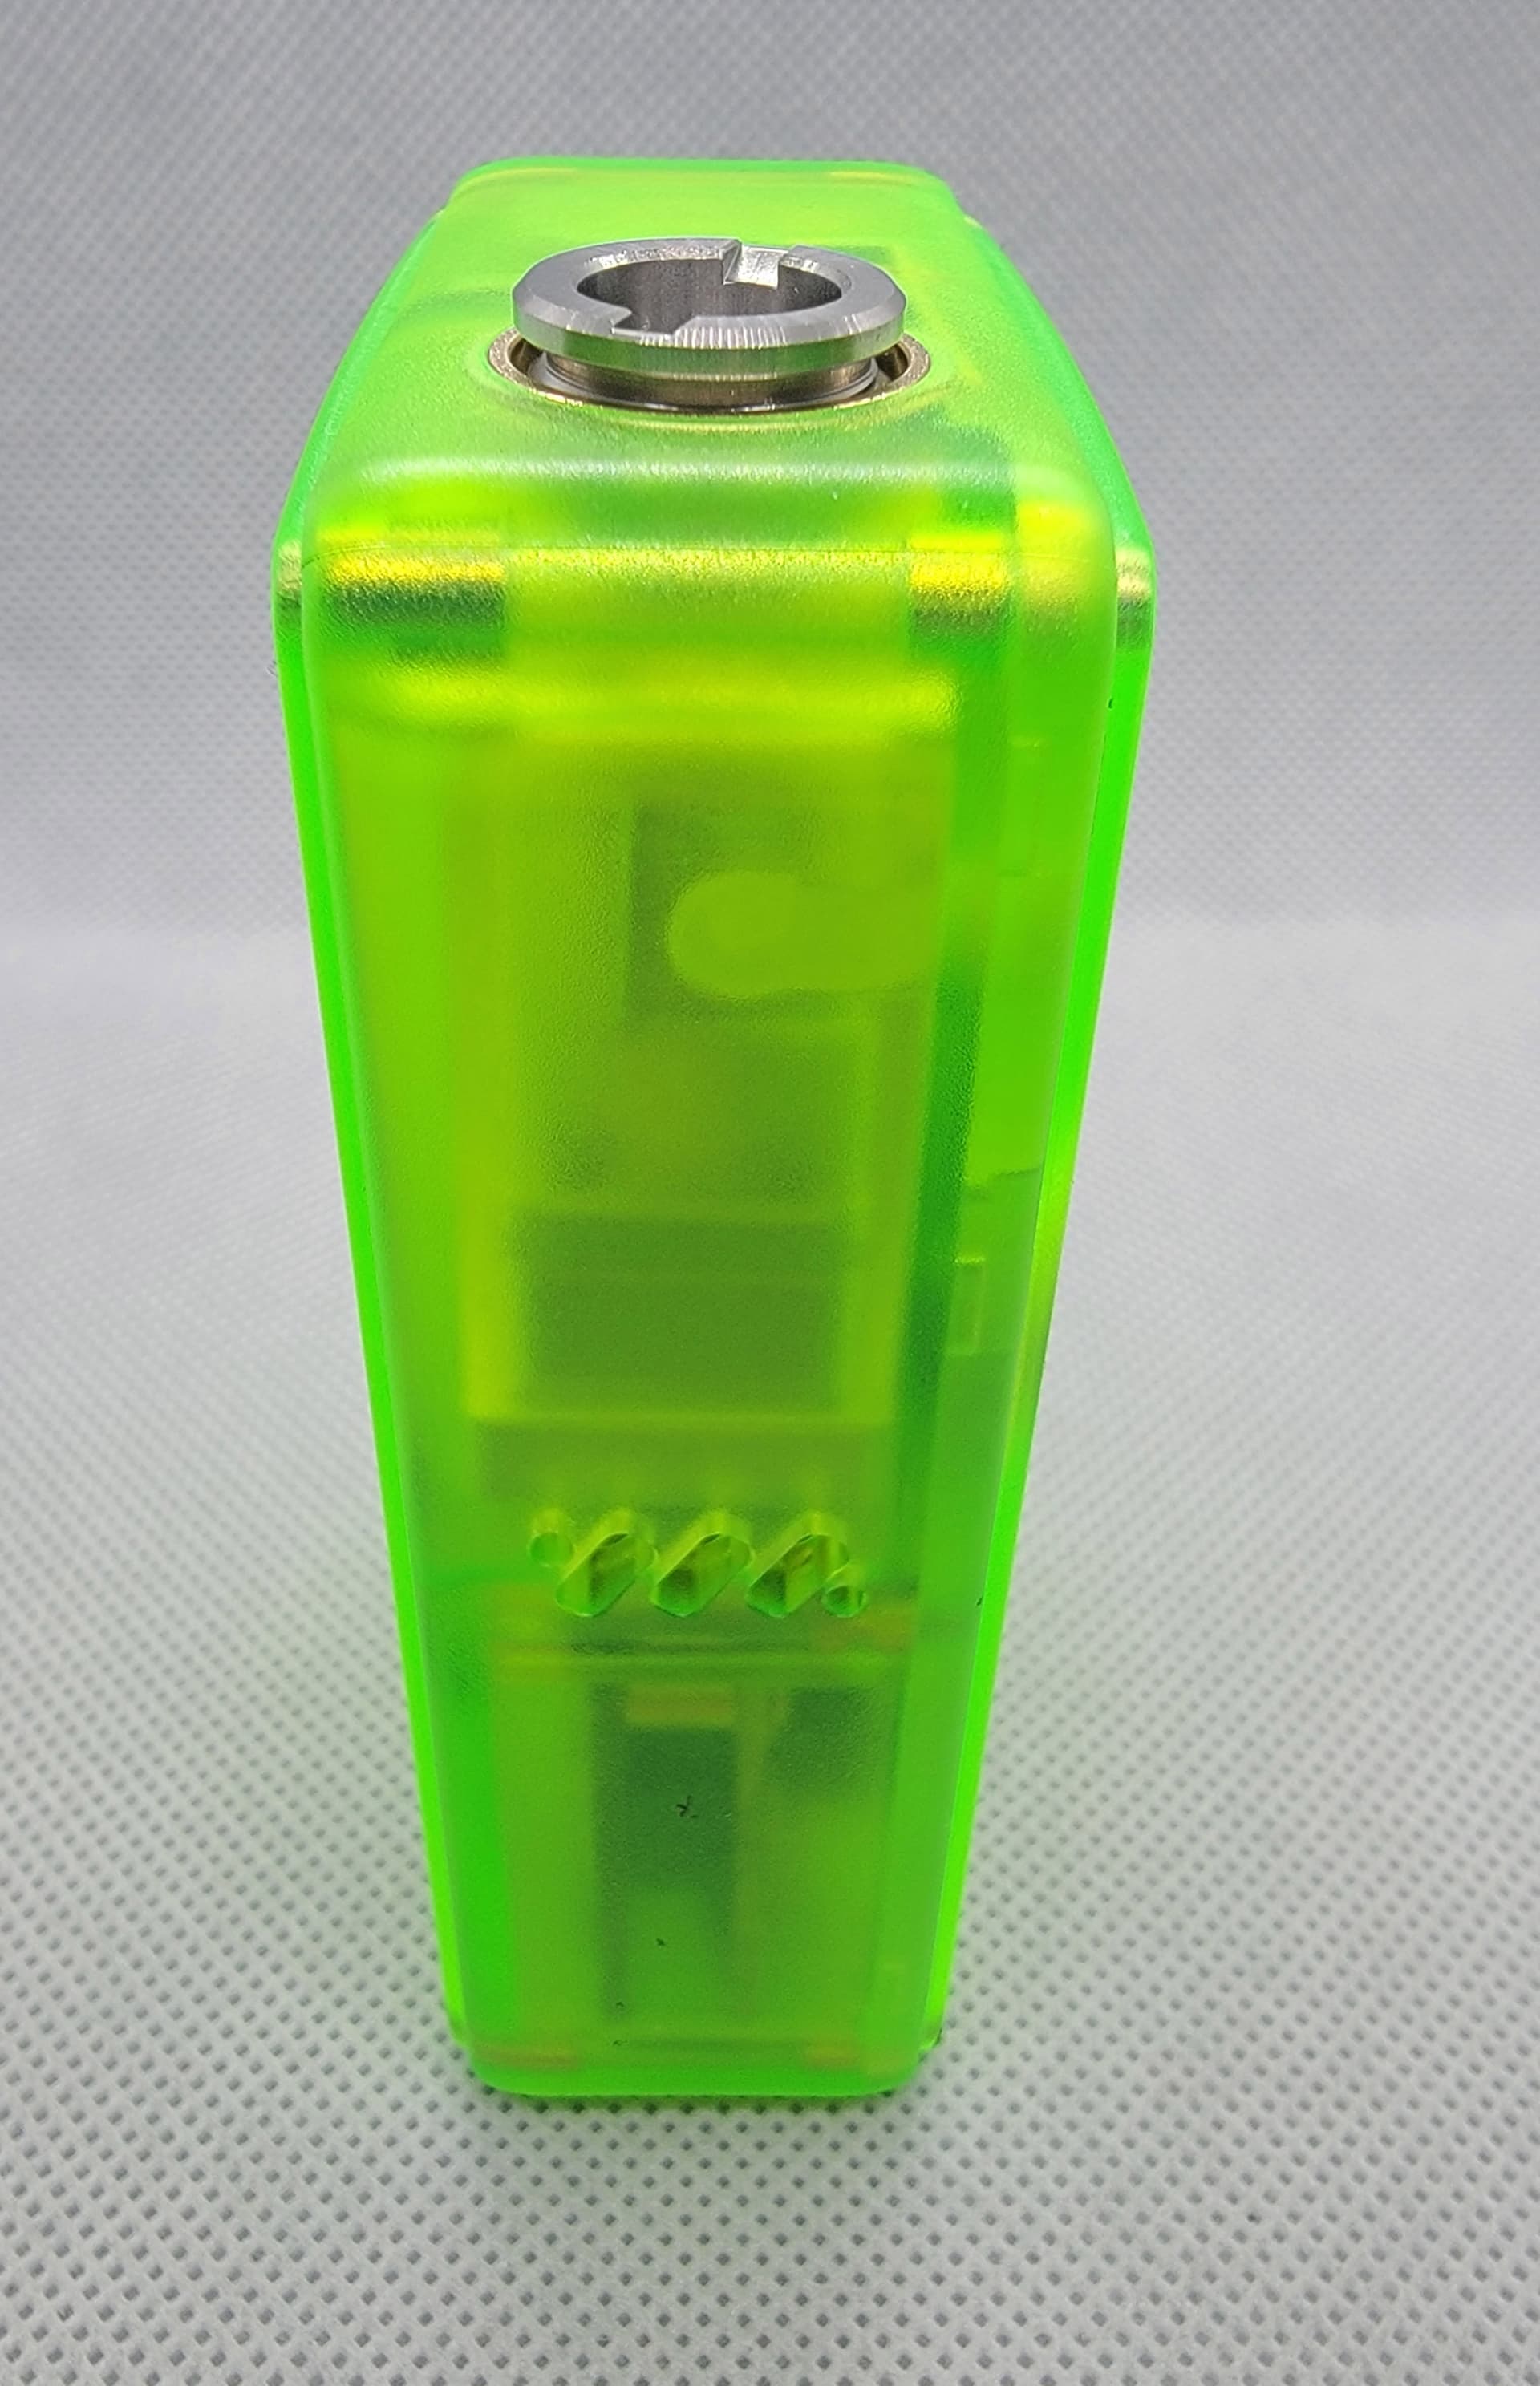
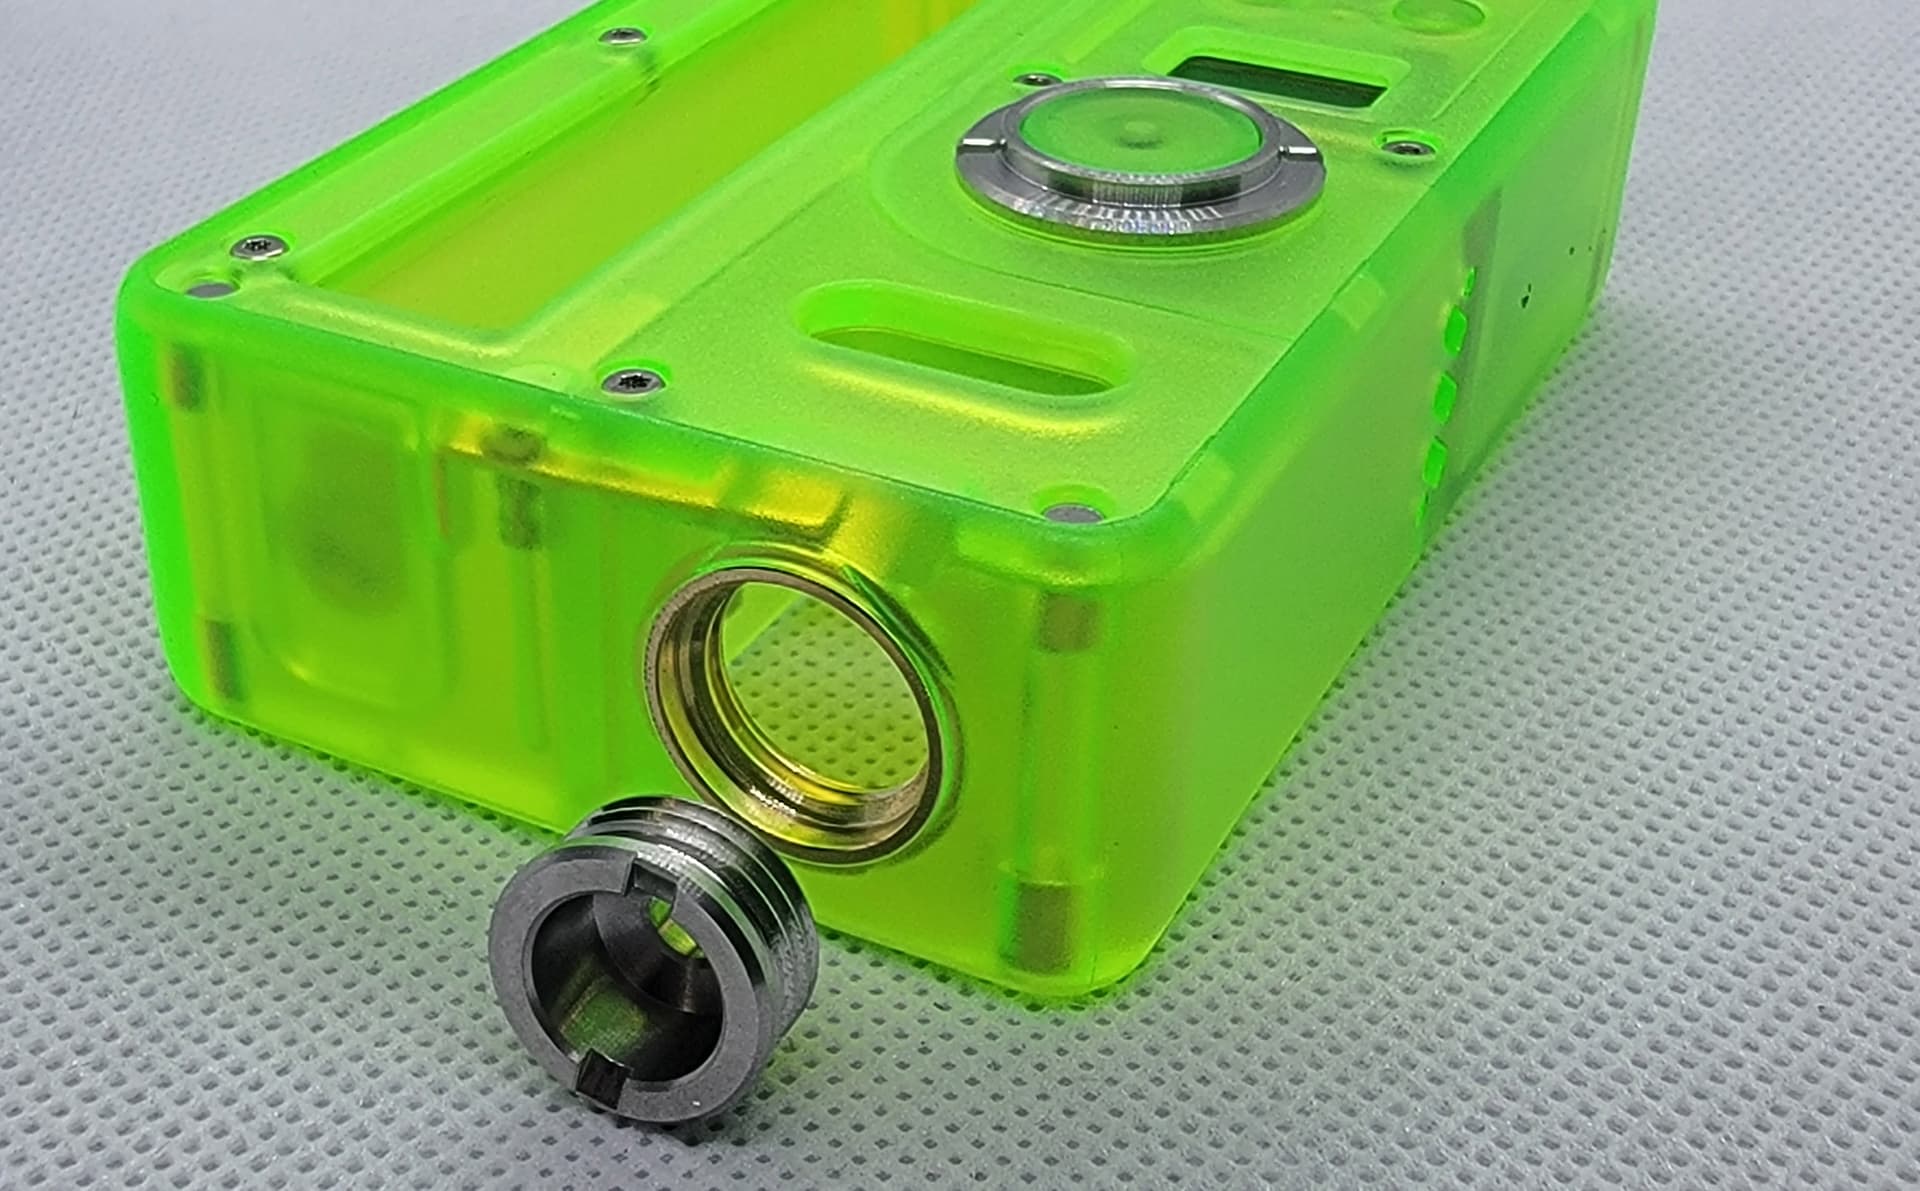
Now onto the first use for the Multi Tool, the ring and firing button …

You can remove and replace the ring and firing button if you wish …
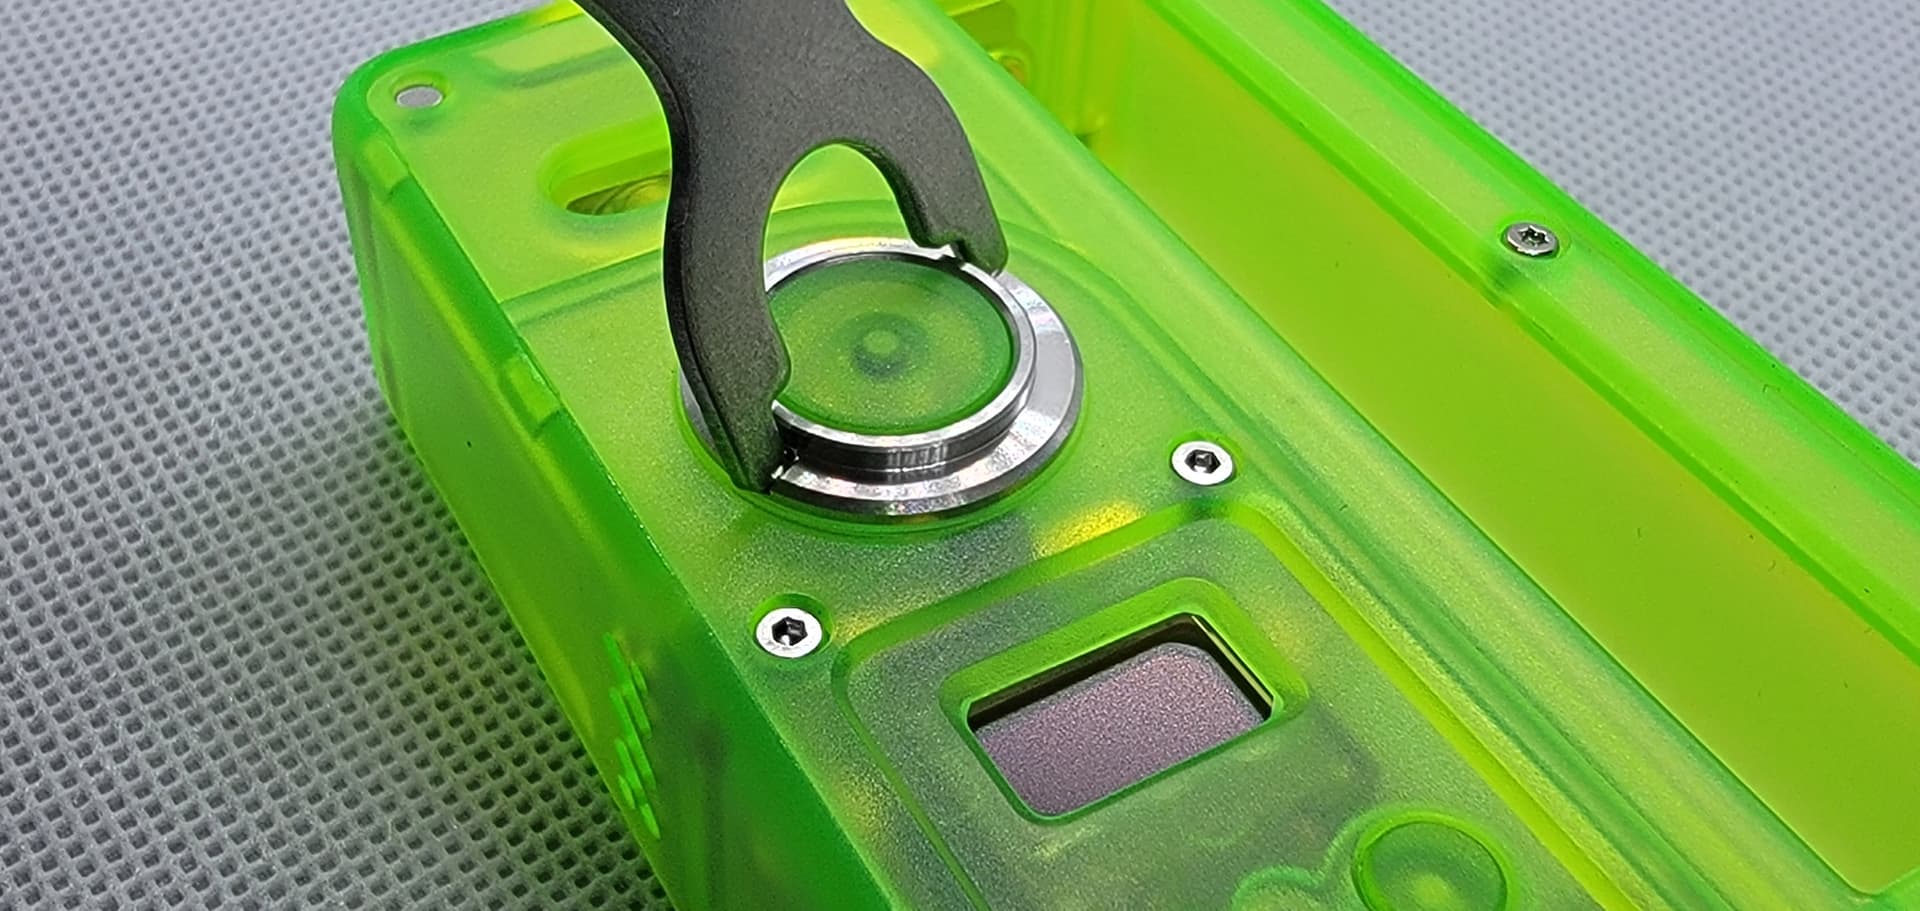

Now onto the second use for the multi tool, getting your vessels in and out …
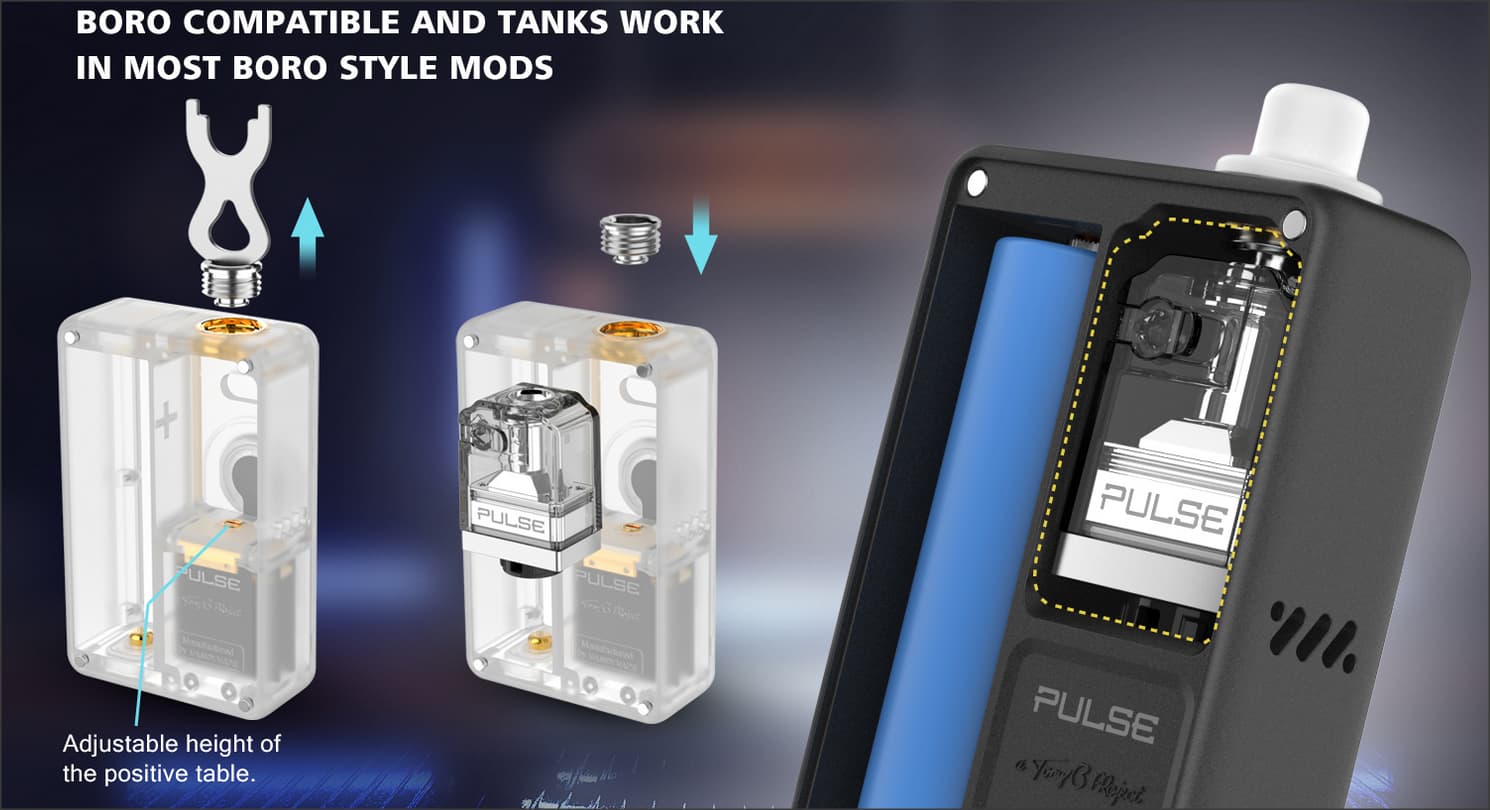
The threading was smooth, and the screw was easily removable …

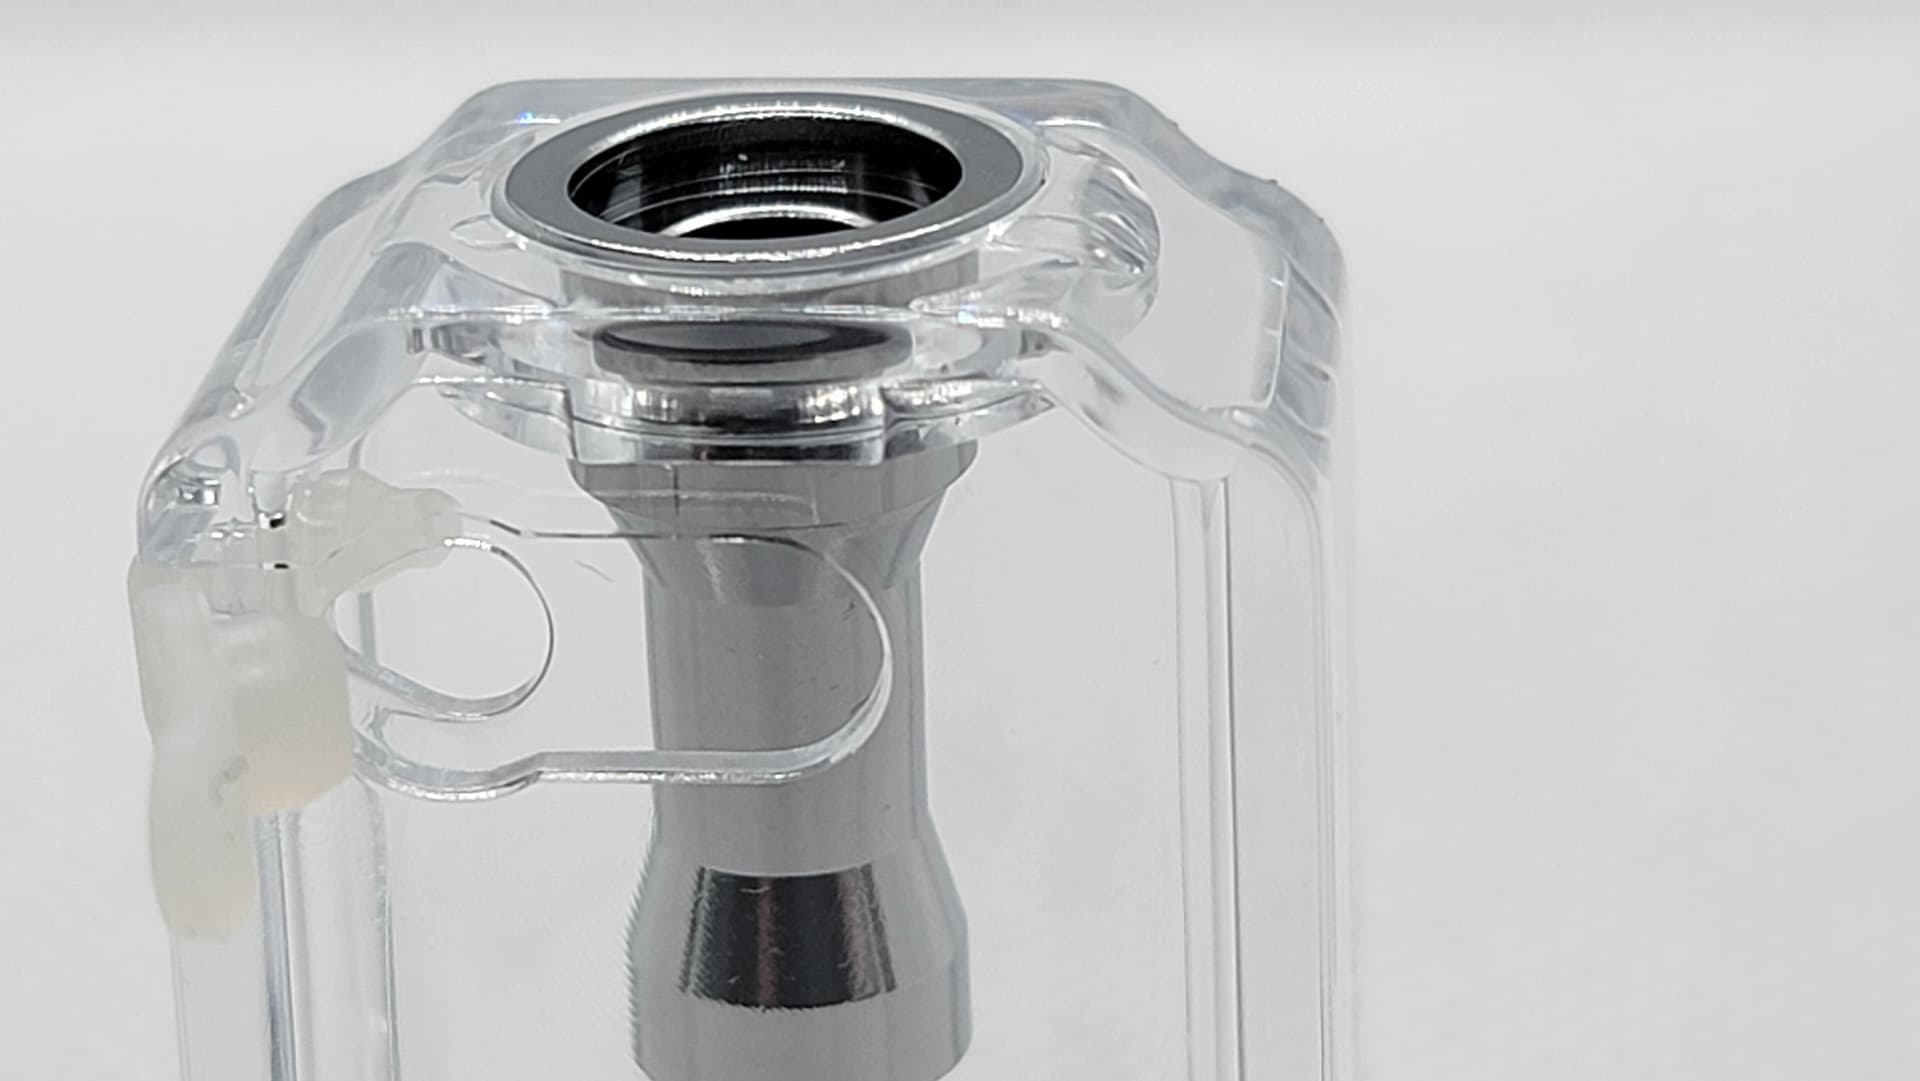
Now that the retaining screw was out, time to move onto your vessels …
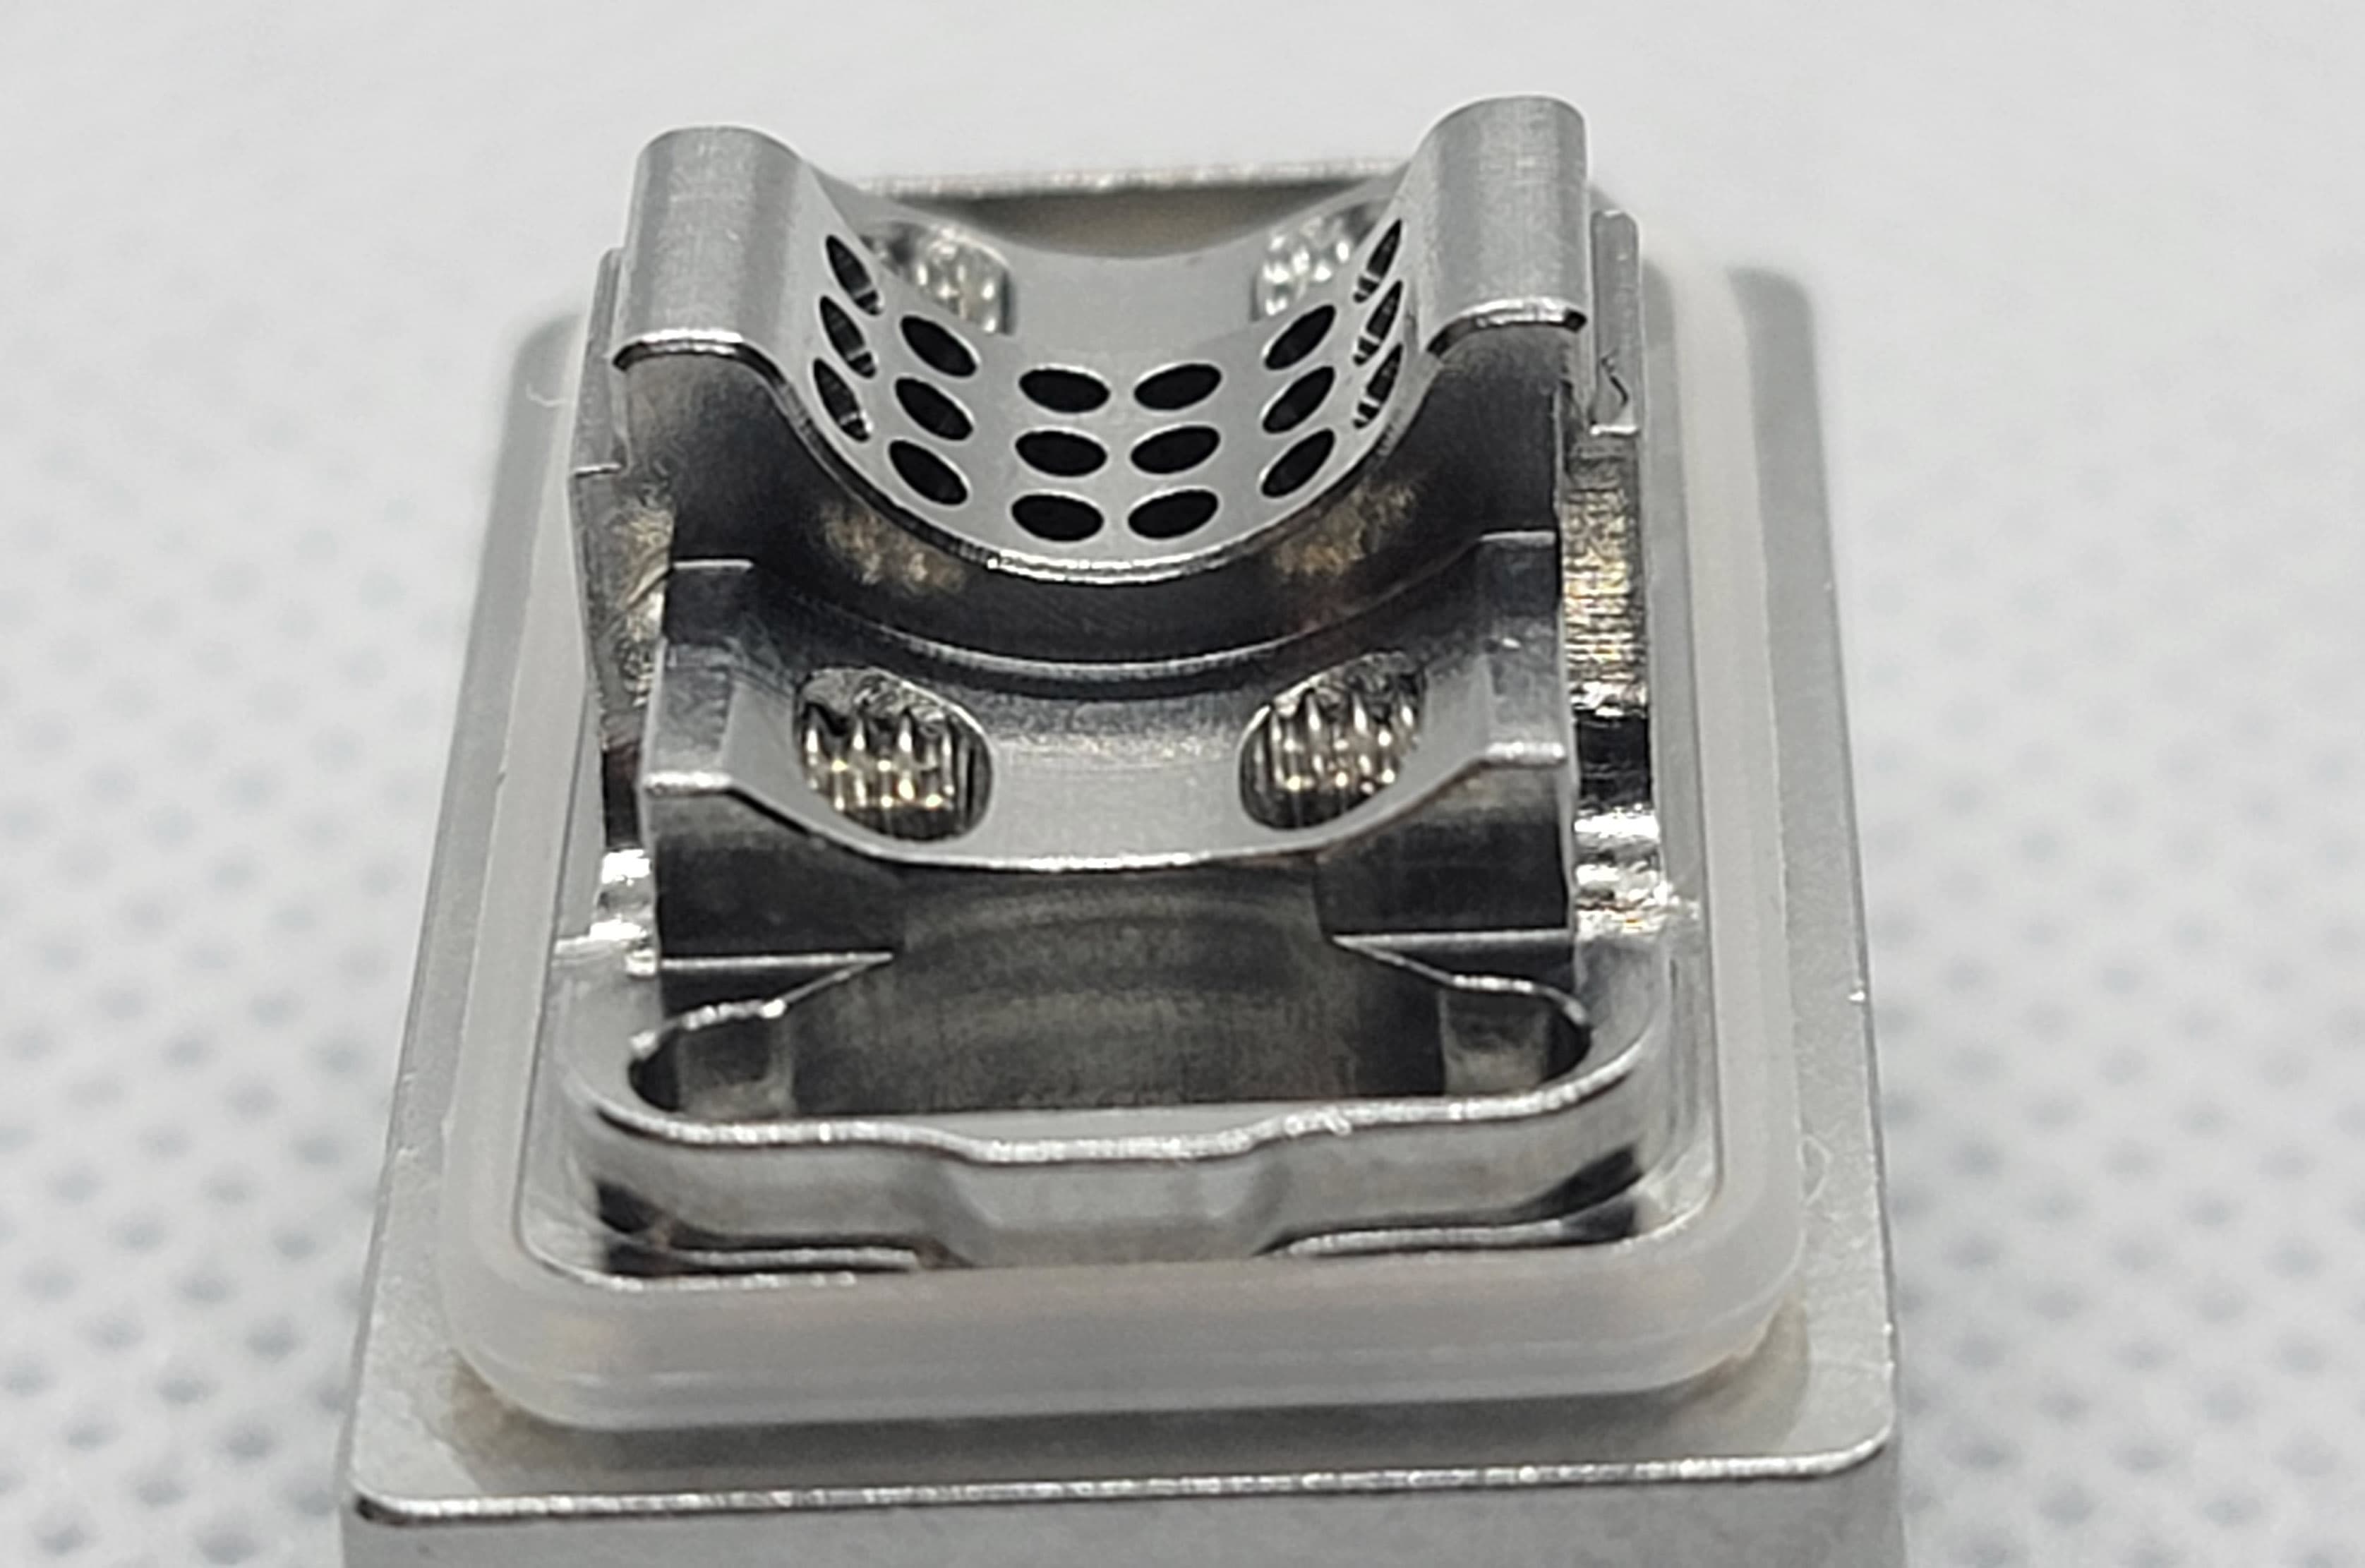
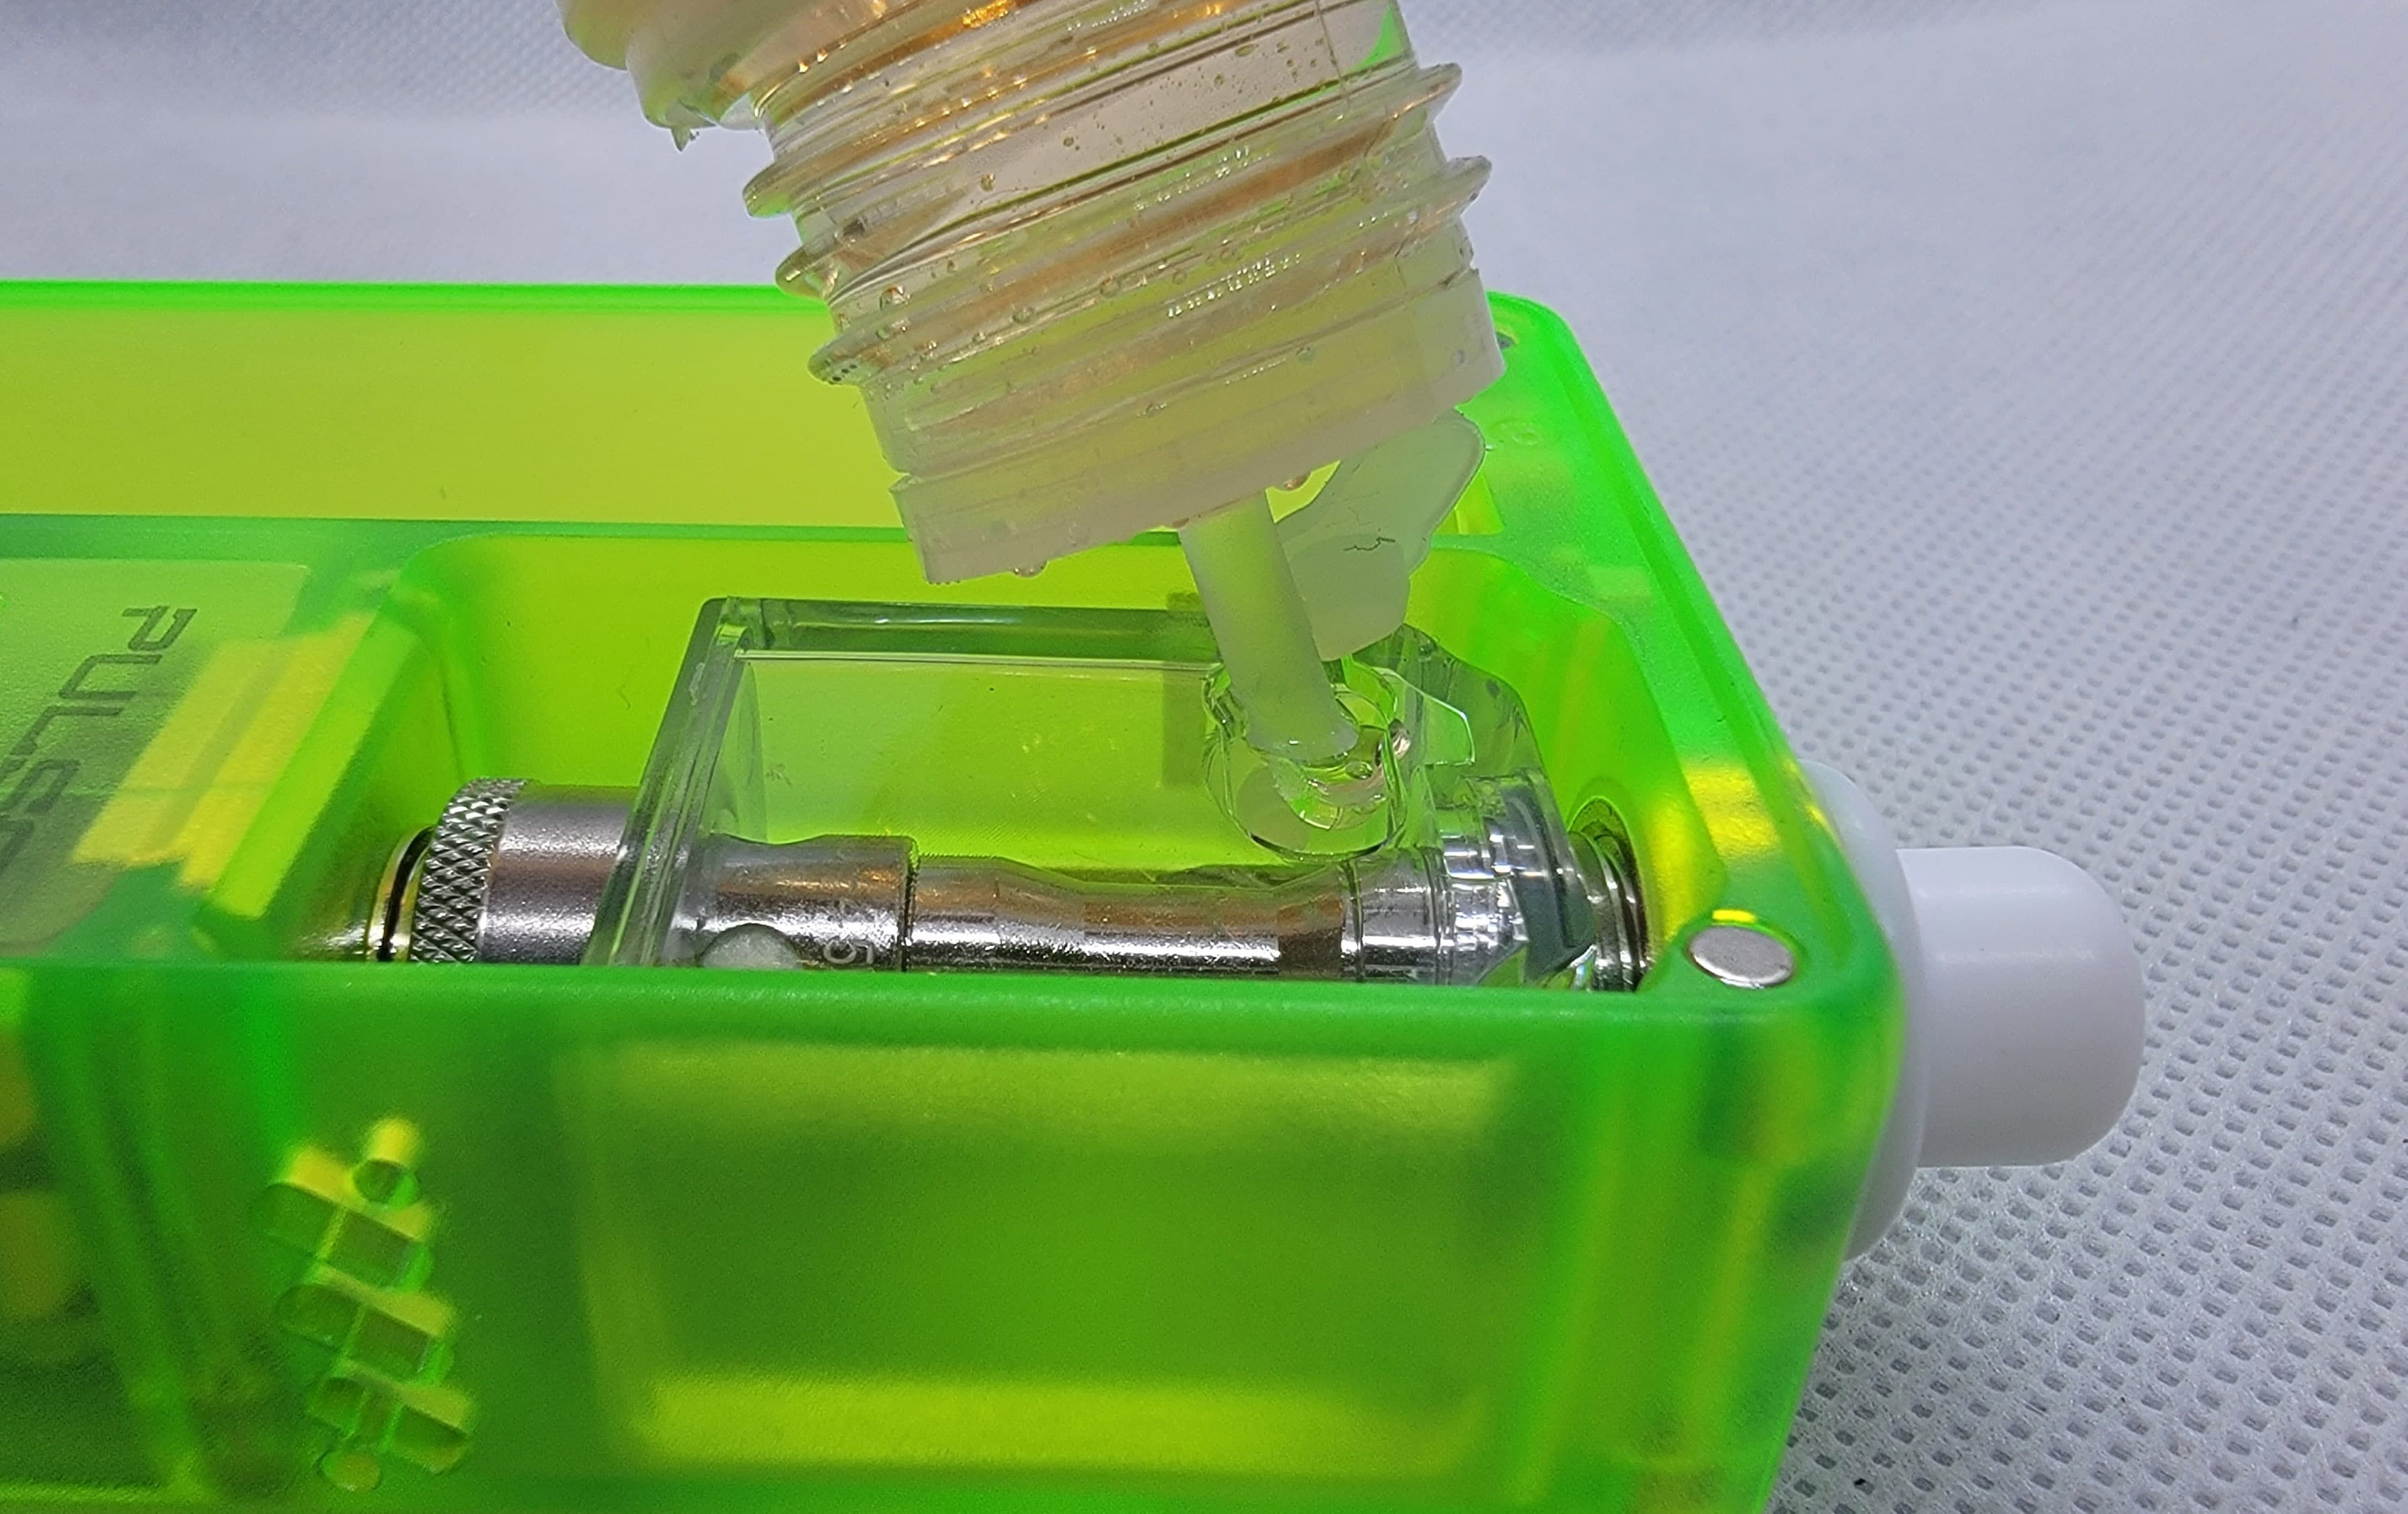
Starting out with the pre-built coil options …
Easy Peasy with the Multi-Tool, just slide in, and pop out …

Tested out the pre-builts with the included VCC-30. Vandy Vape states, the 15, 30, and 60 are designed for DTL, whereas the 90, and 120 are designed for MTL with the latter catering to NIC Salts.

Although the metal type is not specified, I CAN verify the McMeshy-ness …
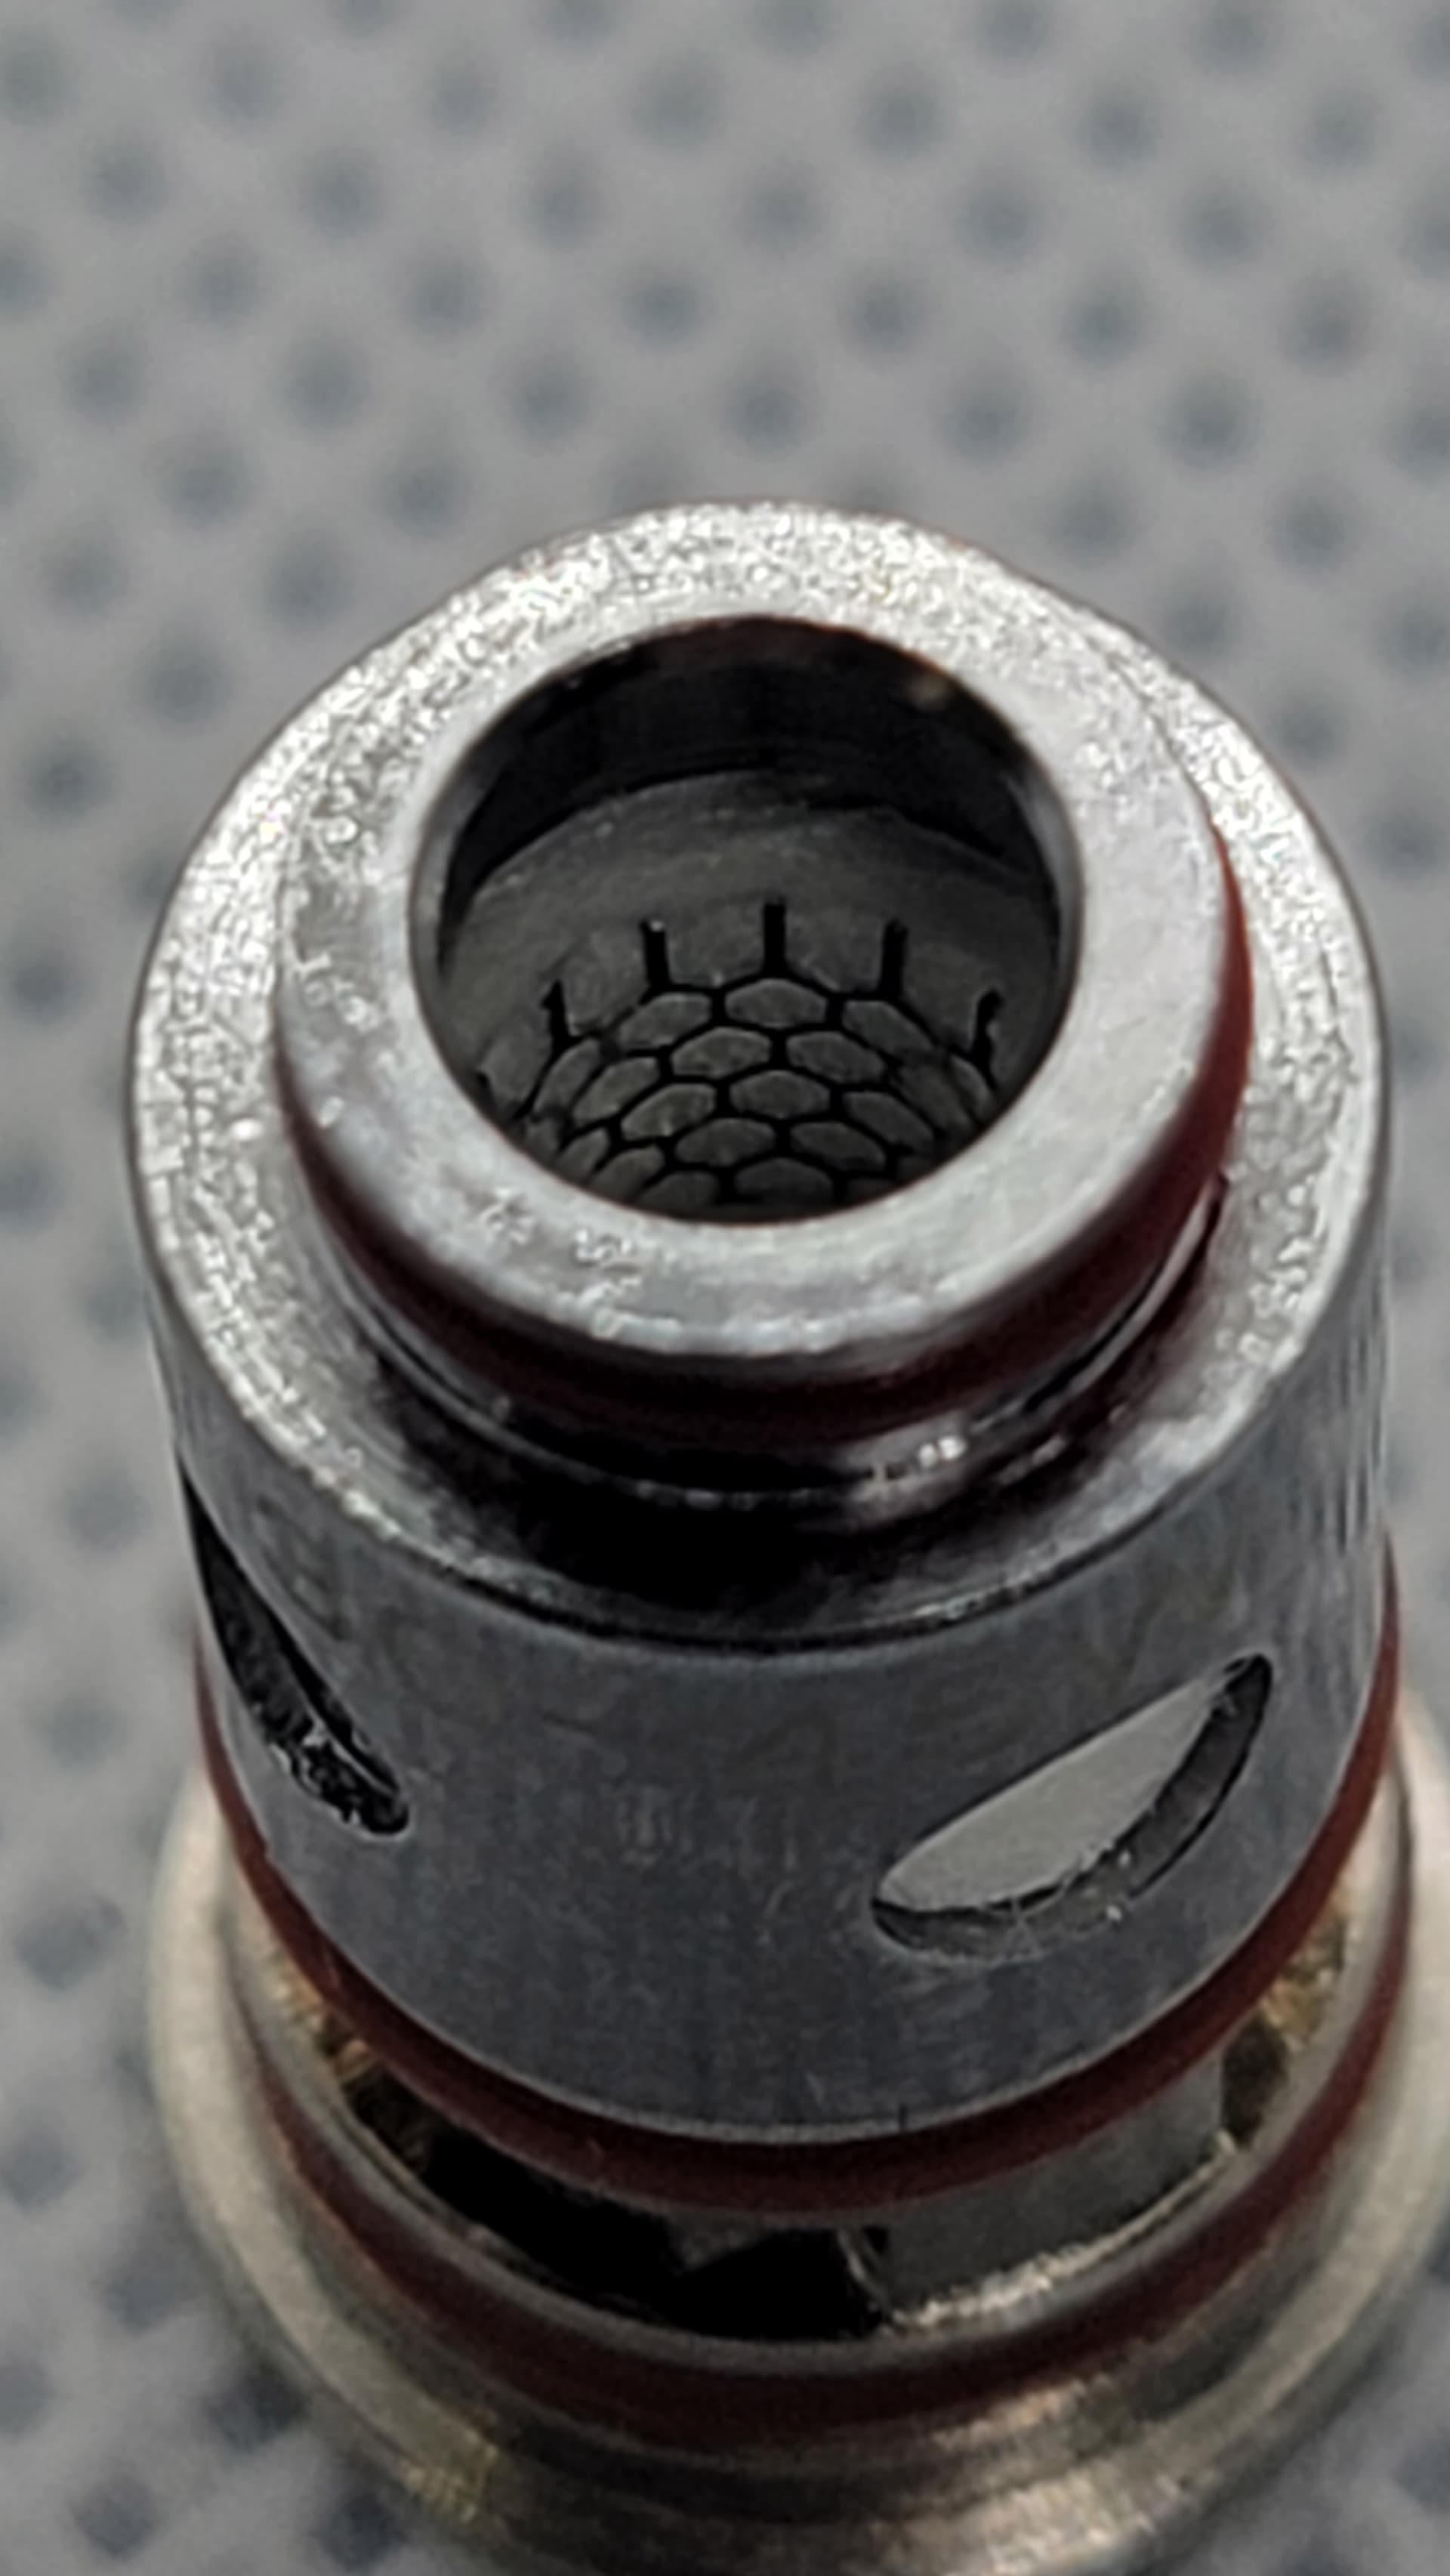
Slide it in, adjust your airflow, and you’re all set …
The 4.5mm juice fill was adequate for every bottle I had EXCEPT for the Cosmo twist top. The pre-built vessel topped off at 5ml capacity, and the RBA at 3.7ml …
Hey, but JUST a second, what if you don’t LIKE buying pre-built coils ?? !!!
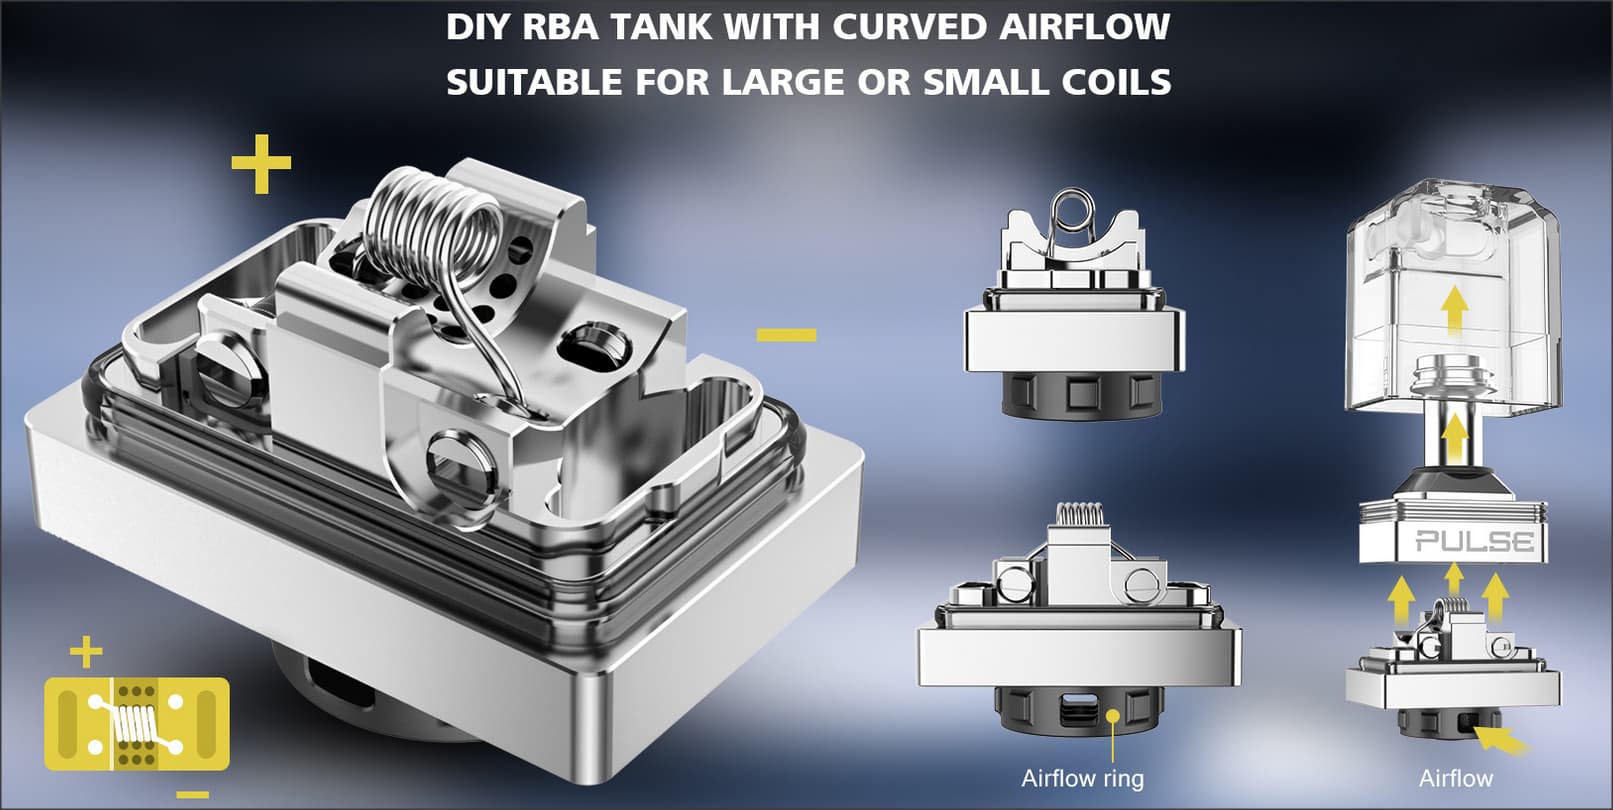
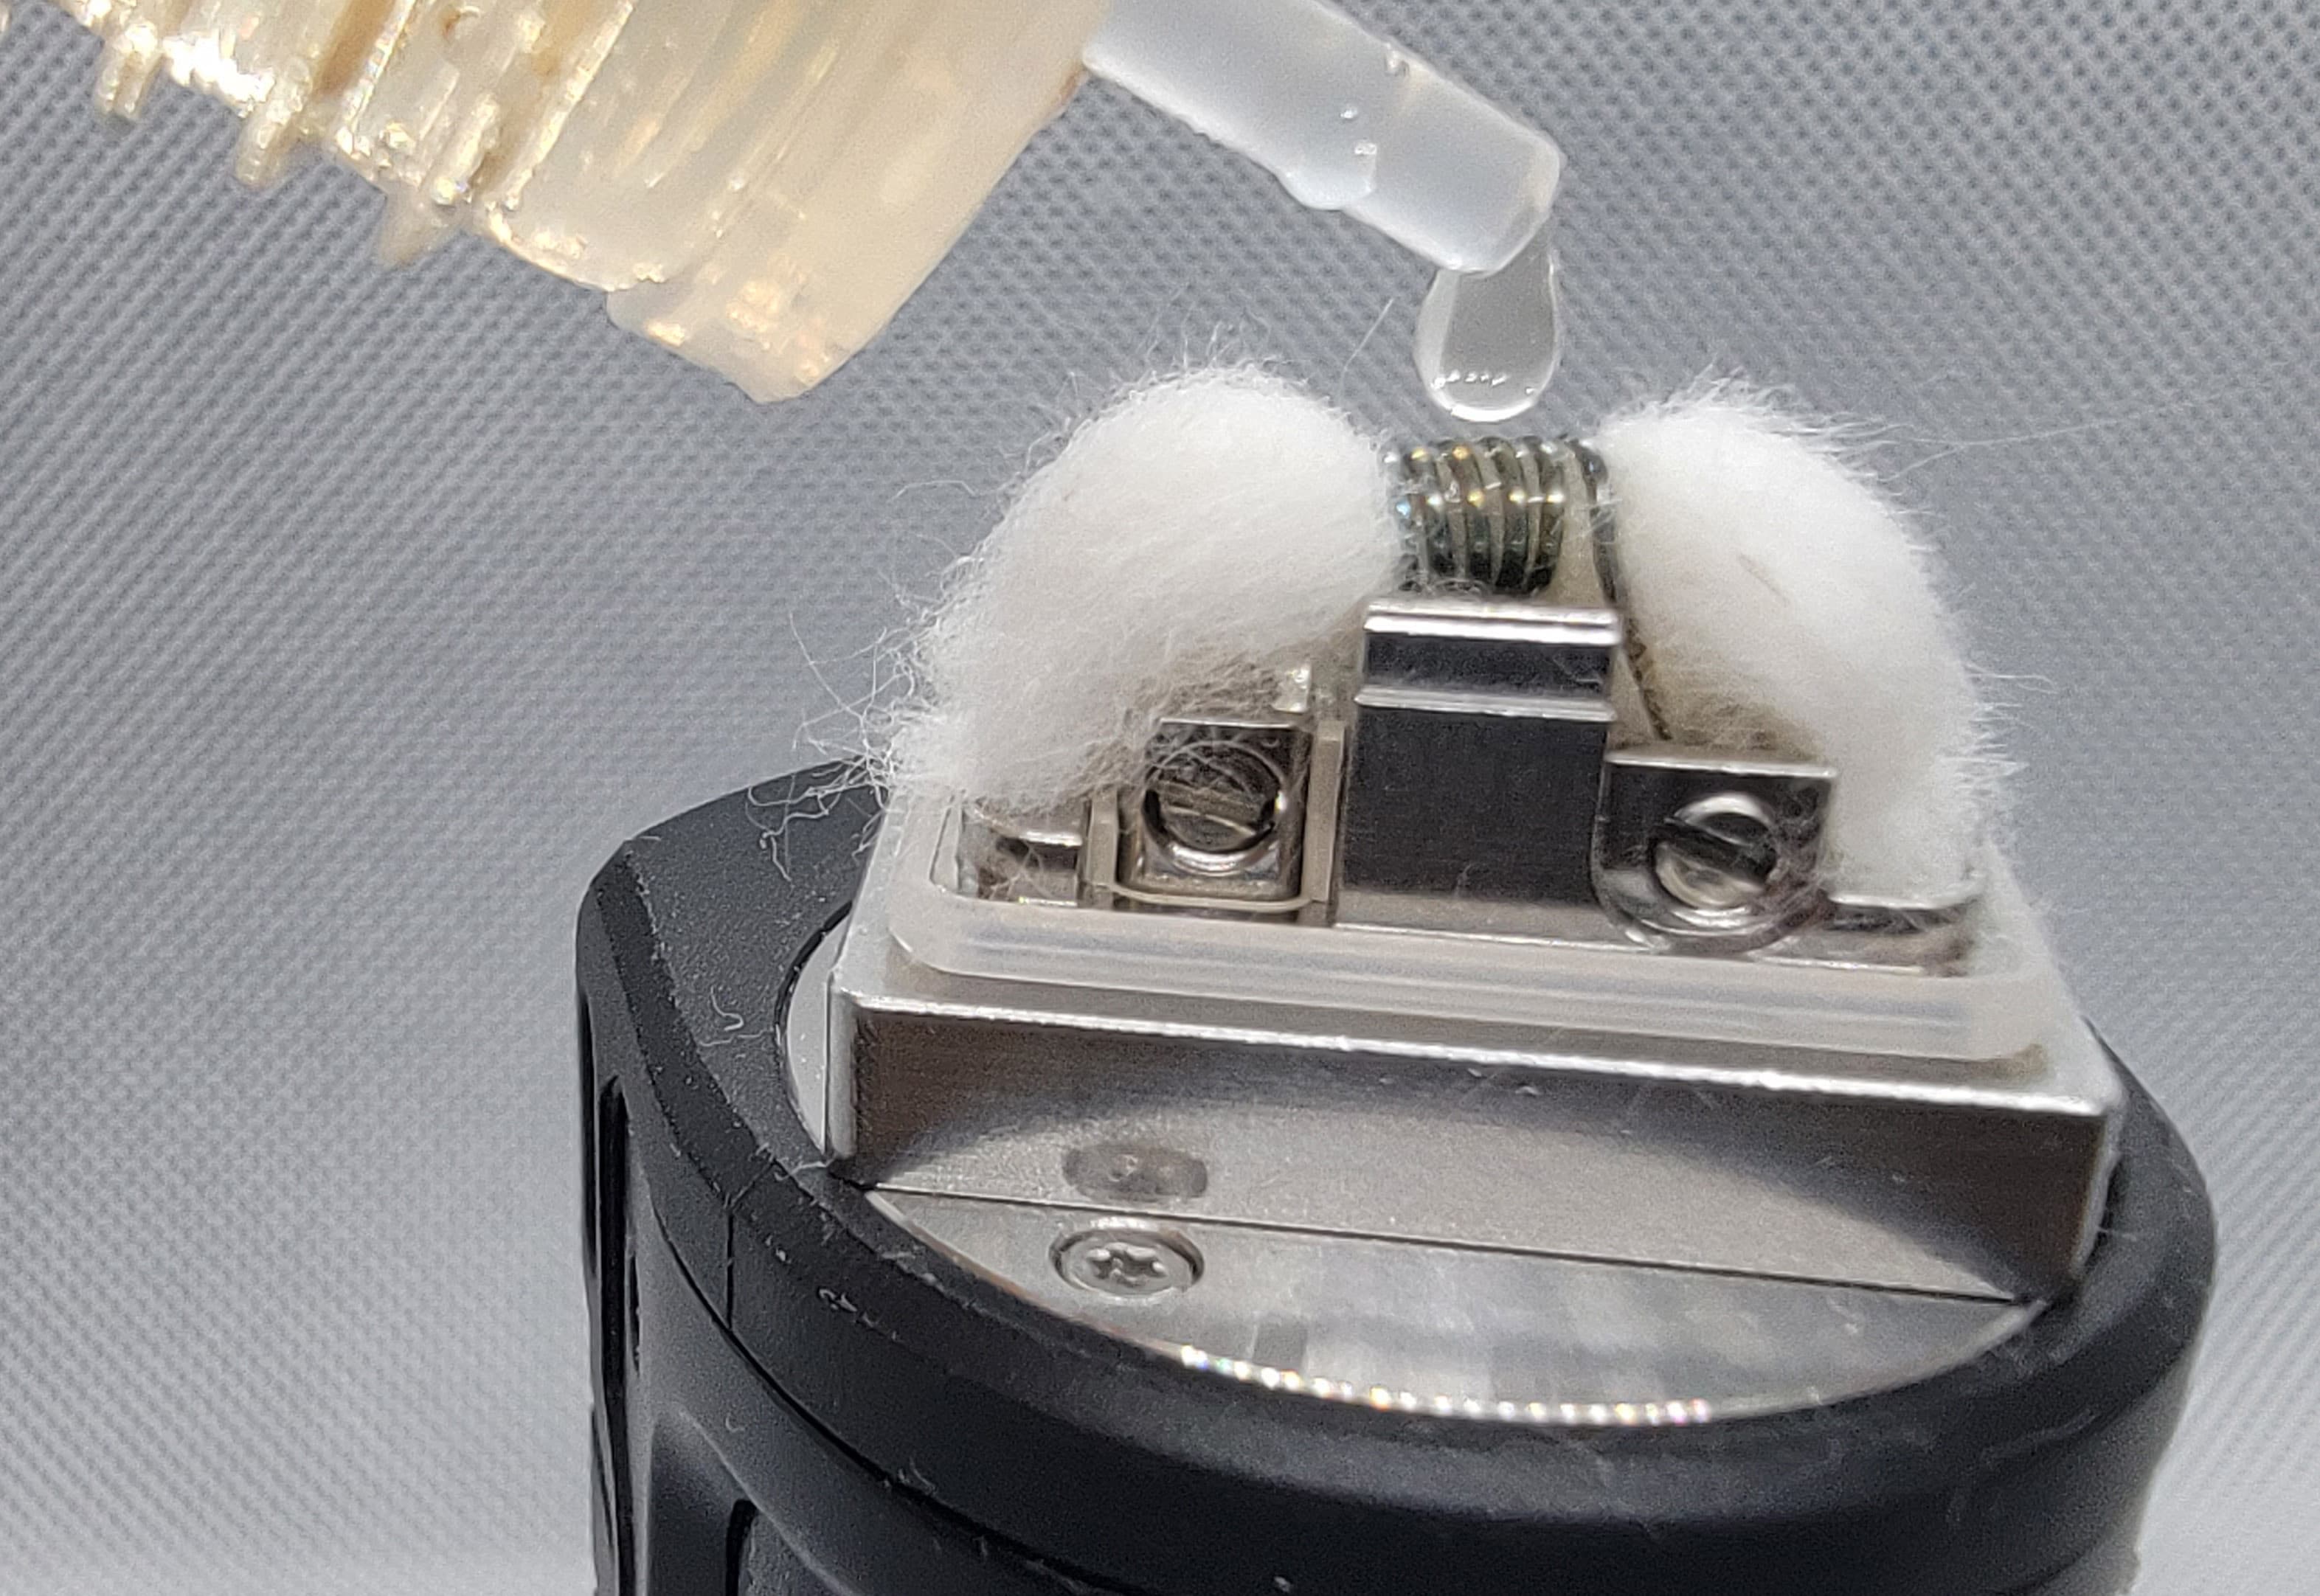
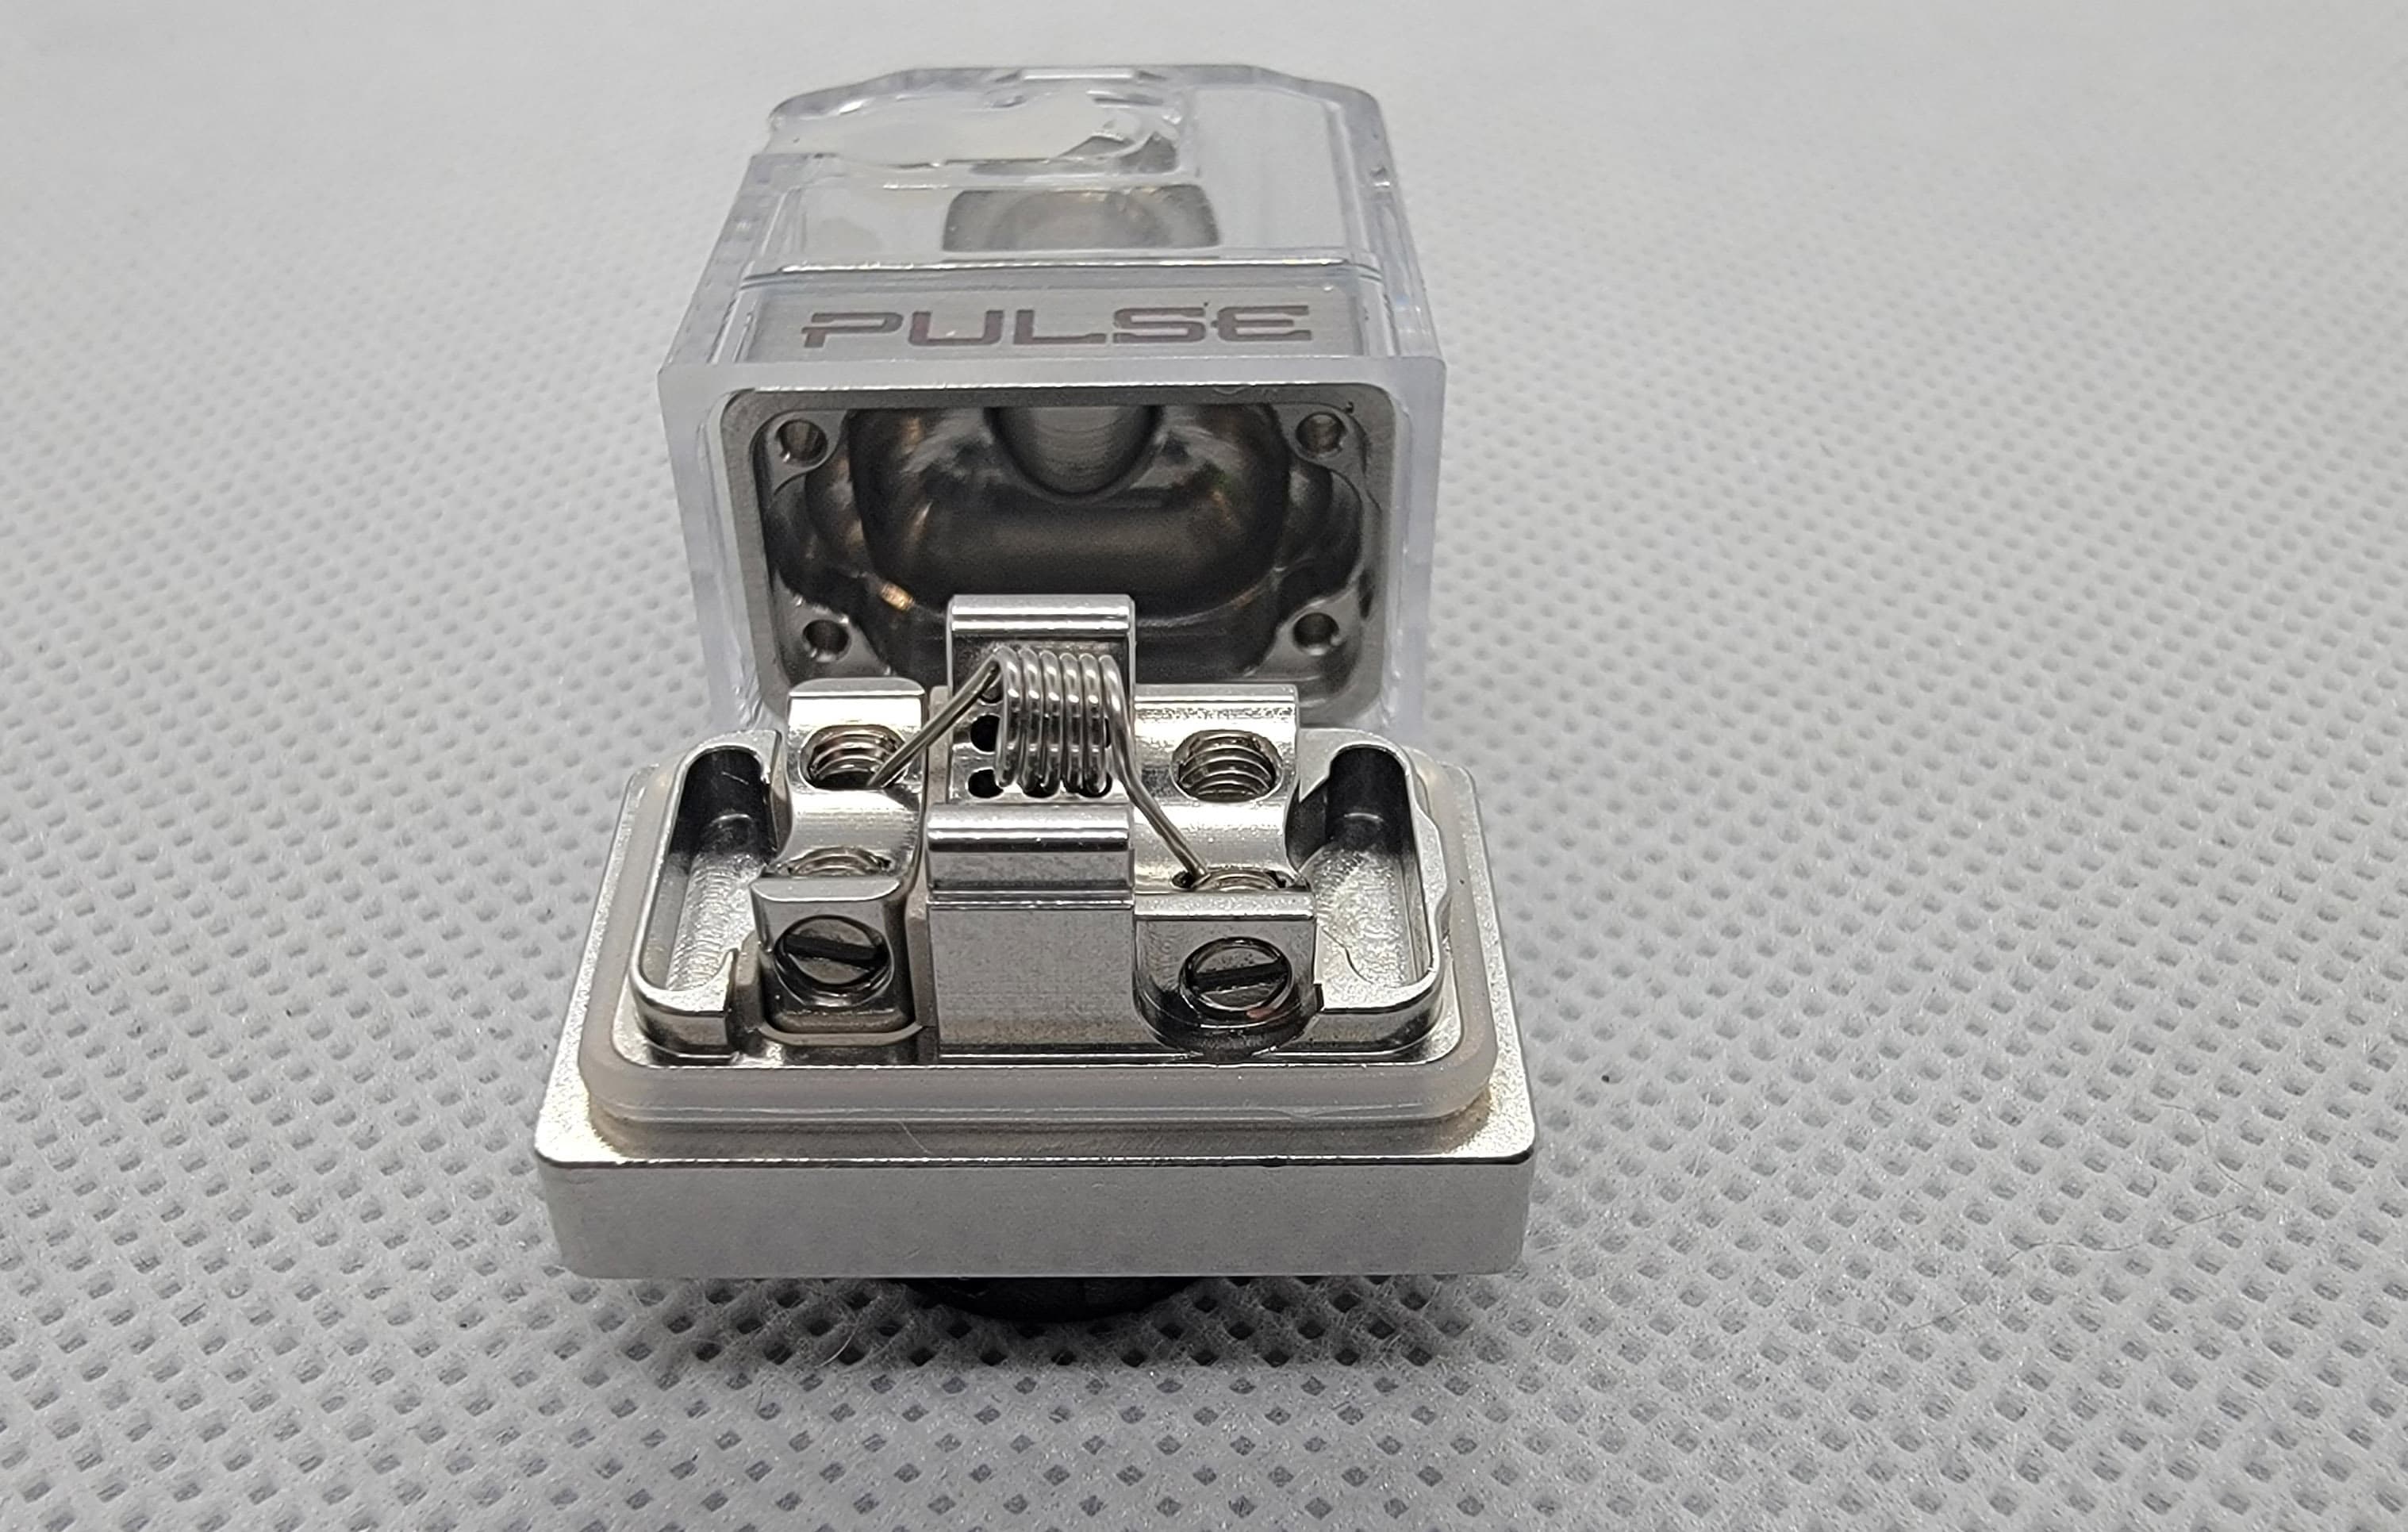
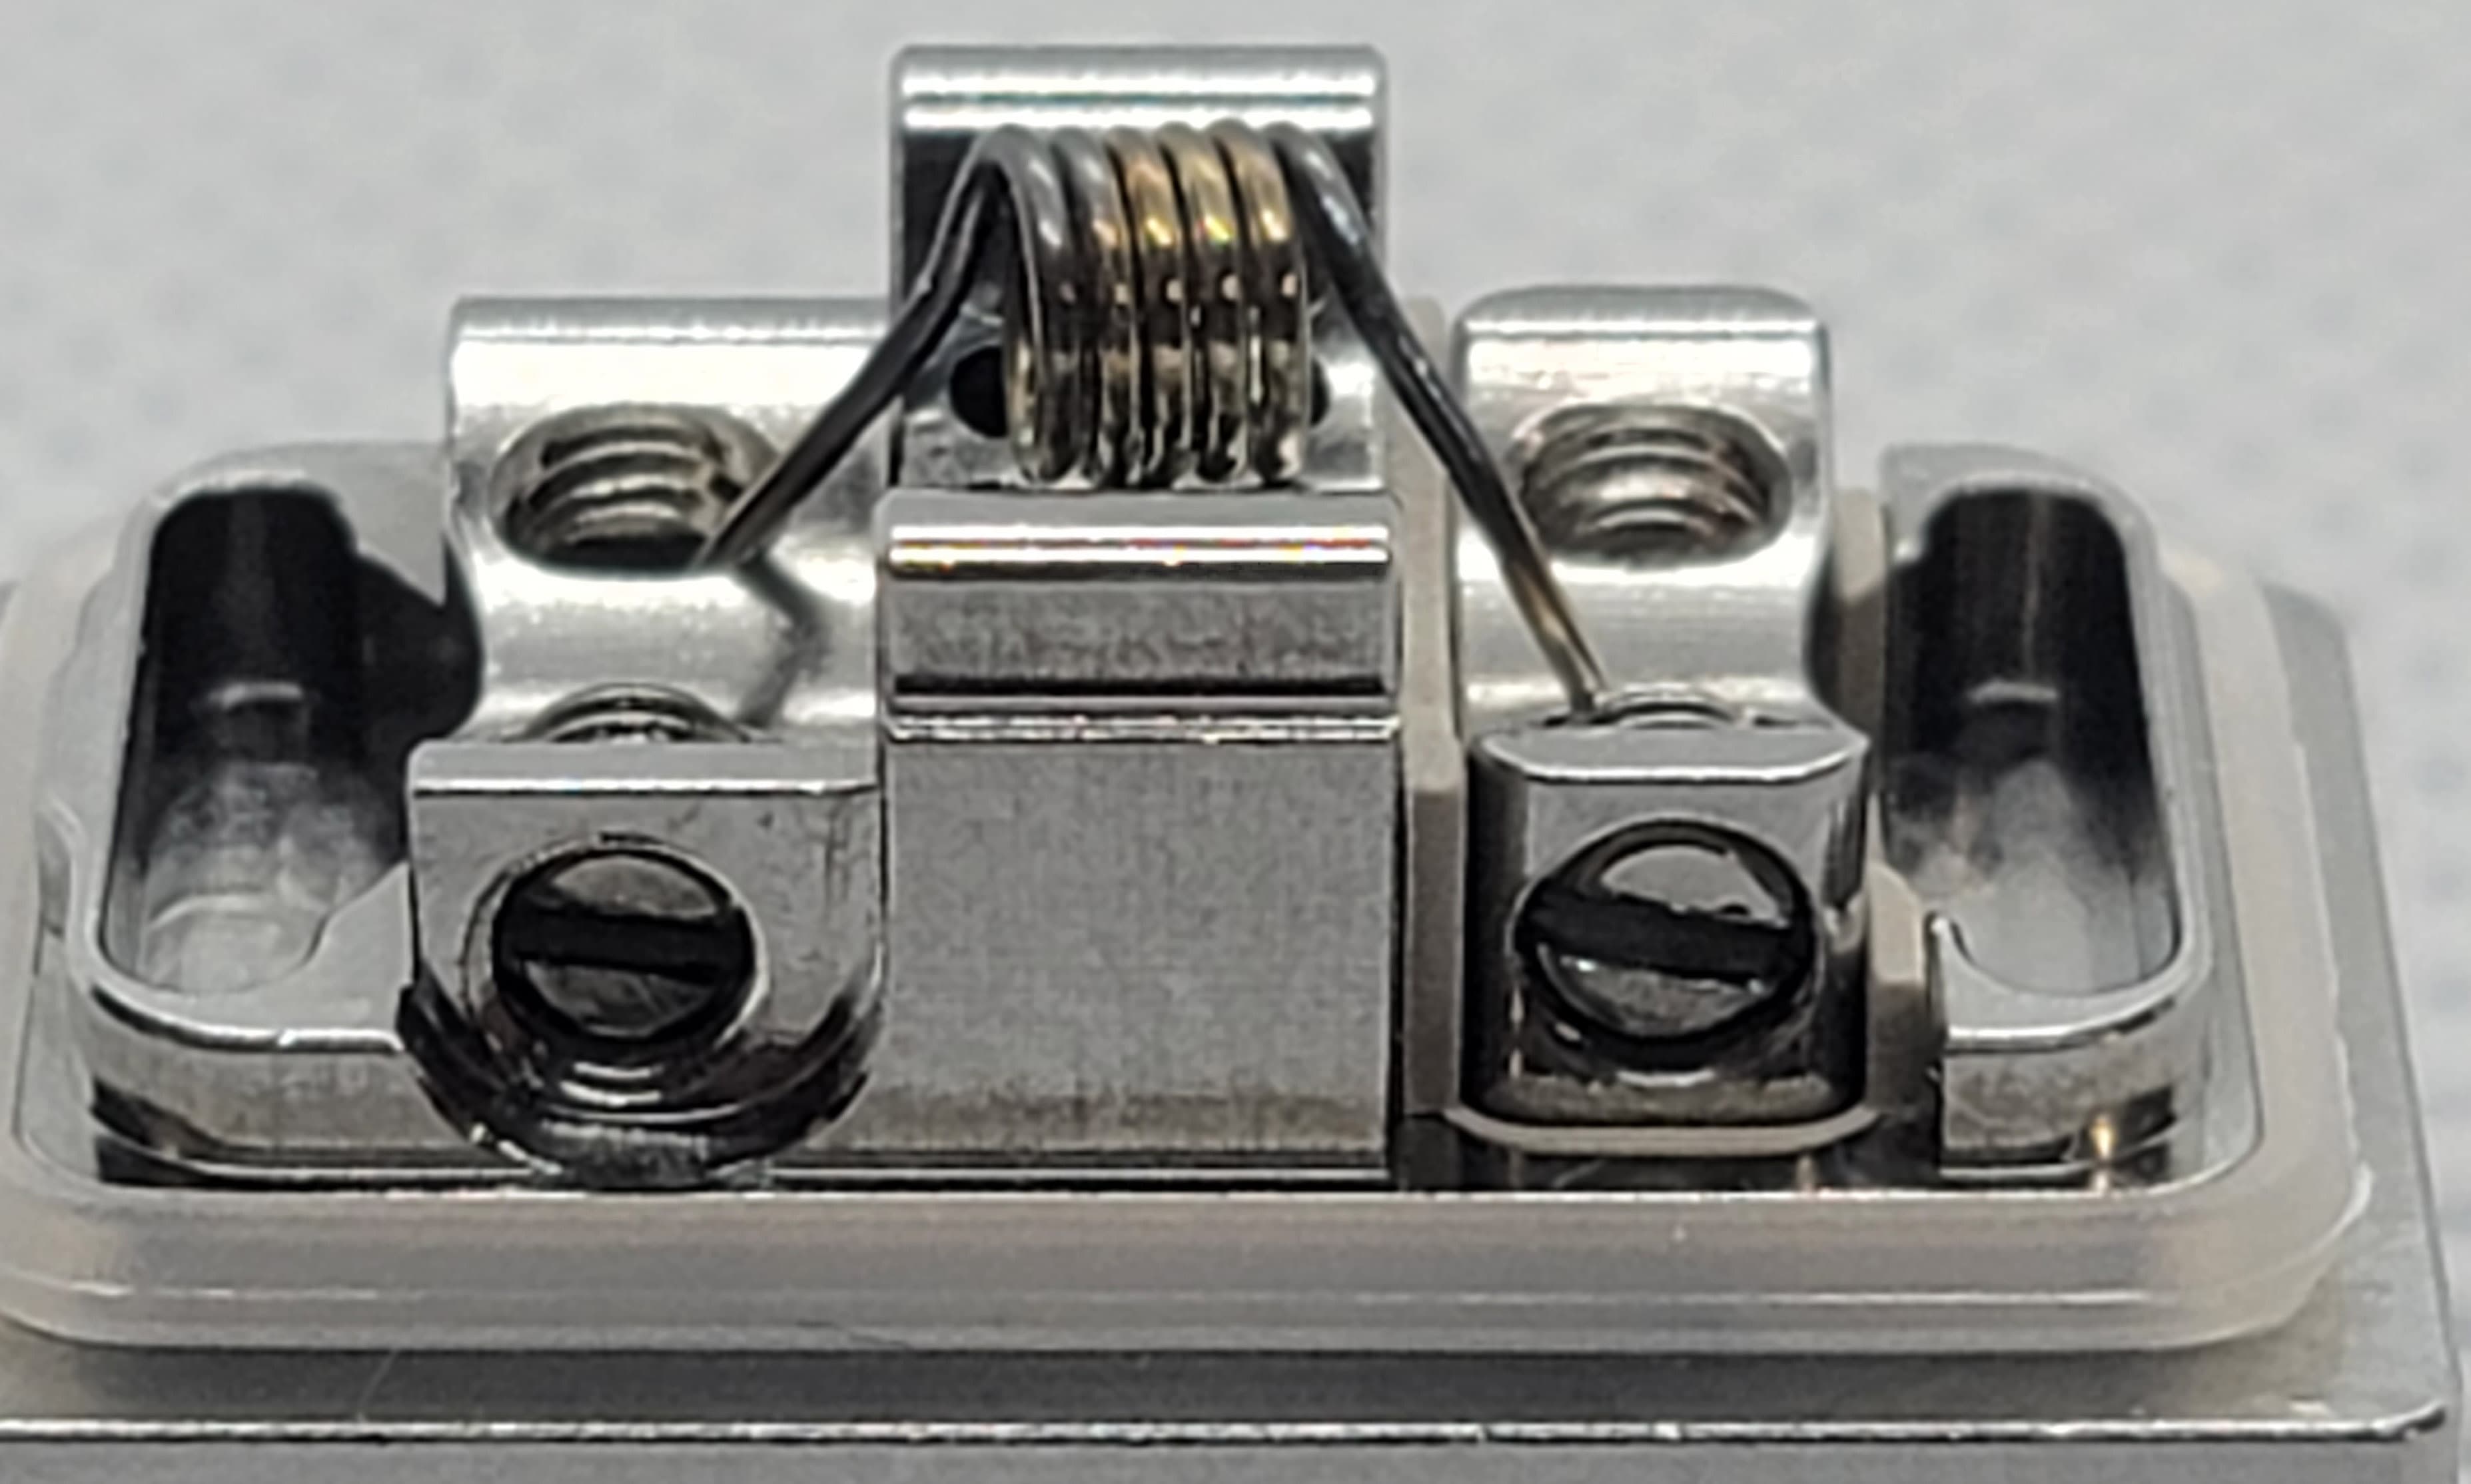
Then rebuild you can. Please note the diagonal placement of the coil …
Vandy Vape included (2) 24ga. Ni80 2.5mm I.D. coils …
Domed for flavor ?? Check !!! Could those be FOUR round juice ports ??
The installed screws were average, BUT, were very snugly set and hard to crack loose with the included micro-driver. Airflow adjustments on the bottom ring just like on the other vessel …
O-ringed, with semi-deep juice wells, the deck sure looked like it was going to suck some flavor, with airflow coming directly underneath the coil …
Cracking loose the screws with the micro driver CAN be done, but a larger driver makes it easier …

Surprisingly I couldn’t find any specifications for coil leg length, and no guide sticker on the coil cutting guide tool so I chose 6mm, and it worked out perfectly …
I did have to fiddle with the teeny coil, and short 6mm legs to load on the deck, but with only minor issue …
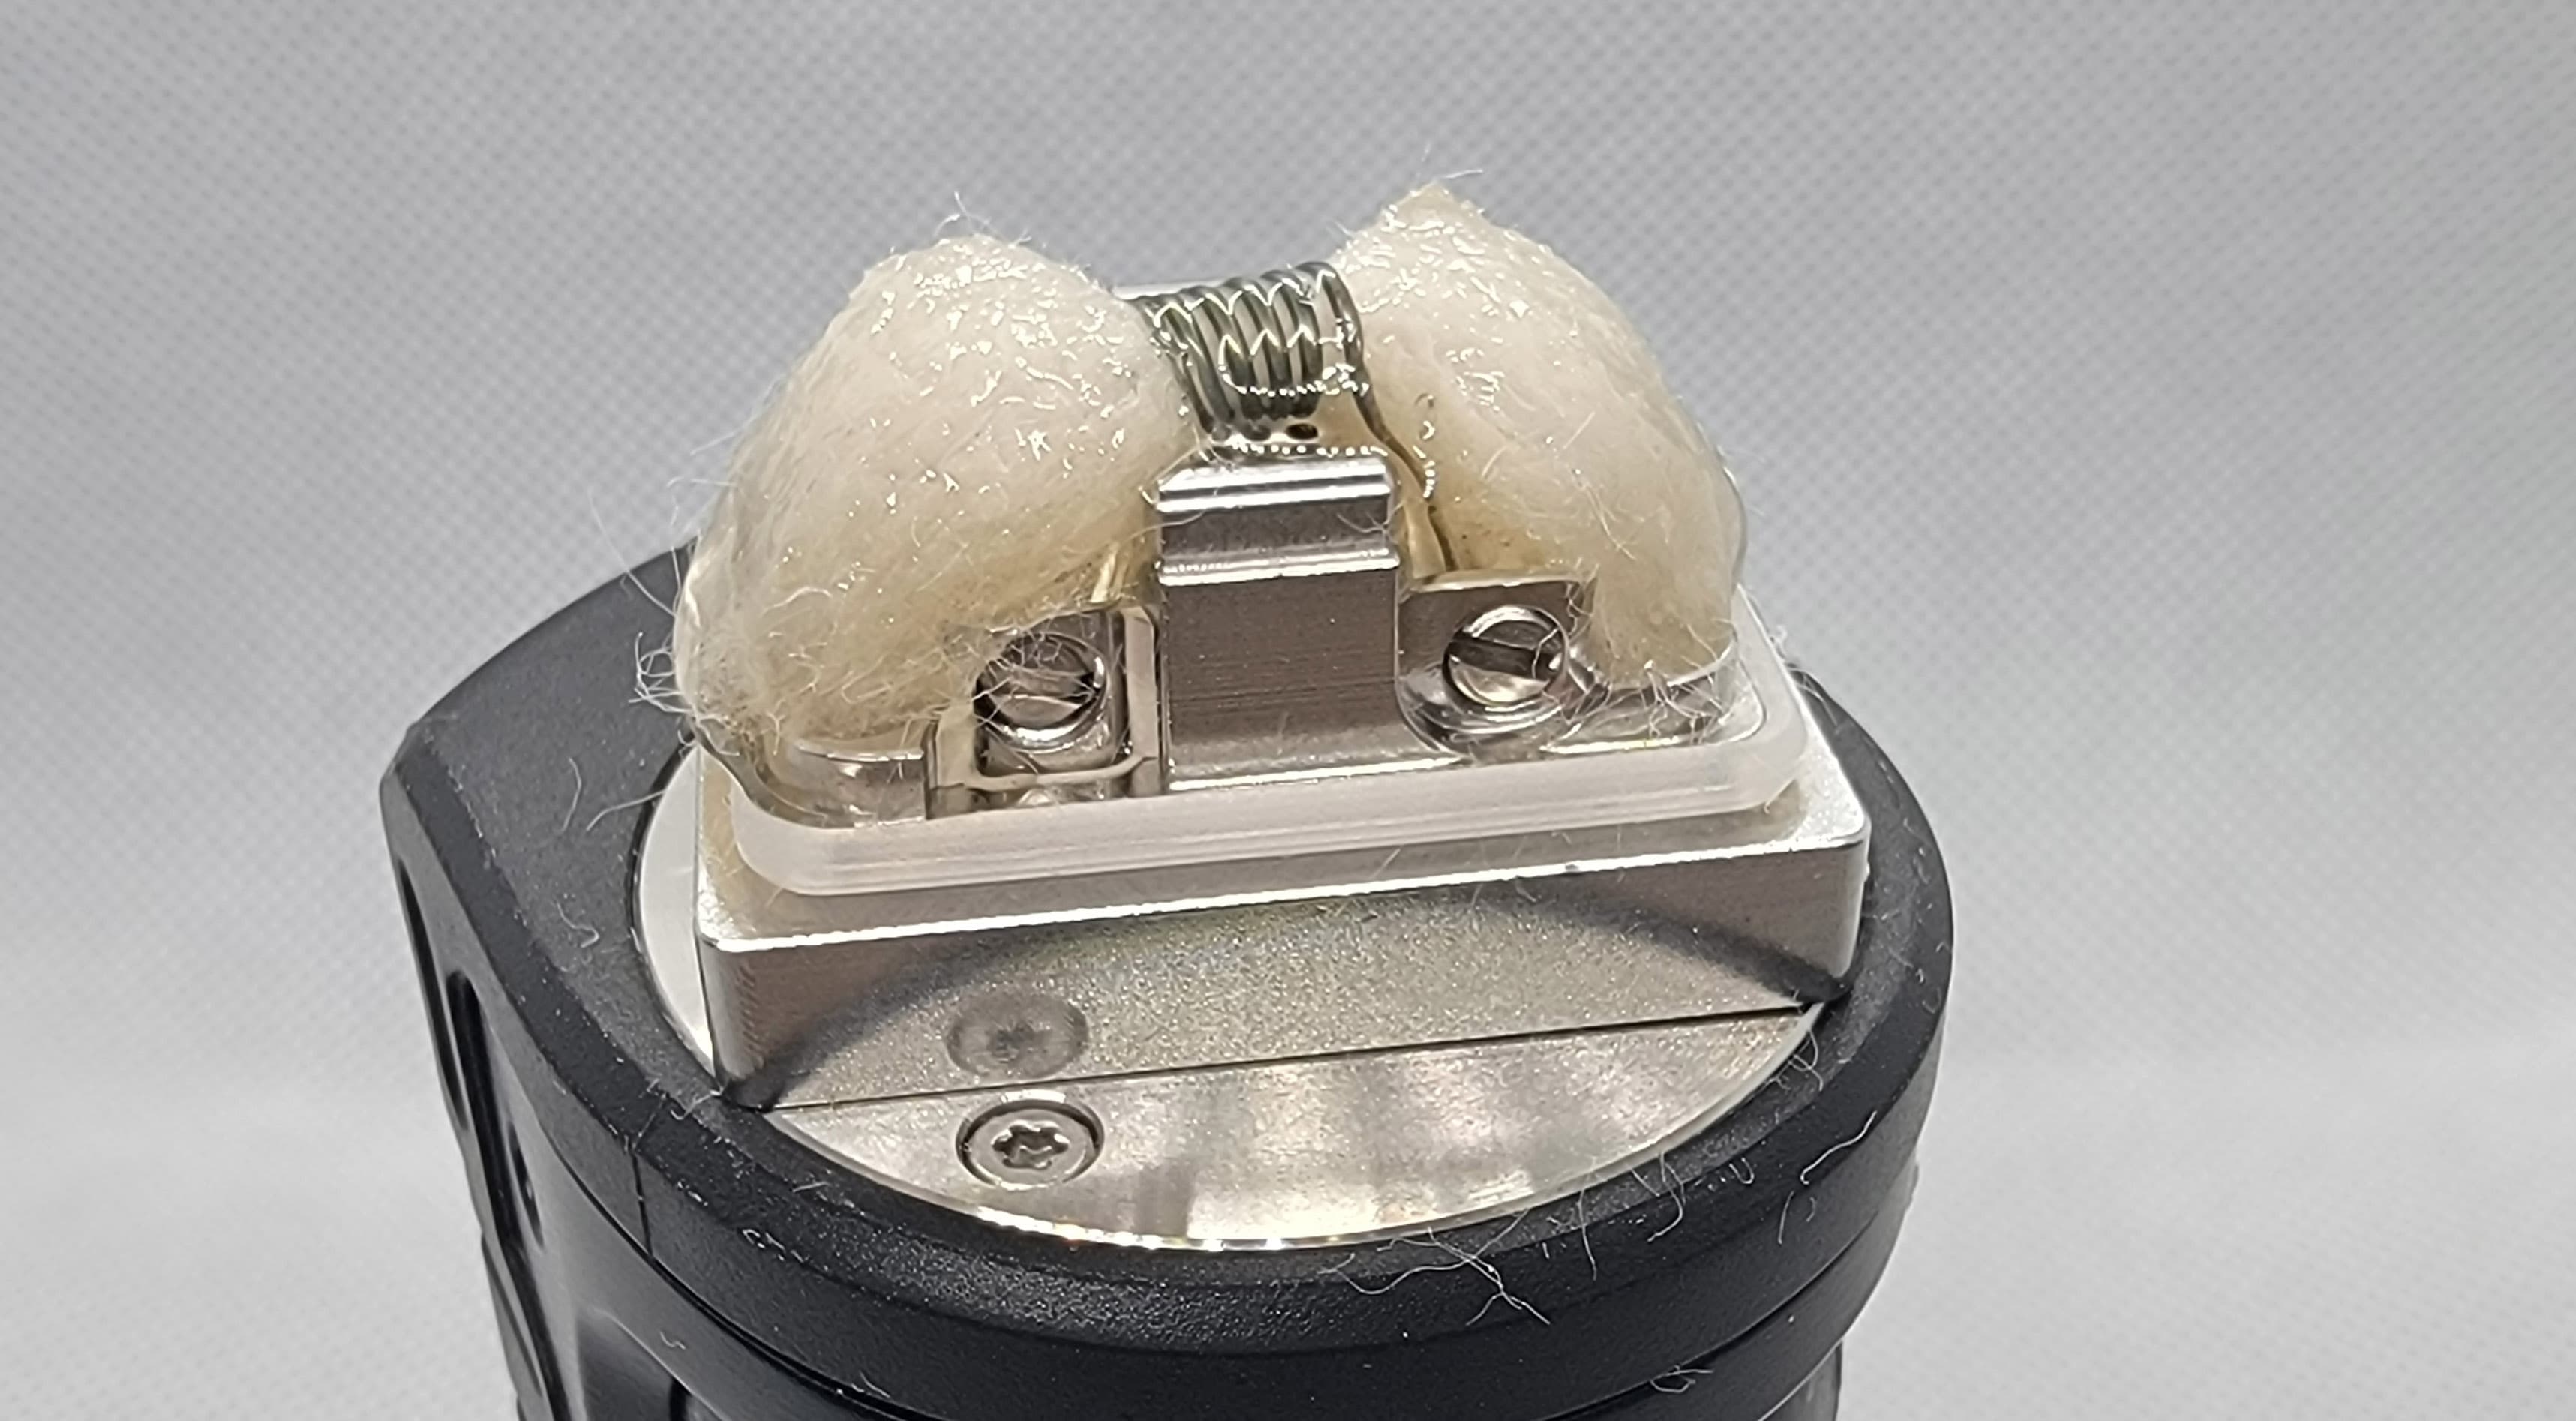
With the coil pulsed, pinched and de-hot-spotted, pulled in some KGD cotton, leaving enough tails to fully land in the juice wells …
Inserted fully without packing the wells …
For this test, I was LUCKY enough to have @SthrnMixer send out some of his kick ass juices, and I decided to load up some Red Beard for majority of my tests …
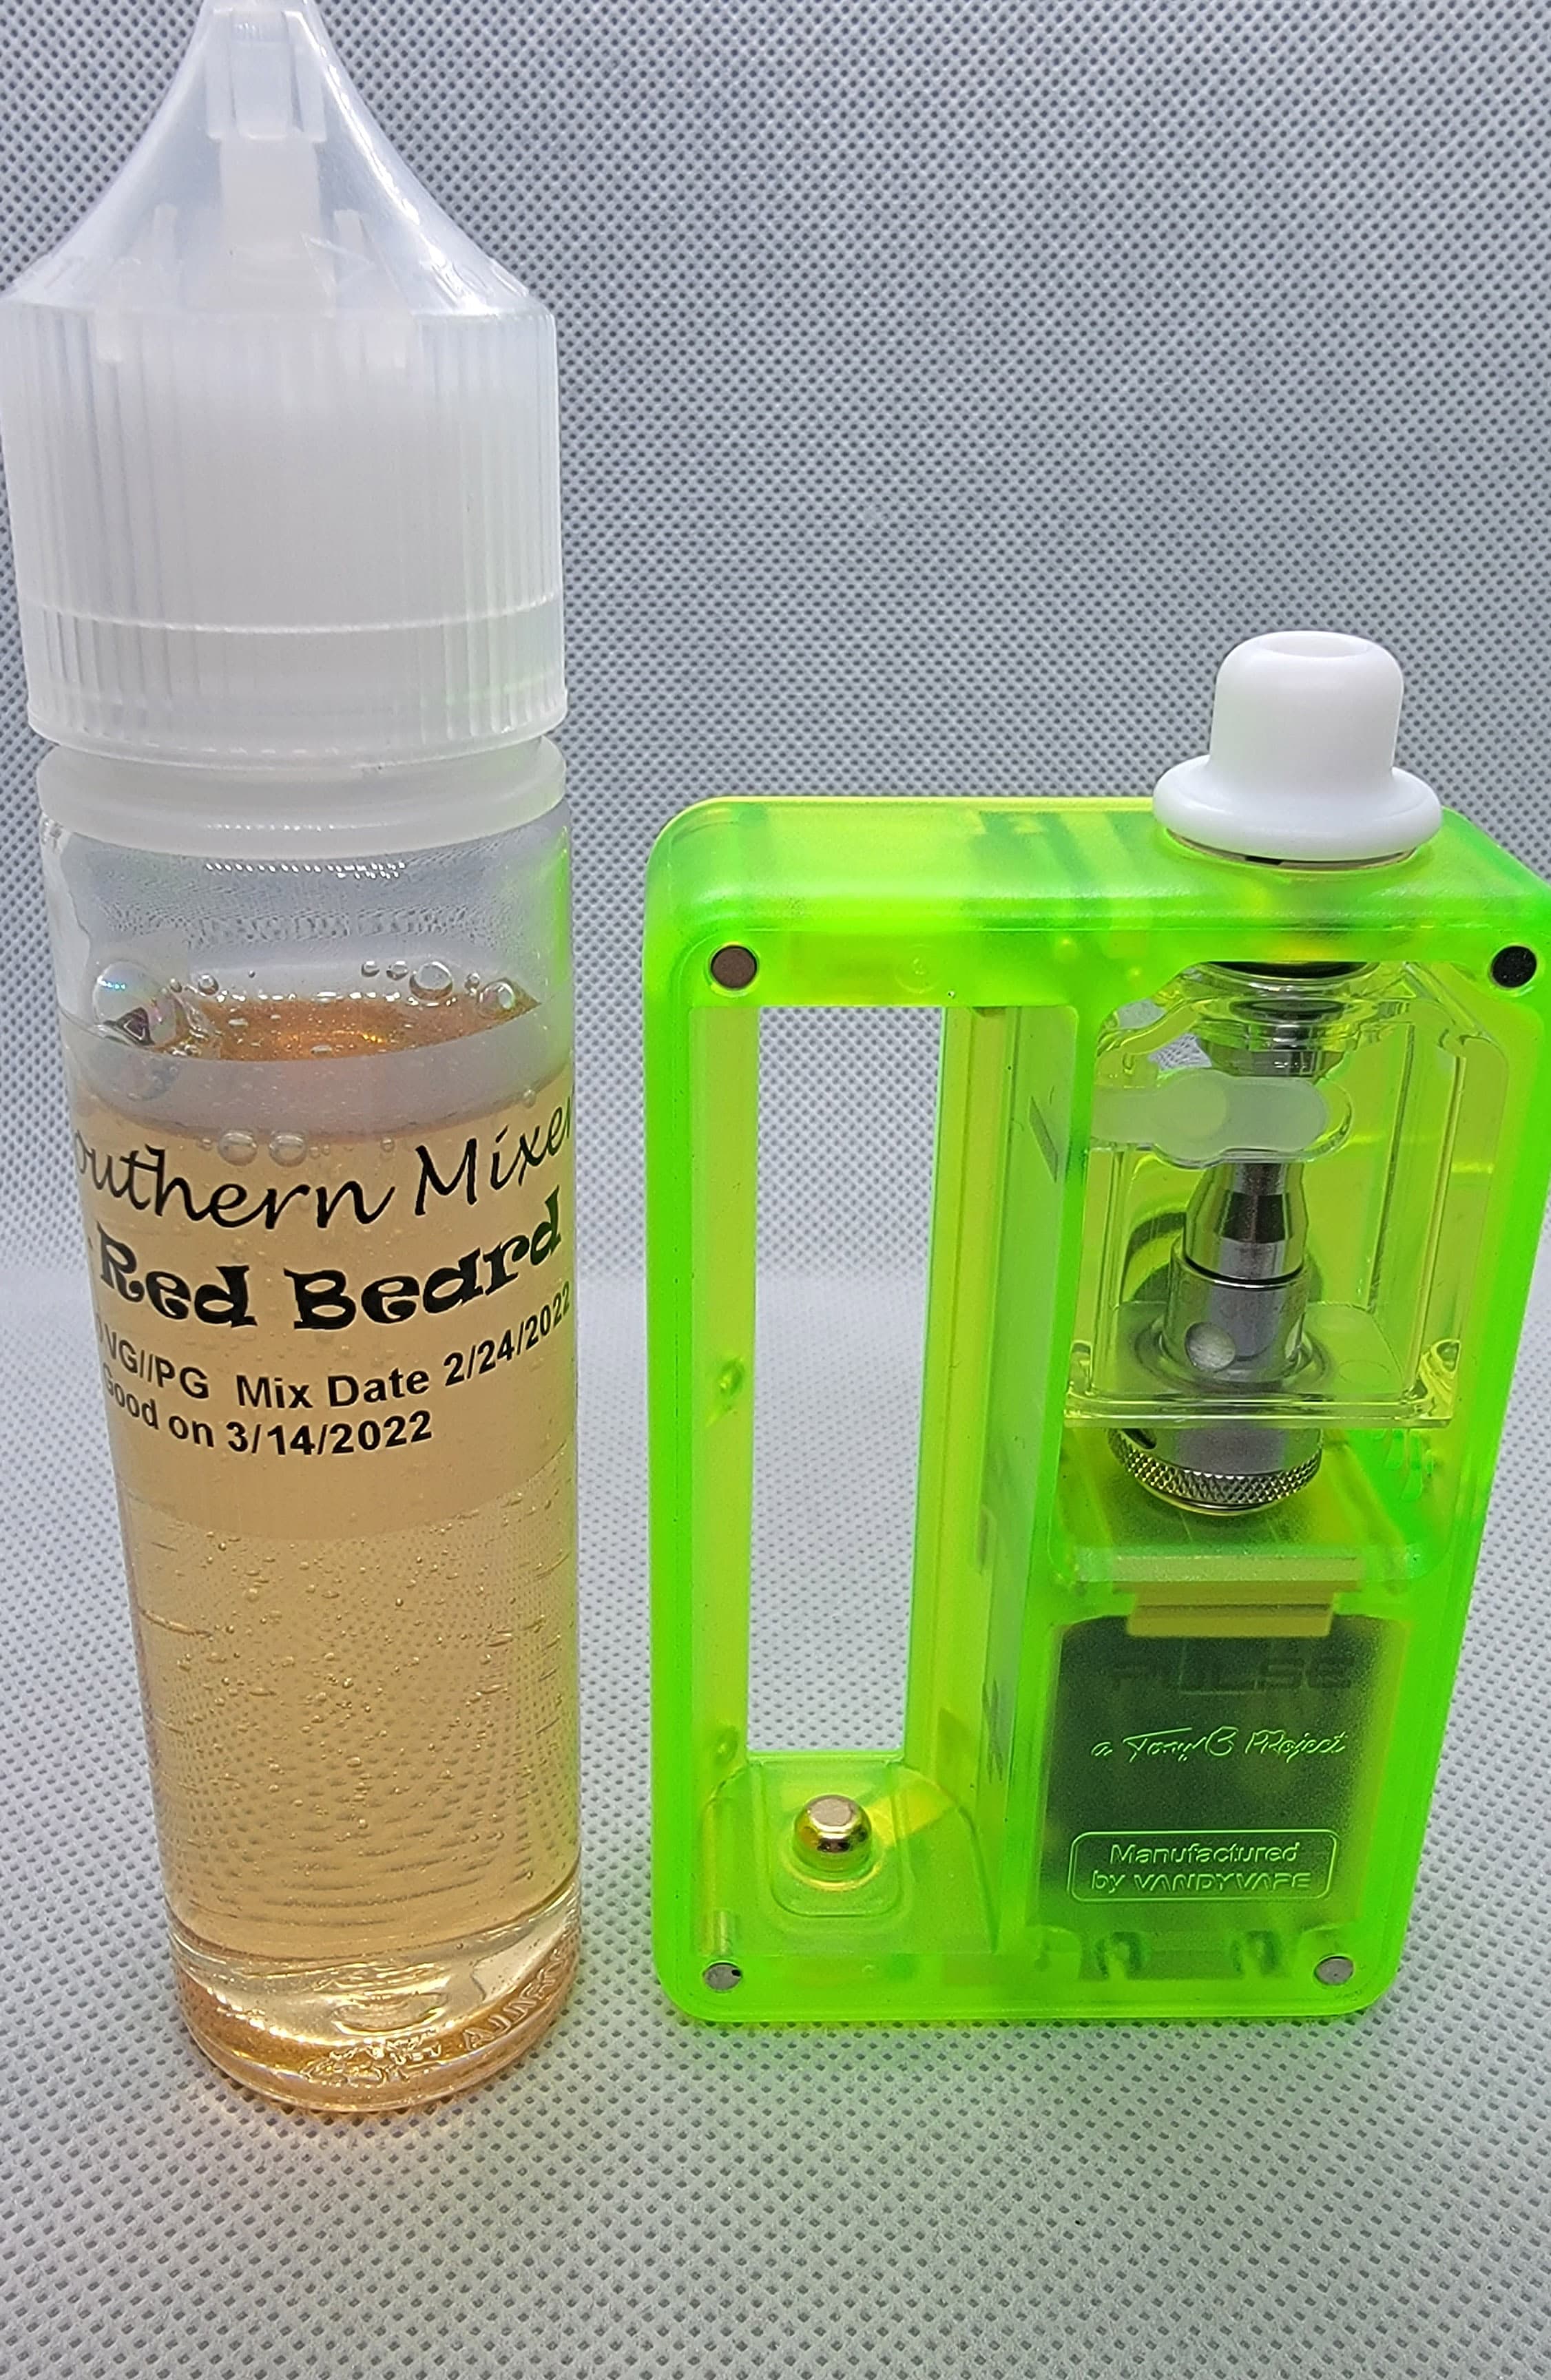
Thanks out to Robert, as this (and the others) was/were VERY good …
Saucing the Sauce …
I had only minor issues with the tails coming out while dry, this was solved by simply saucing them down. Then re-seating the tank (it doesn’t click on, just press fit), re-inserting back into the main unit, and tightening the retaining screw …
Then, pull the silicone tab, and fill baby fill …
Because both the display and adjustment buttons were hidden BEHIND the lid, clear viewing, and adjustments had to be done BEFORE installing the lid …

Available Modes:
- Wattage
- Voltage
- Bypass
- Temp Control (SS TC, TI, NI)
- Smart Mode (when using VVC Coils).
I used only Wattage Mode and/or Smart Mode (using the VCC pre-built coils) for testing.
Operations:
On/Off – Press the Fire button 5 times.
Switch Modes – Press the Fire button 3 times, use +/- to select mode.
Lock Device – Press the Fire button and + simultaneously.
Flip Screen – Press the Fire button and – simultaneously.
Stealth (Screen Off) – Press the Fire button and +/- simultaneously.
Functions Menu (reset puff counter, change mode, show version) – Press +/- simultaneously to enter the menu and navigate – long press the fire button to exit.
Re-read Resistance (New/old coil) – Press +/- simultaneously twice.
Although small-ish, and obstructed by the lid when installed, the display was sharp, easy to read …
Obscuration by the installed side panel …
Testing/Usage:
Having never owned a Billet Box, or Boro, I was interested to see how this “Every Man’s” (or Woman’s) version would work out. The first RBA Vessel that was provided, was mal-formed, and would not fire in the main unit, and Joyi, shipped out a replacement that worked flawlessly throughout the entire test. Although not a “customizer” I can see the allure of being able to customize the panels, inner plate, buttons, and ring, which I will link at the bottom of the review. The included multi-tool worked as expected, for pre-built coil ejection, retaining screw removal, and fire button ring removal, and I did verify a coin worked in removing/re-inserting the retaining screw. The VV chip worked without issue, with speedy adjustments, and an easy to use menu system. The display while small, did convey everything you needed to see, BUT, when the side panel was installed, it was obstructed, as well as the adj. buttons, which COULD be a pro, if you were worried about “pocket adjustments”. I can’t say that I have any neon-ish green mods before this one, and while not my favorite color, it wasn’t hateful, and being able to see the internals with the “frosted” versions, I think was a plus. The unit felt good in the hand, and despite not being made of top shelf materials, it didn’t feel cheap. The fit and finish was actually quite good, with everything tight, and snug, with no rattles, or loose panels. The retaining screw held the vessel in snugly, and cleanly released it upon unloosening. I didn’t have to adjust the deck screw in the mod, but it was nice to have that option.
The damned DRIP TIP !!! I had to get that out of the way. Without lubing you will NEVER get it to sit flush, and even AFTER lubing, it did sit fully flush, but it seemed to work it’s way up a bit. Not a fan, BUT, it did it’s job regardless.
I specifically tested this in Wattage Mode (and Smart Mode with the VCC pre-built coils). Flavor wise, I was actually a little surprised, as I had expected much less flavor. Comparatively across Robert’s Bacco mix, a few Custards, and Fruits, I would rate the flavor production on the pre-built coils to be about 8.5/10, and with the RBA vessel and provided Ni80 coils about 7.5/10. This was directly compared to my SC RDTA. Across the somewhat smallish airflow array of options, that flavor didn’t really change much, but with more restrictive airflow, I did notice an increase in flavor saturation. Across all of my test flavors, both vessels did a good job representing the flavors I knew well, and despite tweaking the coil around, it seemed the pre-builts took the lead in the flavor dept. Not to say it wasn’t good with the RBA, just that the pre-built coils took the lead. I had some minor “fiddling” issues trying to corral the tiny 2.5mm I.D. 6mm leg length coil in it’s diagonal configuration, but still relatively easy. The screws were VERY snug from the factory, and hard to crack loose with the provided driver, but again, a minor issue. The unsettling thing (to me) was that the top tank didn’t click or squeeze on, it almost just kind of SAT on top. Now, realize, I’ve never had a BB or Boro before, so maybe they’re ALL like that, maybe not. The good news is, with the installed o-rings, and downward pressure from the retaining screw, once inserted into the mod, there were NO leaking issues, whatsoever. I even laid it on it’s side for a while, and still NO leaks. Although I WAS able to adjust the airflow adj. ring when inserted, it was a little tricky, and probably better done before installing the vessel into the mod, OR, at least, before cranking down the retaining screw. Even at max airflow, the was some restriction, and having not tested this as an MTL setup, would classify this as a restricted DTL setup.
Pros:
- Very compact
- NO leaking
- Great buttons, easy menu system
- Strong lid magnets
- Bright display when side lids removed
- Pre-built coils OR Rebuildable vessels included
- Easily customizable with lots of options
- 18650, 20700, 21700 battery compatible
- Good flavor, with Pre-Built coils taking the lead
Cons:
- Display / adjustment buttons obscured by lid
- Can be fiddly to get small coils loaded in deck with 6mm length diagonally
- Multi-Tool could be lost ??
- Airflow adjustments when fully installed can be tricky to adjust
- The damned DRIP TIP !!!
Conclusion:
With this being my first foray into the Billet Box styled Boro setup, it actually worked pretty good. Some minor learning curvature not withstanding, it wasn’t hard to setup and master. Probably the most painful part WAS the drip tip, hehe. Maybe just a pet peeve. With the very compact design, and fairly good flavor, with no leaking, I could see this as a great mobile, grab and go device. Super easy to fill, run, and with a pretty straight forward “set it and forget it” approach. The amount of vapor this thing produced, and the saturation level OF it, was actually impressive. Granted there were some differences IN flavor when directly comparing to my tester flavor chucker, but they weren’t as big as I had thought, again, with the pre-built coils having an advantage over the RBA. Having solid, and frosted options, and numerous customizable options available might just put this one IN your pocket. I’ll continue to play around with the RBA coils/coilage, and if I obtain any massive improvements I’ll report back. As this stood as an All In One Kit, it worked pretty damned good.
Colors:

Thanks again out to Joyi from Sourcemore for supplying this kit for review, AND, sending out a replacement RBA vessel.
Thanks out to Joyi from @Sourcemore for sending out this kit for the purposes of this review. She did provide some coupon codes as well for you guys.
Code: PAIOK
**CodePULV
As always, if you’ve made it ALL the way down here, well, dammit, I salute you, and thanks for taking the time to check out this review.
S.D.
Linkage:
Bonus:
As always, if you are in the giving/supporting mood, don’t hesitate to help out at one of the HIGHEST rated Charities on Charity Navigator, The Semper Fi and America Fund. Get the money TO our warriors who are in need.